
The kitchen apron of glass is an excellent alternative to tile. It is much easier to care for him, and the design of the kitchen immediately acquires a unique style and accuracy. An apron can consist of both one panel and several elements of different heights. The main feature is that the junctions between the glasses are practically not visible or they are absent at all. Installing a glass apron can be ordered from specialists, but if you want to save, the installation is really done with your own hands.
Content
Glass selection
For the manufacture of kitchen apron, not any glass will suit. Operating specificity dictates certain coverage requirements. Since it is usually installed in the working area, that is, where the stove and sink is located, the glass must be immunity to the temperature differences and random mechanical effects. It must be strong enough and at the same time have a beautiful appearance.
Under these requirements, only two types are falling - tempered or ordinary glass, but with a large thickness. In order for the surface to be strong and durable, the thickness of the product should be at least 6 mm, however, experts recommend not to install conventional glass in order to avoid traumatic situations. Tempered glass is almost impossible to break the glass in domestic conditions. Even if it succeeds, it will turn into small particles with non-footing edges, which cannot be broken. If the usual glass breaks, then the fragments will fall out across the kitchen. However, the apron of tempered glass is not machined, so when ordering such a product, it is necessary to immediately describe the final dimensions for installation.

The usual glass, even very thick, has a characteristic "bottle" shade, which can distort the drawing behind it. For the manufacture of aprons, special discolored and completely transparent glass, which not only does not change the image, but even makes it brighter and expressive.
Advantages of glass aprons for the kitchen:
- elementary care is enough to wipe the surface to clean the windows;
- hygiene - due to the absence or a small amount of joints in them, fat and dirt are accumulated in them, as in surfaces from ceramic tiles;
- strength;
- durability;
- the ability to choose a drawing or color to the interior stylist;
- visual expansion of the working area and kitchen space;
- simple and quick installation.
So, a glass apron to many better than the usual tile surfaces, however, he has its drawbacks, more precisely, the lack. It is to properly pick the glass, and good glass is quite expensive.

Fortunately, a large selection of panels allows you to choose an option for every taste:
- Transparent glass - protect the wall from splashes, evaporation and dirt.
- Matte glass can be homogeneous or with a pattern applied.
- Stained glass - a great way to add a bright detail in the interior without repair.
- Glass with a pattern - manufactured according to individual projects. Drawing a drawing manually at home is unreal - for this use special factory equipment.
- The mirror - the panel visually expands the space, so this option is ideal for a kitchen with a modest quadrature. However, it is very careful to care for the mirror surface, since even small contaminants are clearly visible.
Tempered glass is an optimal option for creating a kitchen apron. It is able to withstand heating to 1000c, so it can be safely installed directly next to the stove or hob. Before ordering it, spend careful measurements. In this case, as in the saying, it is better to measure seven times, because then then cutting such a material of the house will not work.
Montaja technology
When you made all the necessary measurements and noted the location of sockets and switches, you can prepare materials and tools. Installing apron should be made after mounting kitchen furniture.

To work, you will need such tools and materials:
- glass panel - If you want to install several panels, then you choose a longer (high) glass segment. The dimensions of the apron of glass in width should be the same as the width of the mounted cabinets of the kitchen headset so that the composition looks harmonious. The edges of the glasses do not need to process;
- installation Profile - If you do not plan to mount backlight, use a profile to install a glass panel with a G-shaped section. For the backlight, another special profile is needed, while the lower edge of the glass will be pressed against the surface of the wall by the plinth attached to the tabletop;
- lED tape with adapter - if the apron is backlit;
- wall mural - If you want to disguise the wall defects, there is nothing better than the photo wallpaper. Just get them, and close from above the apron. Alternatively, you can immediately order a kitchen apron of glass with photo printing;
- plastic spatula;
- screwdriver;
- hoven for metal;
- pliers;
- soldering iron;
- insulating tape.
Please note that there is no drill, grinder or screwdriver in the list of tools, since the glass panel can damage too aggressive.

Installation of kitchen apron of glass:
- Attach the mounting profile to the wall, which will hold the glass panels.
- If you are installed backlight, fill the LED tape into the profile and move it to the common network.
- Attach profile. The mounting method is determined by the type of fittings. So, there are profiles that need to be attached to the wall, while others can be installed on the underside of the kitchen headset. Newcomers are better not to choose the second option, because the profile is quite difficult to fix and there is a risk of damaging the integrity of the LED tape.
- Start a film on the glass. If you at least once made tinting glass in a car, this work will not seem difficult to you. Spread the glasses on the floor in such a manner, in which they will be installed on the wall. Clean and degrease the surface to any alcohol-containing agent, then sprinkle with a spray with a spray and impose a film. Scroll from the center to the edges with the help of a plastic spatula and exhibit the water from the film. Stick the film immediately on all panels, if there are several of them, and already after smoothing, cut into the joints of the joints.
- It remains only to install glasses in place. Take the bottom of the panel from the wall and insert the top edge into the profile. Then the lower part move to the wall and with a slight pressing press in the guide. Glass should get up as hard as possible and close to the wall. Watch that there are no big gap between adjacent panels. To reduce this distance to a minimum, with light blows of rubber Cyanka pon the panel to each other. Control the strength of the blows to not break the glass to the lacquer.
Useful advice
The desire to save as much money on repair or construction is quite reasonable, but in this matter you need to know the measure. So, if you do not want to spend money on an expensive tempered glass with a pattern, you can put the usual thick glass and put any drawing under it. Of course, the installation of the apron of glass should be carried out extremely carefully, and then it should be very careful to handle it to accidentally not break.

As for the drawing under the apron, it can be done even without photographic. If you want to disguise any wall defects, the best way is painting or pasting. The usual wallpaper is better not to use the condensate, accumulating behind the glass when heated, did not spoil the paper. The same applies to ordinary drawings. Get them from behind the panel will be very difficult.
Before installing a kitchen apron of glass with your own hands, it is recommended to align the wall as possible. Installing only after installing the furniture headset, the finishing of the walls and the ceiling. If in the kitchen is a long wall, then it is better to make a apron from several separate panels than to put monolithic. Experts do not recommend setting segments of more than 2.5 m.

Before ordering the panel, make accurate measurements and mark the places for sockets, fasteners switches. They should be located no closer than 5 cm from the edges. Cut holes under the fasteners follows after drying the film glued on the apron.
Designer tricks
Glass, like ceramic tiles, are the perfect material for use in the kitchen. It relates to high humidity, temperature drops, does not fade and serves a long time. But why not go further and do not make a practical protective coating and stylish interior additions? There are several designer techniques that will help you successfully organize space even on the smallest kitchen.

By the way about small kitchens. For them there is nothing better than aprons from mirror panels. Paint the walls in a monophonic light shade and put the apron-mirror to the ceiling - the kitchen will immediately become "easier" and visually spacious. If it is not possible to purchase expensive mirror panels, give preference to the maximum glossy glass surface - it will also reflect objects and can visually increase the area.

When choosing a color or picture on the apron, repel from the overall style of the kitchen. So, if you liked the model with funny rabbits, and the kitchen is made in retro style or vintage, then this apron is hardly suitable. High-tech style is suitable dark tones or minimalistic drawings. In modern kitchen with European design, apron with photo wallpapers will look good: fruits, vegetables, flowers.

We have already described above, which are varieties of glass panels, now we will look at how they can be used to create a harmonious interior:
- An apron of transparent glass will be suitable if you do not want to overlap the beautiful color of the walls or wallpaper. The task of such panels consists for the most part in the protection of the surface, and not to decorate it. This option is most often used in studio apartments, where the kitchen is combined with the living room, so as not to distract attention from the overall design.
- The aprons from the matte glass perfectly hide the defects of the walls of the walls. If you do not want to glue the photo wallpaper with a pattern or paint the wall, set the matte panel.
- Multicolored monophonic aprons can instantly "revive" any kitchen. They make the interior fresh and brighter, without breaking the overall design. This option is suitable for those who want to organize modern cuisine, but not ready for fundamental changes. Modern technologies allow you to make a panel of tempered glass of any shade.

- Panels with drawings are an excellent opportunity to create a unique interior. The image is applied directly on the glass with a full-color UV printing, either stick to the opposite side a special vinyl film. The first method gives a better result. Moreover, UV printing allows you to apply even 3D images, which, like a mirror, can visually make the space wider. Pictures with a deep perspective look very beautiful, for example, a sea surface, rubbing far beyond the horizon, or a poppy field in a sunset sun. Panels with blended drawings are cheaper, but vinyl film over time loses color from temperature differences and pecks due to condensate.
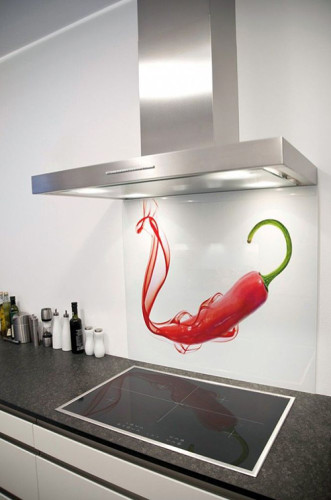


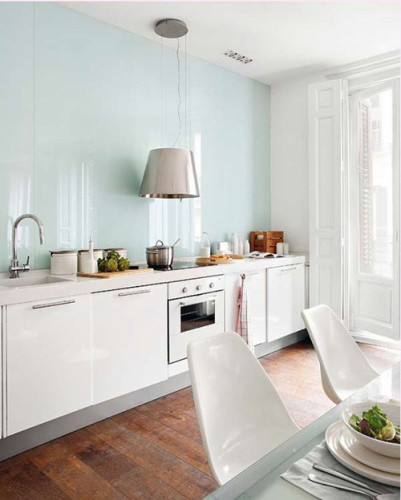
Kitchen aprons of glass, photo
As you can see, install a kitchen apron of glass is quite simple, it is much more difficult to choose the appropriate option. To facilitate this difficult task, we suggest looking at the aprons of various colors and textures in the interiors.


