For each family, the appearance of the kid is a long-awaited holiday. And both to any holiday, preparation for this event begins in advance. In order for the new family member to be provided with everything necessary, you need to spend a large amount right away, and young families often experience financial difficulties. Therefore, for the sake of saving money, some objects of the child's room atmosphere can be made personally, for example, a crib.
Content
Classification of beds for newborns
There are several main models of cots for newborns. Photos of some of them are given in this article. Consider each in more detail:
-
Classic model. It is practical and convenient, suitable for any interior. Such a crib front side can descend and rise. When he is omitted, the child is convenient to take and put, carry out any procedures with it. And when the kid remains alone, you can raise the side to avoid random falling out of bed. Upon reaching a child of older, the crib can be turned into a small sofa, just removing the side at all. Sometimes the classic model is equipped with wheels that can be removed and turn the bed into the cradle, due to the special design of the legs. It can serve as a child up to three years.
-
Cradle. This model will serve as a maximum of six months, because Upon reaching this age, the kids begin to sit down and try to rise in bed. In this regard, the danger of falling out of the cradle appears, because it has small sides. Its pluses include a small weight and size, which allows mom to constantly move the kid to where she is engaged in their affairs. Also, cradles are usually very elegant, and thanks to small size, the child is inside, feels comfortable and safely.

-
Bed-playpen. This model is multifunction and very convenient. It has a small weight and easily develops, which makes it possible to easily carry it, for example, to a cottage or visit. Such a bed can serve as long as it can be fixed at different levels. When the child is still small, then the bottom can be fixed higher, so that it is convenient to take it, and when he grows up and starts to get up on his feet, you can lower the bottom lower. In such a crib, a child can not only relax, but also play as in the usual Manege. Its design is something similar to the classic.
-
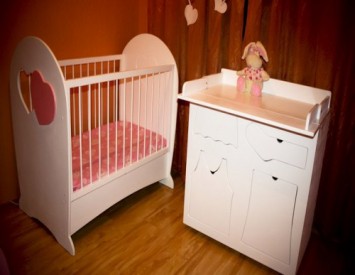
Bed transformer. It is a whole multifunctional complex that includes a bed, a changing table and a bedside table. Often between the floor and the bottom of the bed are provided with a linen box. Such a model is very good for small rooms, because Allows you to save space. Some transformers are designed in such a way that they can turn from a cottage to teenage and thus extend the service life of up to 10-12 years.
This article will show how to produce baby cots personally. For newborns, we decided to choose a classic model, because It can come up for most interiors, and at the same time very simply arranged. The technology of its manufacture can master anyone.
What materials are better to make a crib for a newborn with their own hands?
On this question there is only one acceptable answer - from natural! Furniture for a child, and indeed all the things with which it in contacts should be environmentally friendly, not to highlight harmful substances. Sometimes, in the period of teething, the kid nibbles the handrails and crossbars of the bed, and if they are made from some toxic plastic, it can easily get poisoning. For the same reasons, it is not worth covering the details of the bed with paint, varnish, various impregnations.
As a material, you can choose different breeds of wood. From the selected variety will depend on the quality of the future product.

Very often, baby cribs are made of pine and aspen. They are inexpensive and therefore very popular. But, making a choice in favor of these materials, you need to understand that they are very soft and scratches may quickly appear on the product.
More stringent, but also more expensive, are beech and birch. The crib from their wood will last long and retain the beauty of the appearance and rich texture. Also, they are almost not amenable to mechanical damage, which is very useful quality primarily for children's furniture.
Children's Safety Requirements
Even if you have chosen to make a crib, environmentally friendly materials and abandoned the idea of \u200b\u200bits painting, then the product can be a threat if the safety technique is not met:
-
all fasteners should be deep into the tree. If they write down, the child may be injured;
-
the design details themselves must fit tightly to each other, there should not be gaps and gaps between them;
-
the design of the crib for a newborn should not include any small and weakly fixed items that can be pulled out and swallow;
-
the bed must be stable, with all the legs touch the floor. The kid should not be able to solicit her on his own;
-
bursts should be high enough to exclude the possibility of falling out a child who has stuck on the legs;
-
the distance between Gerdochki and Plancks should not exceed 6 cm. Otherwise, the child can stick the head between them and is injured;
-
bars themselves, perch and other parts of the structure must be perfectly polished. The presence of roughness and the more splinters inadmissible;
-
crib should not have sharp edges, corners and creative cuts, hitting the kid who could be injured or bruised;
-
dipping rim in the lower position should be at least 10 cm rise above the mattress to turning over in his sleep, the child is not dropped.
Tools and materials that will be required to work
-
hammer;
-
jigsaw;
-
machine for polishing wood surfaces;
-
level, tape measure;

-
file with a large notch;
-
tools for woodworking;
-
milling machine and a set of cutters;
-
means for clamping assembled parts - Clamp;
-
drill and drill bits;
-
mattress size 120x60 cm;
-
bars with a cross section 5x3 cm;
-
4 cm thick board;
-
rack having a cross section of 2x2 cm (it is desirable that they are made of hard wood);
-
fasteners;
-
epoxy adhesive;
-
decorative caps;
-
plywood sheet 3-4 mm thick;
-
furniture connecting corners;
-
nails 2 cm.
Instructions for the production of cribs
If you want to make a complex pattern of cots for babies, drawings need necessarily, but in our case, we can do without them, because this model is very simple.
The first step is to buy a mattress, because it of its size, we will make a start by making a crib. By the choice should be approached very responsibly, because it will affect the quality of posture baby, the development of his musculoskeletal system, for rest and recuperation, etc. In this case the pillowtop having a core made of coconut fibers sized 120x60 cm.

Next, determine what will be the bed length and width, starting from the mattress sizes. The height of the skirting, if you count from the floor, will be equal to 90 cm taller backrests we do -. 110 cm from the floor.
Needless to bed should be placed at such a height above the floor at which the kid 2-3 years old will be able to freely climb on it. Usually it is 30-34 cm.
The distance between the vertical beams at the sides and backside of the bed should be 11-12 cm at the most.
Manufacturing composite structural parts:
-
tying sides and backs making of the boards, which are processed with the help of woodworking equipment. Width - 7 cm, thickness - 3.5 cm;
-
to make the lounger, which will later be put on the mattress, we take six bars with a cross section of 5x3 cm. To put the frame of the frame with a single deaf spike, in long bars we do 2.5 cm holes in depth. To speed up the process and avoid errors, immediately put the mark on the same details. If there is no slotting machine, then the nests can be drilled and then refinement with the help of the chisel or manual milling machine.
-
the length of the transverse bars can be calculated by a simple formula: from 60 cm. Turn the two widths of bars and add two depths of the socket to the resulting number;
-
with both edges of BRUSEV with dottechee bearings, we make spikes, using a cross-cutting spike for a bundle. The spikes can be cut through a circular saw adjustable in the input height. The saw output is determined by pushing out the socket parameters. It is necessary that a spike remains with both edges of the bar, which is the thick of the nest. The same makes it on identical details and remove the limiter. Excess wood cut with a saw. Using the rashpil, finally customize the spike under the size of the socket;
-
glue the parts of the bed lying on the whim at the same time, strictly following the angles to be straight;
-
to make a frame backrest frame, it is necessary to calculate its width according to such a formula: to 60 cm to add two sidewall thicknesses and then another 2 cm. Assembly of the backdrop frame occurs by 2.5 cm spike;
-
the formula for calculating the length of the crossing looks like this: From the width of the back, we take two widths of the bed legs and add two lengths of spikes. The lower diameter should be positioned at such a level so that it closes the frame of the lounger in the lower position;
-
in order to make rods for the bed, we take the rails having a cross section 2x2 cm. We join them to crossing the backs and sides with a single deaf spike. Holes in crossings depth of 2 cm Drill 16 mm drill. The gap between them should be 10 cm;
-
when the backrest frame is assembled, we calculate the length of the rods, add the double length of the spike to it. Spikes make in the same way as described above. Before all the components of the bed will be collected together, it is necessary to carefully polish them and round up all sharp corners and facets;
-
next, glue all the details of the back on the lime, while carefully following rectangles;
-
now you need to make board the bed. Their sizes differ. The lower crossbars of the backs must be knocked down with the bottom transverse crossbars of the sides. The back board is equal to the length of the bed plus 1 cm. In height, the side is 90 cm, minus the height of the lower transverse springs;
-
to get a removable bar on the front side, it is necessary that the length of his porridges was 15 cm in short, than the length of the strand of the second side;
-
spikes on them are made by the same principle as on the backs. All details are grinding, cooling angles;
-
we glue the side on the whim, following the components of the parts are strictly perpendicular to each other;
-
the front side has the same length as the rear, and in width it is 7 cm. The shielding bar should be equal to the side of the bed, and the width is 5 cm. The depth of the grooves at its ends should be 1-1.5 cm;

-
at the next stage, we mount the backs and side of the product with the help of self-samples of 8-10 cm. Insert a sun bed after 2-3 mm millimeters, observing the symmetry with the middle line of the back, we mark the points of contact with the back and sidewall. After the markup is made, we remove the gaskets (they were needed to provide a bed of free movement inside the general frame). Focusing on the specified marking, drill through five millionth holes, two pieces for each point of contact;
-
at the same level as the edge of the far side, we have a removable bar, we mark the point of contact with the back and fasteners. With a rubber band, fix the bar on the outer board, for this we drill through holes in the upper diameter and in the bar. Further, a thicker drill slightly extend the holes for the countersinking of the gum (the diameter must correspond to plastic plugs);
-
upon completion of the work, we drag the plywood 0.3-0.4 cm. Sleeping place and attach it with small nails.


