The visor performs two main functions: decorative and protective. Supplementing the facade of a similar element can significantly improve the aesthetic data of the whole house, make an exclusive exterior and give your dwelling a unique style. But this is not the main function of the visor. First of all, the presence of this product protects the zone in front of the entrance door and the door itself from the negative effect of atmospheric influences. Therefore, the door on which the canopy is located, retains its operational qualities for a longer time.
Content
Primary requirements
You can define the following visor requirements above the door:
- This element must ensure reliable precipitation protection.
- In order for the visor to fully fulfill this function, it should play half a meter and more.
- It is extremely important that the canopy has sufficient strength and resistance to wind and snow loads.
- He must also harmonize with the common style of the house.

Material selection for design
- For a successful choice of material for the visor, first of all, it should be proceeded from the appearance of the facade part of the building and coating the roof. For example, for a brick house, a canopy performed on brick supports will be more successful. And so that there is no contrast between the appearance of the house itself and the visor, their coating must be made of a similar material.
- Also, in the process of selecting the material, the protective properties of raw materials should be taken into account. Matte or transparent glass, as well as a plastic-based coating, can only be protected from rain. To create protection from loads coming by the strong wind and significant snow volumes, a more suitable choice will be covered with tiles or steel sheet.
- Recently, a widespread use of the visor received a visor with its own hands. The reservation of this material is explained by a number of positive properties with which it possesses:
- easy operation - Products made of polycarbonate do not need regular care;
- with this material it is fairly easy to work;
- the finished visor will have high resistant to different mechanical effects;
- the high indicator of the plasticity of this material allows you to give a product manufactured by any desired form.
With these advantages, the price of polycarbonate is not too high and is quite accessible to a wide range of consumers. There are two types of polycarbonate:
- monolithic;
- cell.
Cellular polycarbonate is a sheets connected in two layers between which there are longitudinally located jumpers. The polycarbonate of the monolithic type favorably distinguishes its exceptional strength. Sheets on their visual features resemble glass, but withstand loads up to 200 times more.

Varieties of Visrats
Visors are divided into types according to two criteria - according to the method of fastening and in shape. According to the first criterion, distinguish:
- support visors (in this case, the construction of the design is made on the pillars that perform the support function);
- sheds mounted on the wall.
Jumps of reference type withstand a large load than suspended structures. There are also several forms of visors. It can be:
- arched structures;
- tents canopies;
- single products;
- double constructions.
Dick visor, photo:


Construction of a single carp
The visor of this species is insignificant weight and simplicity of installation. For its manufacture, it is suitable for fastening on supports and suspended method. Usually, metal or wood is chosen for the manufacture of this type of design. The order of work is as follows:
- First you need to determine the width width and add 30 cm each to this indicator. The data obtained will correspond to the width of the future visor. To determine the height of the product, you need to make calculations, focusing on the design of the house. The product must be located at an angle of 20 ° and more.
- Based on the obtained indicators, a sketch is compiled, which indicates the length of the skate.
- Next, from the material used, it is necessary to make rafters, the size of which will correspond to the scope length. Also perform beam and soils.
- The assembly of all components in a single design depends on the type of material. When using wood, the frame must be assembled on the self-tapping screw, and welding should be used to work with the metal.
- At the next step, you need to fix the finished frame over the porch. The fastening of the beam is carried out by screws from a stainless composition, and the soot is fastened by anchors.
- After that, you need to install the crate on the rafted system. Bruss or boards are suitable for crates. Reiki must be laid depending on the material that is used when coating. If these are metal sheets or slate, the location of the RECs should be carried out every 40 cm. In the case of tiles, which has flexible properties, the shap must be made of plywood or boards.
- At the final stage, the rafting coating should be laid on the system. Making a visor over the porch with their own hands you need to protect it from atmospheric influence. For this, two strips are mounted. One of them should be attached to the wall and upper fragment of the skate, and the second is to adjoin the lower strait part.
- After that, you can install the drainage tube. It should also be taken into account that nuance that in case the building on which the visor installation is made has multilayer walls, the mount should be carried out on the carrier wall. And in those places where there are slopes and beams you need to take sealing. This will help avoid wetting the insulation layer.

Double visor over the door do it yourself
The visor of this type is characterized by more complex performance, but better functionality. Such a design is better protecting from wind and rain, and it is more convenient to clean the snow from it than from a single visor. For its construction, you will need to do the following:
- Product parameters are also determined as well as when the visor is set to a single-fold form. It also follows, focusing on the length of the design, calculate the size of the crates and brackets. And, given the height and width of the visor, you need to determine the parameters of the rafter system.
- Further, if the production of a suspended structure is supposed, you need to prepare two brackets from wooden or metal material.
- Two beams should be copper one to another perpendicular manner, after which it is connected by slope. It is important to adhere to an angle of 45 ° -60 °.
- After that, you need to fix the brackets to the wall, while the observed space between them should correspond to the width of the future visor.
- Vertical beams should be attached to the wall. Using the level to set them as necessary, and then consolidate with stainless screws.
- For the manufacture of a support visor, you need to install pillars from wooden or metal material. First you need to dig the pits, then make a pillow, putting the sandy layer on their bottom. On top of this layer, lay a layer of rubble, install poles and pour with concrete composition. The upper parts of such supports are connected using carrier beams.
- Then we produce two pairs of rafters, which fasten the rigels. The rafters are attached on the upper beams, after which the ski bar is mounted.
- Then the lamp is installed on the rafter, on top of which the roofing layer is stacked.
- In conclusion, we mount the cornice bar and the drainage chute.

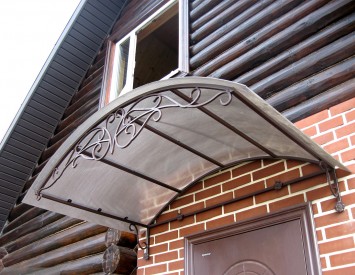
Arched construction
The manufacture of such a visor is the simplest among all ways:
- After performing measurements of the porch parameters, the sketch is made and determine what size the frame should be. This element is pretty simply. As a material, it is necessary to prepare two pipes from aluminum material, they need to be bent in such a way that two arcs are obtained.
- Next, these arcs must be connected to both ends, using direct segments of a similar pipe for this. If you wish, you can make this design with a more tough welding of the beam.
- After to the arc, which is behind, you need to privat the canopies - with their help the visor will be fixed to the wall.
- At the end of the work, the frame should be covered with paint.
- After its drying, the installation of the design to the wall is performed by screws.
- Visor over the entrance do it yourself ready .

Conclusion
The visor is an important element of the exterior of the house. Its presence promotes the protection of the input door of precipitation and as a result by an increase in its service life. Today there are several visors' varieties and a sufficient variety of materials for its manufacture. This makes it possible to choose this item under the style of any home. Installation of construction is fairly simple. To cope in this task, it is enough to familiarize yourself with the description of the technological process.


