A few decades ago, no one thought about such an element of landscape design as a garden path. The plot near a private house or cottage was perceived more like a garden, every square centimeter of which should be occupied by any culture. The path in the garden occupied only a small area between beds and garden trees. In most cases, it was just a trampled tape of the Earth on which people walked. Sometimes a secondary brick was used as a coating of such a path, in some cases it was wicked by old boards, especially rich people simply poured concrete, and some even used the old conveyor tape.
Content
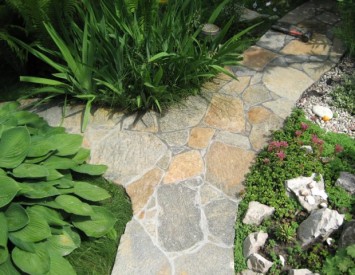
However, others have come. Now, in most private houses, the site is used not for gardening, but for relaxation. The new generation prefers to make a landscape design on a useful area in order to take a break from workdays from the city bustle. In this case, the appearance of the garden path plays a huge role. A well -chosen design and materials will help this design element emphasize the entire beauty of the landscape of the site, and vice versa, an unsuccessfully designed and poorly mounted path can lubricate all the efforts of the designer. The paths lined with stones look especially attractive. It is desirable that the work on the construction of the paths be part of the complex refinement of the site, because in such an important business, each element cannot be separate, everything has its own significance in the overall picture. About how to lay stone on the tracks is carried out - further in the article.
Choosing a stone for paths

Naturally, it is better to invite professional builders to arrange garden paths from stone, however, if there is free time, a little experience in public work, as well as a minimum set of tools, even an amateur can cope with it.
Particular attention is required to be paid to the choice of stone:
- Firstly, it must have a homogeneous structure, without cracks and chips.
- Secondly, one of the sides of the stone should have an absolutely smooth surface. It is she who will act as covering the track. Similar characteristics are sea stone for paths.
Recently, artificial stone paths have gained great popularity among landscape designers. Such material is much cheaper than natural, but has a more suitable geometry for styling. Modern technologies for casting and processing concrete allow an artificial stone to have an appearance no worse, but sometimes, and better than your natural brother.
The advantage of natural stone for paths is that it does not contain chemical additives, and therefore does not enter into chemical reactions that can lead to its destruction. In any case, the choice of material for the track depends on the preferences and the possibility of the owner.
DIY stone paths device

Work order:
- The laying of the tracks begins with markings. For this, its location, width and configuration are determined. The winding paths look pretty attractive, however, their styling is much more complicated than straight lines. For marking, pegs and a nylon rope are used, which is stretched between them. This will allow you to maintain its same width throughout the length of the path. When marking, it is necessary to take into account the width of the border.
- When the markings are finished, they begin to remove the upper layer of soil. The trench is digged with a depth of at least 30 cm, since for the construction of the track it will be necessary to lay several layers of various materials.
- The first layer on the bottom of the trench must be laid geotextiles. This material will reduce the likelihood of sprouting in the gaps between the stones and ensure normal drainage so that excess moisture does not accumulate between the stones, which when colds occur can cause cracks.
- Next, a layer of crushed stone is slept. This material is necessary as a buffer in order to distribute the load over the entire surface and not allow some parts of the track to fall underground. A layer of crushed stone should not be less than 15 cm. After pouring it, it is thoroughly compacted and aligned.
- Then they pour several layers of sand. As a rule, 2-3 layers of the same thickness are enough. After pouring each of them, it is moistened with water and tamped. This helps the sand to gain the required density to withstand the pressure of the stone.
- The next stage of installation of the track is the laying of stone. It is located in such a way that the cracks are as uniform as possible.
- After laying, the surface of the track is sprinkled with sand and marked it to fill the seams. Next, the path is wetted with water so that the sand in the seams is better fixed.
Militation of artificial stone for paths

This method has recently become quite popular. It allows you to make beautiful garden paths without much effort, which will look no less spectacular than paths made of wild stone.
The method consists in casting artificial stone in a special formwork. It is a stencil of various forms of both rectangular and asymmetric. Working with such a stone for paths for paths is quite simple.
Preparation of a solution for casting stone. A cement-sand mixture with the addition of waging is used. The ratio of the components is as follows:
- Cement - 1 part.
- River sand - 3 parts.
- Verings - 3 parts.
Stone casting order:
- To give the stone a decorative look in the solution, certain dyes are added. A reinforcing additive is also often used - fiber -fiber, thanks to which the material will be more durable.
- One batch, as a rule, is made on 20 kg of cement. Initially, cement is poured into the pear. Then-50-350 g of 1%-jealerous-acid pigment. Depending on its number, the tile will have a different shade.
- Sand falls asleep with fasting. After that, a plasticizer is added to the solution. It serves to give the solution more plastic properties.
- The latter are added axes and water. At the output, a mixture of the consistency of thick sour cream should be a mixture, in which case it will be strong and not contain air bubbles in itself.
Installation procedure:
- First you need to choose the direction and location of the future track. Then we set the stakes and pull the threads that determine its boundaries.
- Next, we dig a trench. For work on casting a track for a stencil, a ditch depth of 10-12 cm will be enough. After that, we install the curb.
- Then we carefully compact the soil and drain the trench with sand in several layers. In this case, you need to try to level the pillow in level. Each layer of sand is thoroughly wetted with water.
- After preparing a sand pillow, a form is installed on it, which is aligned in level.
- A concrete solution is poured into the established form. So that it is evenly distributed through the cells of the form, it is smeared with a wide spatula. The entire solution is removed from the surface of the plastic shape. When filling out cells, it is necessary to ensure that there is no air left inside them. For this, concrete is compacted with a small spatula.
- After relieving an excess solution, the form is left for about 1 hour, after which it is removed and rearranged to another place in which the procedure is repeated.
- The form must be removed neatly and evenly so as not to damage the unforgettable concrete. Before starting work, the form must be lubricated. For this, machine training or even vegetable oil is perfect.

Alternative to stone paths
Concrete path
The monolithic path, although it does not have such a beautiful view as when using a stone, but the cost of its installation and operation is much less.
For casting such a path, you will need:
- Cement brand 400.
- Sand (you can use screaming).
- Lighthouses.
The initial stage of work is fundamentally no different from installing a path of artificial or natural stone with small differences. The dug trench is poured only with gravel, which is subsequently thoroughly compacted. Before that, a border is installed along the edges of the trench. Then the beacons are mounted on which the screed will be aligned.
The next step is mixed with the solution. To do this, sand, cement and water are added to the concrete mixer. The ratio of cement and sand should be approximately 1: 3. We pour the finished concrete to the surface and with the help of the rule we roll out by the level of beacons. The path can be safely used after 3-4 days, depending on weather conditions.
For this operation, it is better to choose a non -fire day. The fact is that if moisture quickly evaporates from concrete, it will lose part of its strength.
Wooden paths
Recently, paths laid out from wooden cuts have gained great popularity. They are especially beautiful in the gardens. Such a path has a number of disadvantages, the main of which is the features of the tree. Without proper processing, this material cannot serve for a long time. That is why the procedure for applying the anti -corrosion composition is mandatory.
For the harvesting of the material, you need to take the tree trunk and saw it into circles up to 50 mm thick using a chainsaw. Prior to this, it is desirable to clean the surface of the barrel from knots and branches. After the cuts are ready, they must be processed. For this, an antiseptic and olifa are used. Processing must be carried out 2-3 times. After that, a pillow is prepared for laying wooden sections. To do this, you need to dig up a trench with a depth of up to 20 cm. Then it is drained with gravel or gravel. After pouring each layer, the material must be thoroughly tamped and leveled.
The next step is laid by wooden tiles. The gaps between its individual parts are not very important. Here it is necessary to focus on the size of the step of those people who will walk along this path. After laying pieces of wood, the gaps between them are poured with small pebbles. Unlike stone, it is better not to drive a wooden surface with sand. Firstly, it does not look so spectacular like pebbles, and secondly, sand can cause damage to the ends of wooden tiles.
Stone paths: photos of ideas for design


