In a small apartment or room sometimes you want to feel the scope and freedom over your head. But too low the ceiling does not allow it to do. For more comfortable accommodation in such a room, advice and designer tricks come to help on how to increase the ceiling visually.
Content
Methods of visual increase in the ceiling

For a visual increase in the ceiling, several ways are used to be divided into groups:
- Illustrate: mirror, mounted, french or suspended ceiling.
- Properly installed illumination: all sorts of chandeliers, sconce, lamps or neon backlight.
- Right selected design: design of walls, curtains and curtains.
- Emphasis on a specific item is to distract attention from a low ceiling, you need to attract attention to something else, more bright and expressive.

Using the deformation and change of the ceiling structure, it turns out to be enlarged. Consider the question of which ceiling increases the room.
How to increase the height of the ceiling with the help of a multi-level filing
One option is to visually increase the ceiling multilevel plasterboard ceiling. Possibility to choose the design and complexity of the ceiling alone will give a home unique, and LED strip will add comfort and originality.
Multilevel ceiling completely reconstructs the geometry of the room, the space increases and conceals small irregularities basic ceiling.

For the installation of the ceiling does not need to have special skills, simply read the instructions and make all the rules.
Before you start work, you must purchase such tools:
- metal profiles and guides,
- drywall,
- screws for metal.
Installation instructions tiered ceiling:
- First you need to make a layout. Using a pencil and level.
- Next, set profile and guides, attaching them with screws.
- When the frame is ready - to check the strength and evenness.
- The wires, where will be located lamps or lights.
- Next fasten sheets of plasterboard previously cutting them under profile resolution.
- If the ceiling is a wave, for better fixing plasterboard soak it for 10-15 minutes with hot water, then it is easy to bend.
- Cut in the plasterboard construction site under the lights.
- Shpatlyuem joints and paint.

This option allows you to visually increase the ceiling to choose designs of varying complexity, doing two, three or even four-level ceilings. A proper installation of lighting will make the room bright, comfortable and airy.
Suspended ceiling, which increases headroom
Stretch ceilings are called the French, because they were first invented in this country. Suspended ceiling structure is a PVC film, secured to aluminum or plastic profiles below the main ceiling.
Stretch ceilings are very diverse. In their texture is divided into three types:
- Glossy - represent a mirror surface and thus increase the space. The drawback of such ceilings are visible seams, especially at high ceilings.
- Matt - fit perfectly into any interior. They are similar to the usual ceiling and used to hide minor irregularities basic ceiling.
- Satin - gives a pearlescent shade of the ceiling. They are similar to the texture of matt and gloss on glossy.
- Cloth - represent a large segment of fabric which is dipped in a special solution, and then dried at installation on the ceiling. No seams - the main advantage of such a ceiling.

The main advantage of such ceilings is the fastest way to install. Installation takes only a few hours. Suspended ceiling set in such ways:
- The cam fixed - by means of profiles, which are fixed on the movable and fixed elements of spinning. The film with the spatula, installed and fixed in the profile. Next, the process passes its heat and it is straightened.
- Shpatikovoe attachment - the canvas is attached to the aluminum profile shpatikom or wedge. Extra edges are cut and mounted prints.
- Harpoon - it allows you to set the ceilings of varying complexity. With this assembly is attached to the canvas a harpoon, and then the fabric is mounted on the main ceiling. For this method to warm up the blade is not required.
Thus, the installation of a stretch ceiling requires only 2.5-3 cm from the height of the main ceiling. But visually it is very well increase the ceiling and gives the interior a more space.

How to increase the low ceiling via mirror coating
Mirrored ceiling is another way to increase the space as a whole, and in particular the ceiling. Among the advantages of a mirrored ceiling release:
- easy care,
- hide all the irregularities,
- increase in space,
- environmental friendliness.
But despite the advantages, it has a mirrored ceiling and cons:
- very fragile - it is easy to damage,
- cost - high compared with gypsum ceilings,
- easily contaminated.

Mirrored ceilings UK production and Germany, are among the best. They come in the form of tiles in size 30x60, 60x60 cm. Do not install a solid mirrored ceiling, as if it is damaged, increasing the risk of injury from shrapnel.
Methods for installing a mirrored ceiling:
- Fixing Armstrong.
- Mounting with screws.
- Bonding mirror plates.
1. The first type of fixing is carried out after all the finishing works:
- Mirror plate mounted on a metal profile, thus can hide all communication and power wiring.
- Plates are attached to the profile by means of plastic dowels and screws.

2. Before starting installation, with the help of screws it is necessary to prepare the ceiling, aligning it with plasterboard. On the plasterboard design, mirrored plates are attached and fastened with dowels with screws. This method is the easiest, but unreliable.
Advice: For greater strength before screwing the mirror plates, apply a thin layer of glue on them. The stove will hold better and it will be easier to attach it.
3. To install the gluing method, it is also necessary to align the ceiling by plasterboard, and then glue the mirror plates using a special glue. This method is ideal for light mirror plates.
Recommendations on how to visually increase the ceiling
To all the above methods of changing the structure of the ceiling, add more designer tricks that will allow you to learn how to increase the ceiling.
Interior arrangement tips for visual increase in the ceiling:
- When choosing wallpaper in a low ceiling room, focus on straight horizontal lines. They lengthen the walls, and, accordingly, the ceiling is visually higher.
- When finishing the room, a variant of one color scheme is possible, both for the ceiling and for walls. It must be blonde tones from snow-white to gently beige or dairy. At the same time, the walls and the ceiling merge, and the boundary between them becomes less noticeable.
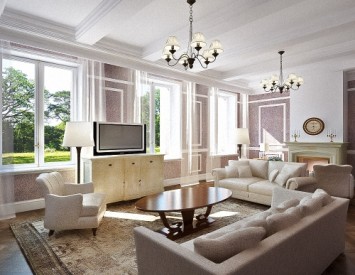
- Lighting is also a very important factor that forms the general atmosphere of the room. For visual expansion of space, it is recommended to use a lot of light. Use LED tapes or all kinds of lamps.
- Niche in the wall with illumination will also help visually expand the space.
- When installing windows and doors, try to make the doorway closer to the stream, and pull up the windows up.
- Properly selected curtains also visually increase the height of the ceiling. Curtains and curtains should be made of light light materials or with vertical nonsense stripe.
- Distract attention from a low ceiling will help focus on the walls. For example, stick beautiful photo wallpapers or draw panels.
- Contrasting cantes expand the height of the ceiling and room as a whole.
- Depending on the size of the room, cover the wallpaper so that they go to the surface of the ceiling by 6-10 cm.
- When finishing the room, use only cold or light colors.
- When selected low furniture, the ceiling will seem higher.

In the finishing and design of the low ceiling room should not be applied:
- massive chandeliers in the center of the room,
- wallpaper with catchy and bright drawings,
- horizontal lines
- low doors,
- short curtains
- huge furniture.
With the help of these recommendations and tips, even the lowest ceiling will seem to a pair of centimeters above.


