Each owner of a private house or a country country area dreams of having a gazebo on the territory of his yard. A small building outdoors will be the place of casual communication with friends behind a glass of red wine or games with children. A large number of different projects of closed or open arbor give the owners to choose the most optimal option depending on the site features and, of course, from financial capabilities.
Content
- Types of arbors
- How to make a gazebo do it yourself from a tree
- Fundament device
- Device of frauds from timber and installation of support pillars
- How to make a roof on the arbor do it yourself
- Installation of railings and flooring
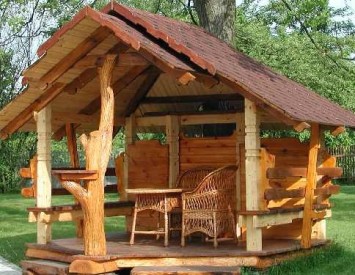
- How to make a gazebo with your own hands: photo
- How to make a gazebo with your own hands: video
In order to save money on the services of builders, you can try to build a gazebo with your own hands. For this work, the initial general construction skills and the minimum set of construction tools are needed. At the same time, the result of such work in most cases looks quite attractive. About how to make a gazebo with your own hands - hereinafter.
Types of arbors

Currently, you can find hundreds of ready-made projects of both small arbors and huge facilities with a barbecue, a bar counter and a seating area. Such arbors are more reminded at home than garden buildings.
By their design, the arbors are divided into two types:
- Open. These are simple facilities that have a roof mounted on supports, and lateral barriers. Such arbors are used only in the warm season. The advantage of these models is the simplicity and low cost of structures, which makes them the most optimal option for small country sites. However, even with a small side wind and the rain will not sit too comfortable.
- Closed. Such arbors are glad using various types of glass. Thanks to this, they can create more comfortable conditions. Here you can be in any weather, and if you put in it a heating system in it, then time can be carried out in cold winter days. True, the comfort will have to pay extra. Even if not to use expensive double-glazed windows, glass will still decently increase the construction estimate.
By material manufacturing material, you can divide on:
- Wooden. The frame of such models is made of wooden bar. Wooden gazebos are the most common due to their low cost and simplicity in the installation. For their facilities, it is not gently attracting employees or special techniques. Small experience with a tree and a minimum set of tools will make it a completely sound gazebo. The disadvantage of wooden models is the need for a constant caring for wood, coating its paint and varnish and antiseptic material.
- Steel. The frame of such arbors is performed from a corner or profiled pipe. Pipes of large diameter can serve as a support. Steel is much stronger than wood and does not require constant care. However, to make a gazebo with their own hands, you will need welding skills. In addition, in many regions, steel is more expensive than wood.
- Brick. Capital structures whose frame is laid out of the brick. They serve quite a long time, do not require special care. However, the construction of a brick gazebo requires a building of a powerful foundation, which will be able to withstand not a small weight of the design. In addition, time to laying bricks is much more spent than on a wood frame and metal framework. Most often, bricks are resorted to the use when it is required to build a capital gazebo with a barbecue, in which it will be possible in the cold course of the year.
How to make a gazebo do it yourself from a tree

The simplest option is a gazebo, which can be easily made with your own hands, is a wooden structure on a column foundation with a two-tie roof. It is quite simply mounted, does not require the use of expensive materials and special equipment.
For the construction of a simple arbor, you will need:
- Foundation materials (brick, concrete, fittings, sand, waterproofing).
- Frame materials (a timing of 100x100 mm for the frame racks and its base, and the timing of 100x50 mm for the rail device).
- Tailing materials (lining, floorboard).
- Roofing materials (bituminous tile, profiled sheet, slate, etc.) The most optimal option is a profiled sheet. It has a small weight, easily mounted and serves quite a long time.
Fundament device

A columnar foundation for a wooden gazebo is the most preferred option. It is easy to install, does not require special costs of materials. For the base of the timber section of 100x100 mm, the distance between the foundation columns should be no more than 1 m. That is, if the size of the arbor will be 2x2 m, we will have to build 3 poles.
The structure of the foundation begins with the markup of the site. From the square of the future gazebos, remove the layer of fertile soil. The markup of the site under the poles, the size of which will be 50x50 cm, produced with the help of stakes and the caprony thread of a large diameter.
In places of crossing threads, pits are digging, the size of which is 10-15 cm more than the size of the pillar. The depth of the post from the ground level is about 30 cm.
On the bottom of the pit stacked the sand layer, which is thoroughly tamped. Next, the process depends on what the foundation will be:
- For brick bases on the bottom of the trench, the waterproofing material is placed, most often - rubberoid. A brickwork with dressing is performed on it. After pouring the solution, the distance between the edges of the trench and the post falls asleep with sand.
- For a concrete base, a formwork is installed, the framework of the reinforcement is lowered inside, after which the solution is poured into the formwork. Concrete is prepared from cement of grade 400 and sand in the ratio of 1: 3.
After the posts are finished, it is necessary to check their height. They should be the same. Otherwise, it will not be smooth foundation. Align the pillars for one level can be possible with a solution.
Device of frauds from timber and installation of support pillars

Procedure for work:
- When the foundation is ready, a bar of 100x100 mm is stacked on it. First, the material is mounted around the perimeter. In the corners, two adjacent bars are connected to the "lock" and fasten with the foundation post using anchor bolts. Before laying the crate, the surface of the foundation pillars is covered with rubberoid.
- The rest of the bars also fit into the castle and are also fixed using anchors. As a result, the gender doom should appear on which the floorboard will be laid.
- The next step is installed support pillars. The location of their installation should be a foundation pillar. In no case cannot be installed the design of the arbor on the "saving timber". From the weight of the structure, he may simply be damaged.
- To install the column in the location of the cable beams, the groove is cut (open the square shape).
- The pillar is installed in the groove with the level check and fixes. For greater stability, the disclosures that connect it with the base bar are installed. The divas is made from the same bar.
- When the poles are installed, they are tied up with upper beams that will be the basis for the roof design.
How to make a roof on the arbor do it yourself

Double roof is one of the most simple designs. That is why this option is the most acceptable for those who are trying to build for the first time.
The roof is made of several main elements:
- Sking beam. It is installed along the roof and is a support for the rafted. Fastened on two racks, which are strengthened with coloring.
- Rafters. Inclined elements to which the roofing doors is attached. They are fixed to the ski beam and the upper beams of the design. Between the rafters can be connected by the fights that will provide them with additional reliability.
- Obsek. Installed along the rafter. Serves as a support for roofing material.
All parts of the roof designs should be assembled with stainless steel fasteners, because otherwise the fastener corrosion must be transferred to the tree. When the design is ready for it, the waterproofing layer and roofing material are stacked. The latter is mounted with rows from below-up.
Installation of railings and flooring
When the roof is already installed in the gazebo, you can proceed to the device and floors.
For mounting, the railing is used by a smaller bar. It is installed between the support pillars and is fixed by self-draws. For greater stability to the loads, there can be an additional rack between the railings and the lower ram. To make a gazebo closed, you can sew a railing with a professional flooring or flat slate.
The last stroke will be the flooring device. To do this, it is better to use a sexual board with a thickness of at least 40 mm. It is able to withstand significant loads at a distance between lags about 1 m, namely, such distances are provided by the design of the base cladder.
The board to the floor is attached by nails. Self-tapping screws are not suitable for this task. If the floor has to be removed, then the board, nailing, will be quite simple to tear off. But if it is bolted with a self-tapping screw and he will have a damaged head, it will be impossible to do it without damaging the board. So that the boards are more closely to each other, it is better to use wedges. To do this, the first board is nailed to lags, then 4 boards are stacked, and another one, which will become focusing. The wedges are driven between the last and the penultimate boards and are not removed until the penitant will be nailed.
After laying the floor, all wooden structures are opened with a layer of olifes and color.
How to make a gazebo with your own hands: photo


