LED backlight does not just look spectacularly, it allows you to literally transform the interior, give it originality and chic. In addition, it is possible to carry out the LED tape not only in the ceiling structure, it is possible to form a headboard or a niche in the wall, decorate the podium or highlight a wardrobe. The backlight of this type has a wide range of colors, and also uses the minimum amount of electricity. In this article we will tell you how to make a LED ribbon with your own hands and how to carry it out.
Content
What is a LED tape and how to make it yourself
LED tape is a soft flexible strip made of transparent plastic. Inside such a strip at an equal distance from each other, LEDs are placed. The brightness of the backlight directly depends on how many such diodes are contained in the tape. The number of diodes can fluctuate in the range of 30-240 pieces per 1 m stripes.
The dimensions of the standard LED tape are such: its width is from 8 to 10 mm, and height ranges between 2 and 3 mm. Tapes are distinguished not only in brightness, but also in color of the glow. In addition to monochrome and colored ribbons, there are also those that can change the shade of the rays in the process of use.
Powering LED ribbons is a constant current, the voltage value for such a backlight is most often 12 V, occasionally - 24 V. To convert an alternating current to 220 V, during the installation process, you must connect the power supply unit for the LED tape. In addition to the transforming block, during this backlight, you also need to install controllers that will be responsible for changing the brightness of the rays and the color of the backlight. To use controllers it was more convenient, they can be equipped with a control panel.
The installation of the LED tape does not represent any complexity, because the adhesive composition is applied to one of the sides of the plastic band. Since the ribbon itself has a little weight, glue is quite enough for it to be securely fastened on the surface.
Sometimes LED backlight adorn bathrooms, saunas or other rooms in which there is a permanent humidity. For such cases, manufacturers produce special waterproof ribbons. As a rule, the IP 30 or IP 65 are on such products.
The plus of the LED backlight can be considered not only the simplicity of its installation and a variety of shades, but also ecological safety, because the LED tapes in their composition do not have mercury - the mandatory component of energy-saving lamps.
The tape of this type can be bought in the finished form, and can be made independently. On how to solder the LED ribbon, we will also tell me further. To begin with, consider the list of necessary materials. This is what will be needed for work:
- getinaks sheet;
- enameled wire;
- lEDs having a voltage of 3 V and the angle of illumination equal to 20-30 °;
- rosin and solder;
- green plastic bottle;
- building a hairdryer;
- colorless heat shrink tubing.
The process of manufacturing the LED ribbon with your hands is as follows:
- Lay on the desktop Micarta sheets and cut them into strips of a width of about 1 cm.
- From a plastic bottle cut the bottom and neck, and then cutting the body to get a flat plastic sheet. This sheet is also cut into strips 1 cm wide.
- In Hetinakse strips, do the holes at an equal distance from each other. These holes are designed to fasten the LEDs, the diameter of which is 5 mm. On a 0.5 m long strip, 16 LEDs will be located.
- Insert the LEDs in the resulting holes, and then smear 4 diode in one chain, which will be calculated on 12 in voltage.
- Using enameled wire, smear all chains in one common chain.
- When this work is done, be sure to check the LEDs for health, connecting them to a 12-volt voltage.
- If all the lights are lit, you can apply a layer of green plastic on the manufactured strip and wear a heat shrink tube.
- Hot air from the construction dryer warm up the tube until under the action of high temperature it will not give shrinkage.
As a result of the work done, you should get a LED tape with green glow.

Features of the illumination of suspended ceilings
LED backlight is most often used to decorate suspended ceiling structures. There are 4 main ways to install tapes on such a ceiling:
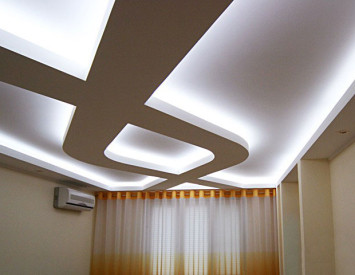
- The contour scattered illumination involves the placement of the LED tape on a special shelf. At the same time, the rays of diodes are directed up, as a result, a solid strip of light is formed on the ceiling.
- The directional illumination means that the tape is installed on the slope, and the light from the diodes is directed along the surface of the ceiling. The effect of such lighting will be the rays divergers in different directions.
- The point backlight is done in such a way that individual LEDs are located on the surface of the ceiling one by one, as a result, the effect of the so-called starry sky is created. It is quite difficult to make the backlight of this type, so it is desirable to seek help from specialists.
- Figure backlight suggests that the LEDs are placed in the size of the plaffones, which are subsequently installed on the ceiling. Such lighting is also quite difficult to make with your own hands without possessing technical knowledge and practical skills.
LED tape, photo:


Arrangement of contour and directed backlight with your own hands
Deciding to decorate the suspended ceiling by LED ribbons, first the appropriate option should be selected. Consider more, which subtleties are preferably considered when buying a LED tape:
- First, you should decide on the color of the tape. If you decide not to draw backlight with your own hands and buy ready, then it is better to prefer RGB ribbon with the controller. Such a tape will give the ability to change the shade of rays and adjust their brightness. The backlight of a similar type is no discontinuous to you, besides, you can always choose the color of the glow in your mood. By the way, this tape is almost as much as its monochrome counterparts.
- The density of emitters is another important characteristic. This indicator is different and amounts to 30, 60 or 120 pieces per 1 m strip. The more density, the richer and brighter will be the light. To install the contour backlight, it is recommended to choose ribbons with a large density of diodes, from 60 to 120 pieces. For directional lighting, this indicator may be smaller and to form 30 or 60 diodes. If the niche of the suspended ceiling is large enough, install 2 tapes with different density of emitters at once. Similar backlight will allow you to make many interesting lighting effects.
- The power of the LED tape should also be considered before purchasing goods. As a rule, the tapes are marked with SMD letters, as well as four digits. Of these four digits, the first two and will indicate the power consumed. In addition, the illumination power can be found from the instruction that is attached to the product. When creating the contour backlight, the power should be about 8 W / m, for directional light, this indicator may be smaller and equal to 5 W / m.
- The calculation of the LED tape will depend on its length, so that this indicator also needs to be taken into account before buying.
- While buying a LED tape, you should also purchase a controller and a power source. When choosing these elements, pay attention to the voltage. The working voltage of the tape has 3 indicators: 5 V, 12 V, 24 V. and the controller, and the power source must maintain the corresponding voltage.
Installation of LED backlight is schematically shown in Figure:

In the process of installing the tape in the design of the suspended ceiling, pay attention to the following subtleties:
- The LED strip is fixed on the surface with an adhesive composition, which is applied to one of its sides. On the new tape, the sticky layer is covered with a special film that does not give it to dry or pollute. Because on the drywall surface, the strip does not hold very reliable and has a property with time to disconnect, in the process of its installation it is desirable to use a special profile for LED tape. This profile is made of polyvinyl chloride and its surface keeps the tape for long years.
- Soldering wires to the tape should be very neat and with great caution, because plastic, and the LEDs themselves do not tolerate high temperatures. For such a work, it is recommended to use the flux paste and solder POS-61, the melting point of which does not exceed 160 °. Waste details preferably with one touch. If you do not have sufficient experience like this, contact the master.
- More than 3 m tapes are not recommended to connect together, since the backlight simply cannot withstand high voltage. Better every 3 m tapes attach to the controller using individual wires.
- Pay attention to the polarity of the wires and their purpose.
- If during operation, the LED tapes will need to be divided into parts, cut them exclusively by the lines provided by the manufacturer. If the ribbon is the last and need a segment of a certain length, take sharp scissors or special nippers and make a cut strictly between diodes.
LED Tape Scheme:


