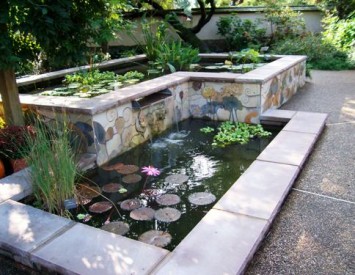
The raised pond can become the central decoration of your cottage. Surrounded by green plantings, it looks like a small oasis. In addition, such a reservoir is much safer for children and adults than the pool, because it is on the elevation and it is difficult to accidentally fall into it.
Content
General rules of construction pond
Not always in the country area can be pulled out with a reservoir in the ground, how in such cases there is a pond? There is a way out - you can construct water on the hills. The deeper you want yourself a reservoir, the higher you need to build its walls. In the raised ponds, you can safely hide the filtering system, as well as they scare the Herlin from the garden. There are many ways to build a raised pond with their own hands, but all methods have general rules:
- Not always the pond in the center of the garden looks harmonious, well he will look surrounded by path and lawns.
- The form at the pond is the most different, the main thing is that it fit into the general view of the cottage.
- The reservoir must be located in a place where the sun is, but at the same time and not all day to be in direct rays.
- Under high trees, it is also not necessary to place a pond, otherwise it will be constantly contaminated.
- Building a reservoir is preferably not far from the source of electricity so that you can set the backlight or pump.
- It is necessary to provide arrangement of the reservoir before frosts, during this period the pond is very vulnerable.

Advantages of a raised pond:
- Does not need care, it means both construction work, and less costs.
- In the summer it is easier for him to care than behind the usual pond.
- More secure, especially for children.
- Can be built on the slope.
Disadvantages of a raised pond:
- I am inferior in the decorativeness of the usual pond.
- It is impossible to make a pond flowing.
- It is impossible to bring it to it.
- Fully freezes in the frost.
Pond from finished shape
The store sells ready-made molded forms for the pond and it seems to many that make a pond much easier than to build from beginning to end itself, but it is not always true. First of all, ask the seller to show what a pond will get out of finished tanks in the photo in the catalogs. It is preferable to choose the containers made from fiberglass, they are the most durable. You can also buy from reinforced plastics, but in this case you will have to make a reliable support to Earth from the outside so that the edges are not deformed. These forms are manufactured abroad and quite expensive. You can buy and ordinary plastic, the cost of them is not high, but also quality too. Yes, and they are not very large. And keep in mind that you need to buy a container preferably black.
Very often due to the fact that the ground is incorrectly filled in the gap between the pit and the form, the finished mills of plastic are deformed. To this not happen, you need to perform the work correctly:
- Pouring a layer of sand at 7 cm. It's good to take it to install it and install it.
- Form pour some water, about 10 cm.
- In the gap between the wall and the pit, pour sand, about 20 cm and pour it with water from the hose. Alternatively, make a bolt, mixing the earth, sand and water.
- Wait while the bolt will become solid and pour some water into the pond again.
- In the gap again pour the chatter with the same layer.
And so gradually, topping the water in the pond, then the chatter in the gap, you fill in a completely clearance. Only such a method can be installed plastic form. As a result, it will hard stand in place and the edges are not deformed. Of the finished tanks, it is not necessary to drain the water for the winter, otherwise it will be cleared of frost without water.

Water from "solid" materials
A few years ago, concrete raised ponds were the most common in gardens and dachas. To build it, you need to perform a number of works:
- Build a foundation from concrete, thickness - 15 cm, and its width should be wider - by 10 cm than you plan to be, which will be finished with reservoirs.
- To the center to install the grille from steel rods.
- Several steel rods must perform from concrete in a place where the center of the wall is from two layers.
- The wall is built on both sides of the rod. From the outside, it can be stone or brick, and inside of small concrete blocks.
- Two layers of the walls are connected by a solution. Thanks to the reservoir, you can build any form.
- Build drain and make a notch where the cable will enter.
- After the construction of the walls with a lime solution, it is necessary to deprive overlapping plates. At the same time, the overlap must necessarily go out by a pair of cm, and from the inside of 3 cm, so they will be more comfortable to deprive them. To prepare the coolant, you need to take part of the cement on 6 parts of the sand, add water, in the end there should be a pasty consistency.
- The coating is applied with a brush with a rigid bristle, first the first layer, and hours after five second layer.
- It is necessary to apply a coating so that the layer is thinner from above.
- The surface is painted in the desired color.
- From above, apply a agent that does not pass water, it is necessary so that the lime does not increase the acid-alkaline balance, which will negatively affect the condition of the water branch.
- Decorate the pond with decorative elements, it can be a plinth, flowers, shelves.

Brick or stone pond with lining
In order to build a pond with a liquefaction in the country with your own hands you need:
- Build a concrete base around the perimeter, which will be two times wider than the walls. Asphalt can be suitable as a foundation if it is strong enough. It will only take a small fit when it is necessary to fasten with the help of the lime solution, because the asphalt is often under the tilt, and the bottom of the pond should turn out perfectly smooth.

- The walls are erected, as in the first version, in two layers and they must be very strong.
- As a liner, it is recommended to use synthetic rubber, its price is high enough, but it justifies itself to what is used for a long time and is waterproof. Manufacturers give it a guarantee of 20 years, and with due care and all 50 years. It is possible as an alternative to use a polyvinyl film, it is cheaper, but also its strength is weak.
- Pulling has two disadvantages, it is easily damaged if it is careless to handle, and it can, when lowering the water level, spoil the whole general view. Therefore, it is better to hide it behind layers of stone or brick.
- The pond needs to fill with water and give a liner for a few hours so that it stretches.

Wooden pond with a lining
This is the most simple way to build a raised pond, as it does not need to build a complex foundation for it. The main thing is that it is perfectly smooth, and the tree used is massive. You can build a pond of railway sleepers, but in the heat from them there will be an unpleasant smell and enjoy the gatherings on the edge of the pond will not be very comfortable. It is best to use solid wooden bars in construction. They do not smell tar and work easily with them.
The principle of construction of wooden pond walls is similar to the construction of a log hut, that is, the beam is placed horizontally on each other. Brux and nails are attached to each other. And the caustment refills under the last bar, the top is attached from above.
The second way to build walls is to build them in two layers, from the outer side of the tree, and inside still build concrete blocks that should end at the level of the penultimate wooden bar. Pulling must be cut through the wall and hold the penultimate wooden bar. Thus, if the water evaporates a little, then the caustment will not be visible immediately.
It is preferable to use chestnis or oak from the tree, because they do not need to additionally process with waterproof reagents that can get into water.
Decoration of a raised pond
To decorate a raised pond, you can use figures from clay and ceramics. You can install vases with flowers on the sides. It looks good raised reservoirs with fountains and waterfalls.
The bottom of the pond can be decorated with a laid out drawing using tiles and mosaics. If you want to strengthen the effect of the purity of your pond, then put it with a tile of blue and white colors. At night, your pond will be unrecognizable if you decorate it with lanterns and lamps. Do not forget to make sure to insulate the wiring. The network voltage is better not to use, but to put a transformer, which has 24 to voltage at exit.

When decorating the stones of the pond, they need to be laid from the base of the walls. Together with the styling of the pebbles, throw in the pond hose with water, gradually the water will put pressure on the body and it will see, and then you can adjust the flaws.
The top row of stones should hide the edges of the form, it is possible to plant plants between the stones, which do not require special care and it will turn out a peculiar alpine slide with a pond.


