The problem of free space and ordered space exists in every home. Wardrobe room - the dream of every woman and realize it is possible even in a small apartment. Make a wardrobe with your own hands is not difficult, for this you need a little imagination and skillful hands. The positive moment of the construction of a wardrobe cabinet is the utilization of old boning furniture and the appearance of a free place in the apartment.
Content
Wardrobe materials use a wide variety. It is required to build a partition in a suitable place for this place, install the door and shelves for things. Making a wardrobe wardrobe with their own hands, you should consider the design and location so that it naturally fit into the overall interior of the room.
Select Place and Marking for Wardrobe Cabinet
Carefully inspect and measure probable places to arrange a wardrobe in the apartment. Pay attention to the storage room, a deadlock of the corridor, angular spaces in large rooms, etc. In the scheme, mark the places for the shelves and racks for things, the design should provide convenient access to the stored clothing.

- Sketch an exemplary drawing on paper and decide on materials. Plasterboard is suitable for dressing room, LDSP, plastic lining wall panels MDF, OSB or other suitable materials can be used.
- On the walls, make a vertical markup of the future simple dressing room by referring to a plumb or waterpaste. Connect lines on the floor and ceiling. Important function have doors, they can be made standard or sliding.
Arrangement of a wardrobe in a deadlock of the corridor
The implicit space of the corridor is ideal for the arrangement of the dressing room. You already have three finished walls and ceiling. It remains to make the facade saint and the door. Materials for simpleness are suitable for a wide variety. Even better, if you remake the storage room for the dressing room.

- Make marking on the walls, ceiling and semi for installation of simpleness. The skeleton frame is made from a bar with a cross section of at least 4x4 cm, and a special profile applies for drywall. Door opening, make 90 cm in width and up to 2 meters in height. The rest of the area is sewn with a square cell in increments from 75x75 cm to 1x1 meters.
- It cuts out the opening for doors in advance. In the upper part of the opening in the corners, the small, with a diameter of 8 - 10 mm holes are drilled. Longitudinal and transverse propulsions can be made by electric jigsaw. Cut for door opening sheets, you can use for the manufacture of doors. The door to the wardrobe closet, you can make a glazed, sliding. Thus, the place is saved and an additional source of light occurs.
- A sheet of chipboard or OSB, has a sufficiently large dimensions of approximately 2800x2070 mm. Two such sheets are enough to block the opening completely, four - to close it on both sides. On chipboard or OSB, the wallpaper is easily glued, drywall requires putty and painting.
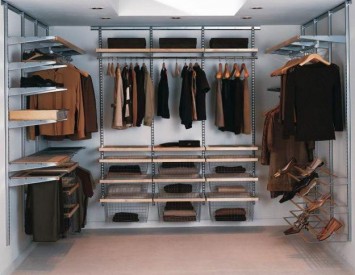
- It is important to properly plan and install the shelves, racks and racks for the shoulders for which clothes are hung. Mobile stands and racks, much more convenient for cabinet furniture. Any correctly planned wardrobe room is divided into two parts. On the one hand, the bar is attached for the shoulders, and on the other hand shelves for things.
Arrangement of a direct wardrobe cabinet in the room
The direct wardrobe in the dressing room in the room is somewhat more complicated. It is best to place it in the corner, then you will have two stationary rear walls. A design attached to them will be much more stable and stronger.

- If there is no suitable corner in the apartment to arrange the built-in closet with your own hands, you can make a straight wardrobe in the room. To do this, mount the frame - the foundation of the dressing room and secure it with screws to the floor and wall. Rear wall functions will perform the wall itself. The side walls of the wardrobe can be made from LDSP. This will solve the question of finishing work.
- Facade side - can be done with sliding doors. Purchase accessories and fastening in the furniture store. These are two guides, upper and lower, rollers are fixed directly on the canvas of doors, handles and stoppers. Door canvases themselves, you can reorganize with mirrors. Sliding doors of such a cabinet compartment, open full access to things placed in it.
Arrangement of the corner cabinet made of plasterboard
Properly equipped with angle wardrobe wardrobe will save space and streamlines space. Plasterboard, easy and convenient material processing. It is not difficult to build such a closet, and the material costs are minimal.

- A good solution will be the arrangement of the corner cabinet with their own hands. To do this, you will need to build one facade wall and equip the entrance. For the arrangement of the facade partition from drywall, you will need two types of profiles. The rack, it is used for vertical racks and has dimensions - 50x50, 50x65. And the guide, it will be needed to install the doorway and jumpers. Suitable profile size 50x40 or 65x40.
- Standard size of wall drywall 2.5 per 1.2 meters. For facade wall drywall, a preferred thickness is 12.5 mm. Thin sizes are used for ceilings. Plasterboard is easily cut by a knife on plasterboard and fastened with self-drawing to the framework of the profile.
- After the markup is made, the guide profiles are fixed on the floor, the ceiling and walls. For one profile meter, three dowels are used. Vertical rack profiles are attached to them, and a checkered base from guide profiles is made, with a side size of 65-75 cm. To strengthen the doorway, you can get a wooden timber to the profile.
- To begin with, install and secure whole sheets that do not require fitting. Screen from the corner, screws in 250 mm increments. Self-tapping heads "Podopit" by 1 - 2 mm. Starting putty, prflip the joints of sheet carp sheets and sprouting the screws.
- Corner joints and adjunctions to the wall are closed with a plastic corner profile or a reinforced fiberglass mesh. Sleeping of the corner cabinet puts out the finish putty, polished and paints. If you wish, you can save wallpaper.


