
Hammock is a cozy and practical design that can enjoy any household plot. This useful interior object is usually used for short-term rest to relax in the shade and enjoy the rustle of foliage. In addition, the aesthetic appearance of the hammock harmoniously fits into the overall design of the site, and make it with his own hands will not be absolutely no difficulty.
Content
General Recommendations for Hammock
Deciding how to make a hammock with your own hands it is necessary to take into account several features to create the most comfortable design and carry out a long-awaited stay. So, when forming a cozy hammock, it is necessary to take into account:
- Frame material - Competent selection of fabric and thoughtful design will make a hammock as convenient as possible. To sewing a durable and reliable product, it is recommended to use dense fabric - tarpaulin, camouflage, canvas, mattress tick or coat. The use of durable synthetic materials is undesirable because they do not allow you to "breathe" the body, despite the high characteristics of wear resistance.
- Cords - If we put a hammock from the rope, then it is better to give preference to natural cotton materials, rather than synthetic. Ropes from natural components are easier to bind, weaving and with them more pleasant to touch the body during use.
- Strength and fastening height - Hammock must be placed in a special way between two supports or trees.

Weaving hammock do it yourself
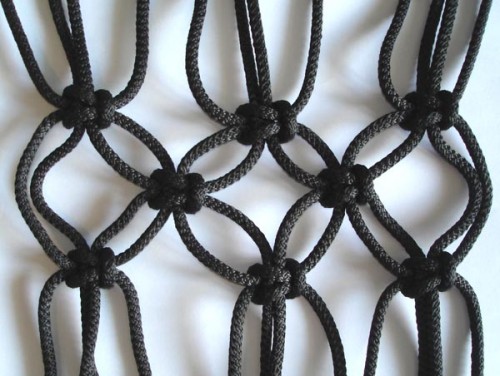
One of the options for creating a reliable and aesthetic product is manually weaving. In order for the design to meet all the requirements of safety and comfort, you need to take into account some of the process features.
Tools for weaving
Before making the Hamak itself, it is necessary to prepare the following tools and materials:
- Line or centimeter tape.
- Stationery knife or ordinary scissors.
- Planks for fastening cord 5 cm long with holes - 2 pcs. It is necessary to select such elements so that the diameter of the opening was at least 4 times the size of the diameter of the rope itself and the edges were perfectly smooth. This will avoid wiping the cord.
- Cotton rope with a thickness of at least 8 mm.
To calculate the rope length necessary for weaving the length of the rope, you need to multiply the length of the design to 3, and then multiply the result by the number of allocated holes in the wooden plank. To take into account the fastener should also add 20 m.

Hammock Weaving Guide
- Make a hammock in the photo is simple enough. Initially, it is necessary to plan the dimensions. For example, the future design will have dimensions of 2.5x1 m. Then you need to knit the grid, gaining from 20 to 30 loops in width. The thicker it is a rope, the less the loops will need.
- The process of knitting hammock is similar to the manufacture of the canvas. After the first row is accumulated, you need to turn the product with an invalid to yourself and penetrate the next row. Then again you need to turn the hammock to myself "face" and peck the third row, and continue until the end. Each time the needle needs to wind so many ropes in order to maximize it through the loops.
- When the cord is over, you need to leave a certain length from the edge. In this case, it is important to correctly calculate the residue, so that the node is on the edge of the row and did not get into the middle. Otherwise, tightened nodes can spoil the appearance of the hammock and deliver discomfort when using the product.
- After the grid is woven, wooden planks should be prepared. In the bars drill holes in such a quantity, how many loops are planned in the width of the hammock. At the edges of the slats, it is advisable to make wider holes so that the carrier rope can be traded.
- Then, in order, you need to go to the appropriate loop cavity from each row.

- Measure the length of the cord to the length of the length that you planned and cut off the excess.
- Repeat the procedure with all the holes and loops, attaching a second strap to the future hammock.
- Collect the free ends of the twine together and fold them in the form of a ring, wrap across and firmly tighten. The same procedure must be repeated with the other side of the product.

- In the newly formed holes made of fabric rings, a holder or a dense cord is used, which will fix the hammock to the trees.
- To strengthen the shape of the product, you need to turn around the perimeter of the grid thick rope through the extreme loop. You can also conceive thin bars.


Detailed instructions for knitting loops are set out in the video presented:
Consider a step-by-step guide for weaving stretch marks can be on this video:
To see how to make a hammock on the video in the following fragment:
Hammock sewing manual
Before making a hammock chair or sew a strong and comfortable hammock, it is important to prepare all the necessary components in advance.
Preparatory process
To sewing the product, you will need such items:
- Dense cloth for the canvas with dimensions of 3 * 2.2 m.
- Strong plot with dimensions of 5.2 * 3 m.
- Singyprute filler with a thickness of 0.5 m.
- Wooden bar or beam with a diameter of 4 cm.
- Sandpaper.
- Fal from Capron 4 mm.
- Acrylic paint under the tone of the canvas.

Tools that need to work
- Hacksaw.
- Line or centimeter tape.
- Pencil or chalk on fabric.
- Iron.
- Chisel.
- Paint brush.
- Sewing machine.
- Scissors, needles, pins.

Fabrics for canvas - a fairly important operation that reduces the thickness of the product and the stress on the seams. In addition, the stitching of the fabric will be smaller.
Instructions for tailoring products
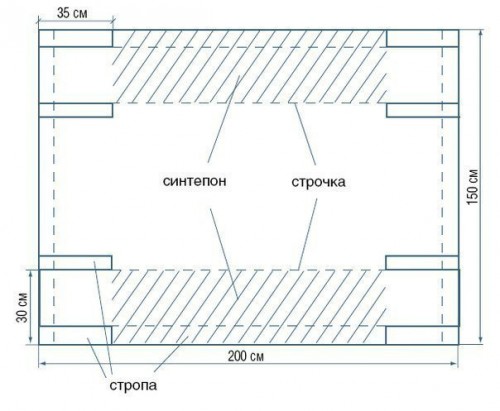
- From the wrong side of the canvas, you need to place 2 rectangles with dimensions of 200 * 150 cm.
- Cut the blanks and fold to each other face.
- Then you need to carry out the short sides of the web on both edges of the product. To do this, we retreat 3 cm from the border.
- The product is turned inside out - the lower cut will serve as a back, the upper pattern is a hammock face.
- Items must be burned with an iron.
- Next, it is necessary on the long edges of the workpiece to shoot the sling, retreating from the edge by 5 cm. At the extreme boundary of the backrest, the harm must be shot along the entire length, and on the front edge - by 30 cm from the corresponding seam.
- We cut off from the harvested line 4 of the segment, each of which will be 70 cm long, and add them to zones where the mount will be. At the same time, it is necessary to combine both sides of the product.
- Then it should be stirred along the product length, retreating 30 cm.
- The synthetic layer must be cut into strips with a size of 125 * 25 cm and put them in the resulting 30 cm pockets.
- Then the edges of the product must be turned out, fold and strain, so that the tanks along the long edges of the hammock are.
- Pockets with syntheps should be passed in 4-5 places so that the filler holds tightly inside.

- Wooden timber must be cut in half and make 2 climbed with a distance of 1 cm.
- I do a chisel to deepen under the rope, we clean all the sandpaper and cover the paint.
- In the ends of the product need to be searched by "loops", for which it will be attached to a wooden bar.
- We produce the product through the loop on the crossbar and tie the podium file to them to fix the nodes in the recesses.


Ready!
Mount Hamaka
To correctly fix the product, you must follow the following requirements:
- The minimum distance between the tree and the design loops should be 230 cm.
- In the fixed state, without taking into account the weight of a person, the hammock should be 50-100 cm above the Earth. The height on which the hammock needs to hang depends on the distance between the suspension places and is calculated by the formula:
H \u003d 2xl: 3

If the hammock must be fixed on the supports, then they should enter the ground at least than 1 m in the depth.
You can see the detailed guide to the structure of the hammock on the video:


