Children's wardrobe - an integral part of the interior for any family where there are children. Children's things and underwear must be separate from adults. First, it is just comfortable. After all, adults will always be able to quickly and easily find the right thing to dress their child. Secondly, in this way, the child learns to independently put their clothes and keep it in order. This is very important for the formation of discipline. And finally, thirdly, the children's wardrobe will most naturally fit into the interior of the child's room and give comfort to the space of your baby.
Content
The advantages of making a baby cabinet with their own hands

Children's cabinets, prices for which the dealer determines can become a very bill purchase. You can buy such a subject of interior for small money, for example, 70 - 80 cu. Designer models are tens of thousands. On request Children's cabinets Photo on the Internet you can find a huge number of models for every taste and wallet. However, a truly unique thing, any parent can make it yourself. And the advantages of this approach to the choice of a baby cabinet are actually many:
- Ecology. Parents take care of their child's health. That is why, having decided to make furniture for the baby yourself, choose those materials that correspond to the best standards of European quality.
- Availability. In any product that is sold in the store, the markup, advertising, taxes, salary sellers, utilities and much more are included in the store. Therefore, children's furniture - cabinets made with their own hands - much cheaper, as you will have to spend only on materials.
- Uniqueness. Mass production cabinets are usually the same type. And furniture made with your own hands is a unique work that will be only at your child.
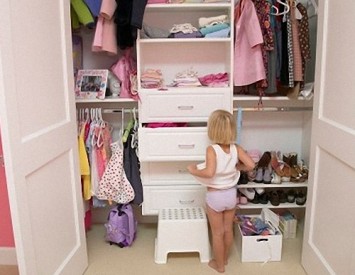
- Convenience. The sizes of the children's cabinet, created by their own, make such a form and height, which will be suitable for the size of the kid's rooms and most conveniently and harmoniously placed in it.
- Spend time with the whole family. The creation of a cabinet for the baby will be very interesting work, if the work is to take the whole family. Together, together to make a sketch, decide ourselves, where and which shelf should be. And children will gladly draw the doors or stick special stickers with the image of various cartoon characters. Wardrobe, children's pictures on which are created by the child himself, will be perceived not only as furniture, but also like a favorite toy.

Cabinet materials and assembly
Baby cabinets make it easy to make enough. To do this, you will need a completely simple inventory.
So, to get started to cook:
- Materials for the future cabinet: doors, inner walls, shelves, door handles, door sangs, crossbar for hangers, mirror and fastening for it, self-tapping screws, euroschauses, retractable drawers and profiles for fastening boxes.
- Set of crusades.
- Drill.
- Drill.
- Roulette.
- Building level.

At the initial stage it is worth determining the dimensions, depth and height of the product itself. It must be convenient, first of all, for the child. The baby must get to all the shelves.
Solve how much shelves and crossbars for hangers will be in the future closet and determine the location of its location in the room. To do this, you need to take a sheet of paper, pencil, line and draw an accurate sketch of the future product. Or download a special program for making drawings.
After that, they begin directly to the creation of a children's cabinet. It is important to process slice places with a special material in order to avoid chipping and cracking.
During the assembly, it is necessary to strictly ensure that all parts are tightly lossed and perpendicular to each other. As for the decoration of a childrencard for clothes, a photo from the article will be prompting several original solutions. In addition, stickers, drawings, rhinestones, pearls, photos, ribbons and much more will help you make a really unique children's closet with your own hands.

How to make a children's closet
Baby cabinets are designed and assembled with many factors, such as the size of the room, the location of other furniture, the taste of parents and the baby, the number of shelves, tremers and many others. Consider the most common.
1. The wardrobe, where the doors do not open, and are compactly moved. Such furniture will perfectly fit even in the smallest children's room. The correct location of the wardrobe will not only visually increase the baby's room, but, if necessary, the uncomfortable layout of the room will hide. In addition, the materials are very available and sold in almost any construction store. At the same time, it is undesirable, making the cabinet with their own hands, choose glass doors. First, it is simplored, as the baby, playing, for example, in the ball, can break the mirror and hurt. Secondly, the mirror surface will constantly have imprints from small handles.
Collect the wardrobe is very simple:
- first of all, we apply marking on the wall with the help of a roulette and a simple pencil. It is necessary to note the place where the vertical stand will be, the place to attach the corners for its fixation and heights on which the shelves will be fixed;
- using drills, we make holes for dowels;
- we finish the edges of the cabinet parts;
- we start assembling the cabinet with side walls;
- after that, with the help of the level, markup is applied to install the antlesol shelf;
- install the shelf;
- cut in size and install the bar for clothes;
- carefully drill and install the false panels;
- install the upper box;
- if the design of the baby cabinet provides backlight - set the backlight panel;
- measure and cut the lower guide rails for doors. After trimming, it is necessary to immediately insert a stopper in them - one by one on each side;
- with the help of screws, the rails are fixed to the lower false panel;
- install the doors of the future baby cabinet in the following sequence: the first upper guide, then set the rollers to the rails of the lower guide;
- adjust the door of the cabinet with the help of a hexagon;
- to protect the door from shocks, we stick a pile.

The cabinet is ready. It remains only to decorate it to your taste and fill in children's things.
2. Angular cabinet also saves room space. In addition, this option is the most spacious and perfectly suitable if, for example, two kids "live" in one room. The corner cabinet is the perfect option for small-sized apartments, where every centimeter is on the account. Materials for the corner cabinet are MDF and chipboard. They are the best. Along with a small value, these panels are durable and with proper operation will serve for many years.
Collect the angular cabinet is more difficult than the other cabinets due to the more complex design and more details. Therefore, the diagram is a drawing for a childrencard need to be very carefully. If necessary, consult with a specialist. Creating an angular cabinet with your own hands includes the following main steps:
- detailed drawing of the scheme of the future cabinet. It should include a detailed drawing of the cabinet, as well as very exact dimensions of each part. It is important to correctly calculate the location of the door sash;
- the next step is to drink materials for the future product;
- painting details. Drying materials. Drying time paint can be found by reading the instructions for paint;
- finishing the edge of each part;
- tool preparation: screwdriver, hammer-nail, hexagon keys, perforator, hacksaw in case any part will have to be adjusted;
- cardboard must be seen on the floor in the place where the assembly will be built. It will protect the floor from damage;
- all modules secure intercouction tie. It is important that the holes are combined exactly, therefore it is worth a special attentiveness;
- before the restraints under the loop are installed, you need to determine which way the doors of the future cabinet will open;
- installing the limiter on the cabinet door to prevent the door of the other door when opening;
- installation of mounting slats and plastic linings for an angular hinge with self-tapping screws;
- installation and adjustment of doors. During installation, it is important to trace the retainer to be open. It is possible to remove it only after the end of all installation works;
- installation of fittings;
- cabinet decoration.

The assembly is completed. However, there is a simpler way to create an angular cabinet with your own hands. If you have a wardrobe at home and you want to expand it - you can simply attach a homemade corner module to it. On the Internet there are many ready-made solutions. If you want a truly unique thing - then the drawing can be made of independently taking into account personal preferences, the size of the room, the shape of the cabinet, the features of the location of the future interior item.
So, in order to attach the corner module to the finished wardrobe, with your own hands, you need to make three attachment points:
- At a distance of 5 cm. From the top of the module shelf.
- In the middle of the side panel of the angular module.
- Immediately above the bottom shelf of the angular module.
After that, it is enough to fasten the elements of the accessories and the children's corner cabinet with their own hands ready.
With the creative approach of the parents, the cabinet combined with the bed will become a whole game center for your child. You can choose one of the many options on the Internet and make the same, or show creativity and create a unique designer thing. Wardrobe bed, really optimal option for the children's room because saves a lot of free space and can be most compact and stylish even into a small room.
The finished wardrobe, perfectly suitable and in size, and in color, and the design is for your crumbs, it is almost impossible to find in the usual store. On the Internet, the choice is more, however, the order of such an overall cargo also has drawbacks. For example, during transportation, some details may be deformed. In this case, they will have to buy new and, accordingly, pay for their delivery. Therefore, we will make a children's closet, combined with a bed, do it yourself.
1. The first thing to do is, of course, the exact drawing of the future cabinet.
2. Second - preparation and painting of parts. After that, it is necessary to separate the edge of each element of the future baby cabinet.

3. Third - Preparing tools for assembling furniture. Tools are needed as the same as for the assembly of any closet. But here you should consider some nuances. For example:
- the fastener to the wall should be as reliable as possible, therefore the drill is a diameter of a minimum of 10 mm;
- since the design is very heavy, then plastic and wooden dowels use strictly prohibited. It is necessary to pre-prepare anchor attachments with a length of at least 80 mm;
- in some homes, in view of certain reasons, the floor and walls can be behavior. In this case, install the cabinet bed is strictly forbidden, as the design will become loose, breaking fasteners. It is very important to remember that, because in the event of a fault of the structure, the child can get serious injuries.
Creating children's cabinet with his own hands - it is a creative and interesting work. As a result, you get a unique thing that is ideal for both your child and have all the necessary features and conveniences.


