The process of resettlement bathrooms - quite an important part of the repair of the apartment. Typically, the bathroom does not always have the desired size, because most of the buildings housing were built long ago. In view of this, space saving is an important issue when deciding which installed the shower tray is the best option. Installation of this item - a laborious process, but it gives a positive result.
Content
variety of pallets
Depending on the type design, Saucers can be divided into the following types:
- flat (10 to 18 cm);
- superflat (6 to 10 cm);
- deep (25 to 35 cm).
according to the criterion shape of the product, Made the following classification:
- round pan;
- polygonal;
- the product of arbitrary shape.
Modern manufacturers represent a wide range of designs, among which the best shower tray kupitmozhno in a universal form - quadrant. Such a structure makes it possible to mount the product in a corner, taking up minimal space in the room.

Depending on the manufacturing material, Saucers are of the following types:
- The acrylic pallet for the shower is a modern product option, which is characterized by a small weight, a wide range of forms and colors, as well as practicality - small scratches are practically not visible on the surface. However, this design is not too durable, and therefore requires a fastening or reinforced bottom.
- The cast iron saucer is expensive, but the most durable and durable product among the analogues. The disadvantage of this choice is the monotony of forms.
- Steel products - such a shower pallet high is distinguished by durability, relatively low weight and low cost. However, it is less durable, in comparison with the cast-iron bottom, and also makes noise under the jet of water, in contrast to acrylic structures.
- The pallet from the ceramic material is characterized by high aesthetic value, considerable cost and durability. However, such structures are not too resistant to damage, as well as cold.
- Marble soverees are the most expensive products that are quite practical, order warmer than ceramic analogs, but fragile and subject to chip.

Required toolkit
To establish a shower tray with your own hands, but to implement a conceived idea, it will be necessary to prepare a lot of tools:
- perforator;
- accessories for the pallet;
- building level;
- screwdriver;
- self-tapping screws;
- sewer pipes;
- plastic dowels;
- screwdrivers;
- drill with drills on concrete;
- set of plugs;
- penoplex;
- concrete solution and container for it;
- sand;
- master OK;
- silicone sealant.

Installing a shower saucer on legs
This design of the design is the most simple and suitable for implementation in any room because it does not require the preparation of the flooring. Consider more than step by step instructions for the performance of work.
- Prepare a purchased product and place future supports so that they are parallel to the main axis of the saucer.
- Then, in accordance with the type of design, it is necessary to measure the distance from the axis and the marker to mark 4 holes on the thickened day.
Important! The axis on the pallet is a line that connects opposite corners of the product if it has a rectangular shape. And in the designs of a semicircular type, it runs between the angle and the center of the arc.
- At the placed places, drill the groove with a diameter of 3 mm. In this case, observe extreme caution: in order not to damage the integrity of the saucer, do not deepen the drill by more than 10 mm.
- After that, fasten the support beam.

- Make the setting of a shower pallet on the legs. For smooth geometry, use the construction level.
- On the wall surface, apply the height of the upper side of the pallet with a marker, and make the markup at a distance of 100 mm from the angle, where the axis of the fastening of the bracket will be held.
- Along the axis, under the edge of the saucer, drill the grooves in a depth of 8 mm.
- Insert plastic dowels in the holes, in which you need to fix the brackets with screws.
- On the upper part of these elements, apply a thick layer of sealant and hang the pallet there.
- After the product "sees" the most tightly, man's siphon.

Montage of the saucer on the floor
Installation of self-supporting shower dna - simple, but a painstaking process that requires maximum accuracy. To make the result pleased the wizard, it is necessary to accurately follow the instructions. So, step-by-step guide looks like this:
- Prepare the desired pallet and check all the connections for the drain. For greater reliability, pass the sandpaper of the shower and floor shower and floor papers.
- Apply silicone sealant on peeled places. Move around the perimeter of the area, about 1 cm from the outer border.
- Measure the height of the extreme side of the product on the wall and apply marker marker there.
- Then drill the grooves and wind the plastic hooks that stabilize the position of the design.

- Install the saucer bowl on the prepared zone and pressing a strong press. This will allow glue composition to tightly fix the bottom on the outdoor cover.
- Then tighten and install the siphon.
- The resulting gap between the tile and the saucer must be filled with silicone sealant and special plastic rails, which are usually supplied complete with a product.
- The pallet is ready for operation.

Installation of the pallet in the floor
This method is the most time consuming, since it requires careful preparation, as well as construction skills. However, efforts are rewarded with reliable and durable result. The Pallet Installation Guide to the floor is as follows.
Stage 1. Waterproofing
The first stage in the installation of a shower pallet is the waterproofing of the place where it will be. To do this, it is necessary to make such actions:
- to bring the sewer pipe to the very center of the saxes;
- carefully check each system element for chips or cracks to avoid possible leaks;
- pour the reserved angle with a sealant or fibroresina, and output sewer pipe output 15 cm above the floor level;
- let me dry for 24 hours.
Important! It is not recommended to put a plastic drain, even if the manufacturer assures in its reliability and strength. Replace it on brass or steel so that unpleasant incidents and the design served dozens of years.

Stage 2. Barrier Installation
After the place of construction is thoroughly sealed and seeded and the sewage is laid, you can start displaying the protective barrier. The process is performed in such a sequence:
- note the height of the barrier line, as well as a brick perimeter, which must be at least 5x above the level of the sewer nozzle;
- prepare a moisture-resistant solution, having thoroughly knead it in the container using a trowel or spatula;
- the ratio of cement and sand 1: 1, be sure to add liquid glass to ensure the designs of excellent water repellent characteristics;
- lay out the perimeter of the brick, putting it on the edge;
- let me dry for 48 hours.

Stage 3. Filling the floor
This process occurs in the following sequence:
- Initially, it is necessary to make the basic fill with the help of a self-leveling cement composition. The layer must be as smooth as possible, filling the entire space of the corner, and also have a thickness of 5 to 8 mm.
- Treat the surface with reinforcing waterproofing after drying. To do this, fiberpool, dekoprof or others are suitable.
- After the insulation layer is completely dry, knead the solution. To do this, use tile glue and cement.
- Slowly, concentric circles apply a layer, gently increasing the thickness of the layer from the drain hole. Try to withstand the level of curvature, because irregularities and coarse transitions cannot be hidden under cladding.
- When the makeup dry, clean the surface to eliminate irregularities and roughness.

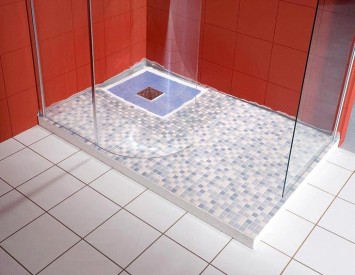
Stage 4: Decorative Facing
The exterior aesthetics of the shower is an important factor that is worth considering during repair work. In this case, the optimal solution will be the facing of the floor with a mosaic tile, because it perfectly hides small errors when pouring. Use a glass mosaic intended for the baths, since such a material has anti-slip characteristics and does not lose external appeal over the years.

Recommendations to the process:
- Before installing a shower saucer, it is necessary to determine which design is planned as a whole: a shower corner or a cabin. It is necessary in order to carry out power supply during construction, if the plans are plans to install a shower cabin. Connection to the network occurs by means of a copper cable with a cross section of at least 2.5 mm. He should also have double insulation. Be sure to provide for the installation of a protective disconnection to ensure safety.
- Despite the decorative shower pallets, the photos of which decorate design magazines, the design should have good sound insulation. The sound of a beating about the pallet of water does not like the owner, as well as his neighbors. Modern technologies allow us to use a lot of options for isolation, and therefore should not be neglected by this.
- The best tool for checking the sovereign position is a water level.
The Pallet Installation Guide can be considered in detail on the video clip:


