When repairs in the apartment comes up to his finish, it is necessary to glue, and then shout and paint the baguette, in other words - ceiling plinth. It seems that the operation is simple, but after performing the work not qualitatively, you can spoil all the impression of repair. How to put on and paint the ceiling plinth? The answer to this question you will find in this article.
Content
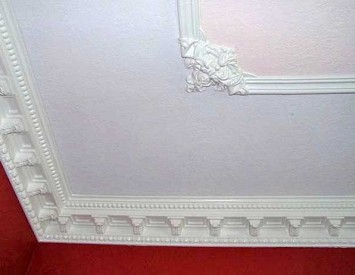
What are the ceiling plinth?
The putty of the ceiling plinth is the necessary, because if you stick it, so leave it, then the view will spoil the gaps formed due to the irregularities of the wall, the locations of the docks will be well.
Ceiling Plinth Sweaf Subtleties
There are certain requirements for the putty itself, and which we will consider:
- the putty must fill all the slots, joints, so we choose small;
- in the case of a very uneven wall, the gaps are especially large to close them, we take a gypsum-based putty, and then use the finish mixture.
Shpaklevka process

Before placing the ceiling plinth, we will examine it and start working with the biggest slots, i.e. the width of which exceed 0.3 cm, and for this:
- clean the ceiling plinth from dust;
- we prepare a plaster solution using a putty, the basis of which is plaster;
- we take the usual spatula and smear the gap. The remnants of putty carefully remove the wet rag or spatula;
- let the starting putty dry dry, gently clean the surface of the ceiling plinth with sandpaper;
- we divor into the finish dry putty so that it is convenient to apply with the help of a folding brush and complete the work;
- if the baguette is a patterned, then the spatula cannot be applied, everything is performed using the brush, and on the joints is unnecessary with a sponge.
Healthy: Sleeping seams between cartoons, perform vertical movements with a spatula, repeating the relief of the ceiling baguette, then it will look like one solid canvas.
What is the plaster mix better?
If you choose plaster based on plaster, then stop your choice on the universal dry plaster mix of Rotband (Rotband), which manufactures KNAUF (KNAUF) in Germany. Its advantage:
- in its composition, additives providing excellent adhesion will, therefore, will not be flapped from the ceiling plinth;
- small proportion;
- exonomically spent.
For sealing small gaps, you can use the finish fine-grained Eskaro Fine Filler putty supplied from Estonia. Its distinguish:
- high adhesive properties;
- ease of application;
- the presence of packages of different weights.
The finish putty was well established, produced by the company "Students". It stands out:
- good technical data;
- environmental safety;
- in the way that includes in its composition quality components of companies from Germany "Bayer" and "Wacker", the French firm Rhodia.
For the shtlock, you can also use glue-putty for the ceiling plinth, by means of which it was attached to the wall. If the finished mixture does not remain, then prepare it yourself in this way:
- instruct according to the instructions finishing putty;
- add PVA glue into the solution at the rate of: 1 kg of putty - 0.15 kg of PVA.
Do I need to paint the ceiling plinth
The painting of baguettes - the procedure is not binding, so the question is: "Do I need to paint the ceiling plinth?" Everyone decides on their own, but if we want in the interior of the room after repairing there was no reason to find fault, it is better to fulfill this procedure. And in favor of accepting a positive decision, the following factors say:
- by painting the ceiling plinth, it can be done so that it will be completely harmonized with the general design of the room;
- the ceiling plinth, due to the well-selected color scheme, will play the role of a contrasting line separating the walls and the ceiling or smooth the contrast between them;
- the color of the ceiling plinth will strengthen it, as the material from which it is performed is soft and not very durable;
- with the help of paint, the texture and stucco on the baguette is well distinguished;
- since the baguette is made of foam, polystyrene and polyurethane, and these are porous materials, then without painting they will be simply with dust collectors and will lose their presentability very quickly. The painted ceiling plinth can be wipe;
- after sealing the gaps with a putty, no matter how carefully, we did not do it, there will be no homogeneity of the material. Output one: coloring. It will hide all the flaws and such a formal element as the ceiling plinth will look monolithic.
Mobile ceiling plinth
Before painting the ceiling plinth, you need to decide on the choice of paint and stock the necessary tool.
Paint for ceiling plinth
Solving which paint to paint the ceiling plinth, pay attention to the following:
- ceiling plinths from polyurethane and polystyrene are melted with paints, which contains aggressive components. Therefore, choose paints latex, acrylic, water-dispersion;
- the tone of paint should be harmonized with the color of the walls and the ceiling. The desired color, in the case of using paints having a water base, we independently obtain by applying the flaper.
Selection of tools for painting ceiling plinth
We will work:
- brush. Selecting it, pay attention to the width - it should not be wider than the baguit itself, but also very narrow does not fit;
- in the process of painting will have to quickly wipe the splashes, so a rag or a sponge is needed at hand;
- to stained only baguettes, and not sections of walls and ceiling adjacent to it, buy a protective painting tape or tape;
- since the work will be performed at the height, the stepladder will need.
Two color options
Collecting ceiling plinths in two different ways:
- after the baguette is glued;
- before gluing.
The best option is when the ceiling plinth is installed before the wallpaper sticker, then it is placed, and it looks easily, but it is more convenient to paint on the second option, but the installation will become complicated. Painting the cartel on the floor and then installing, the junctions will have to put off, and then dye again.

Rules that need to be observed during painting
Choosing the first way to paint the ceiling plinth, follow the following rules:
- putty or glue must dry completely;
- if there is dust and pollution, we remove;
- if the wallpapers are not yet glued, we start to dive immediately;
- in the case when the wallpaper is already on the wall, protect them using a painting tape. You can protect the wall and a wide spatula, applying it close to the baguette and moving as staining;
- working with a brush, put paint on the outer surface of baguettes;
- the joints should not be allocated after applying the paint layer, and if they are still stand out, then the procedure must be repeated.
Take note: If there is a decorative stucco on the plinth surface, then staining it, make the movement with a brush, imitating the kneading, otherwise the surplus of paint is formed, which will begin to drain.

Well lies on the surface of the ceiling plinth of the water-mounted paint, the trademark Triora (Trior). It applies to its advantages:
- water resistance - surface painted with this paint can be washed;
- vapor permeability;
- no unpleasant odor;
- pronounced shine;
- wide palette of colors.
Apply for painting ceiling polyurethane plinths with stucco and such a toning material, like gllaz belonging to lesing paints. With its help, the usual baguette can be able to give it the effect of metal, stone, wood, and even gold. It goes without saying that a wide ceiling plinth is suitable for painting gllays.
We use gllays

In order to apply gllaz to the ceiling plinth with stucco, it will take:
- caller with gllasa or pulverizer;
- brush;
- sponge or rag.
The order of its application is:
- spray gllas on the surface;
- we take a brush, a sponge or cloth and rub to get a tinted effect.
Patch the ceiling plinth
To make a simple ceiling baguette, like an antique thing, it needs to be patched with gllase. Make it is not difficult:
- we buy gllase having colors Taire and Umber;
- apply the gllashes of color Taire with a smooth layer on the upper and lower part of the ceiling plinth, leaving a non-colored middle;
- now the sponge must be made of decisive in the place of docking the painted area with unpainted. At the same time we remove the outer layer of paint. At the same time, the convex relief will be lighter and brighter, and the recesses will contrast with the color of reliefs;
- for underscore, use the gllays of the Umber color.
Here is a clear example of creating an antique effect on the ceiling plinth: 
Create a stone effect
If there is a large distinguished drawing on our plinth, then it can be given the effect of natural stone, slightly dirty, surfaces:
- glase TAIRE Apply a thick and uniform layer on the surface of the plinth;
- we rub the surface with a brush to form light strokes;
- using the sleeve Umbert, cover the surface with dark spots;
- we are rubbed;
- apply small strokes of dark color, excessive excess;
- we give the surface to dry;
- on reliefs we apply strokes using bronze gllays;
- we leave for drying.
In the room, the design of which is made in the baroque style, it will be relevant to the ceiling plinth with gilding.
Gold plated plinth

It will take:
- glase gold or silver color;
- brush thin;
- rag.
Technology:
- brush dip in gllas;
- we take a rag and remove the paint with the brush;
- we put the brush on the protruding part of the pattern and slowly move it horizontally. In this case, the paint will remain only on the bulges.
With the process of preparing for painting and painting itself, you can read these videos:


