
When it comes to finishing the housing facade, it is important to choose the right material. It is very important that the coating will light up for a long time, while not burned and spoiled. Among the wide variety in the modern market, you can highlight clinker tiles, which will perfectly cope with this task. Technology laying this tile is quite simple, although it has its own characteristics. After conducting all facing work on their own, you can save well.
Content
Clinker tiles. General
The history of clinker tile begins from the beginning of the 19th century. It is believed that it appeared in Holland, where it was used as a finishing material for external parts of buildings. Due to its excellent wear-resistant qualities, the clinker is increasingly used in the arrangement of the facades and basement foundations, protecting the dwelling from the negative impact of weather conditions.

Clinker production
In addition to the facade facing, the clinker was used in the arrangement of the road surface, since it had excellent durability. This material refers to one of the types of artificial stone. Over time, the manufacturing process has changed somewhat, but the principle remained unchanged.
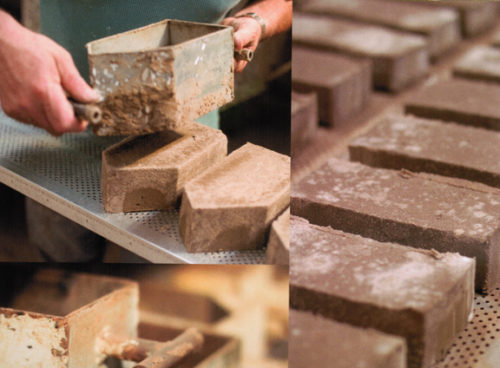
The production of clinker tiles provides the following steps:
- Special shale clay is mixed with reinforcing additives and pigments.
- The resulting mixture is fed to the extruder. In special blanks begin to form future clinker outlines.
- The clay "tape" with a preliminary pattern moves through the conveyor, after which special machines cut it onto the workpiece.
- Moving further on the tape, the blanks go to the furnace with a long-term about 150 meters, after which the roasting process begins.
- The future clinker is burned at a temperature of 1300 ° C, giving its consistency homogeneity and high strength.
- Klinker is allowed to cool.

As you can see, the production of this artificial stone provides for the firing. It is this procedure that gives the clinker tiles the necessary strength and wear resistance. Thanks to these indicators, the clinker is often chosen to finish the foundation, as well as other outdoor parts of the building.
Types of clinker tile
Clinker tiles, as one of the varieties of artificial stone, has a wide range of applications. It is used in the finishing of almost all parts of the structure, protecting it from the harmful effects of climatic conditions. For the arrangement of a particular part of the building or site use different types of clinker tiles.

The main types of clinker include the following:
- facade (is a brick imitation, and is used to finish outdoor parts of the house);
- facing (used both within and outside buildings, representing imitation of natural stone);
- paving slave (imitates the road surface, applying more often in the improvement of the house territories);
- thermopanel (ready-to-ground polystyrene foam stove, with clinker pasted on it. The work of the tile accelerates the process of lining at home, while insulating it);
- outdoor (applied to decorate indoors);
- stages (produced in the form of steps and attacks of standard sizes, speeding up the process of facing the stairs).

Each view is good because it performs its basic function to the desired degree, whether it is a facade clinker or outdoor. The clinker tile will become an excellent choice as a finishing material, because it will last long and ensure proper protection to your dwelling.
Advantages of clinker tile
As can be seen, the clinker is often used in places most susceptible to mechanical or natural impacts. Firing tiles in the production process gives it a number of positive features, allowing us to think about the choice of this finishing material.

The main advantages of clinker tiles are customary as follows:
- wear resistance (various reinforcing additives take part in creating a future tile, and hardening in the furnace only improves this indicator);
- long service life (even under dozens of years, clinker will not lose its presentability);
- protection against weather conditions (has a very low (about 1%) indicator of moisture absorption);
- frost resistance (even under the influence of low temperatures, the tile retains its initial structure, and it does not crack and does not destroy);
- protection against fungus and mold;
- versatility (clinker is applied to cladding both internal and external parts of buildings);
- unpretentious (the coating does not require special care);
- design (a wide selection of colors, shapes, sizes and textures allows you to experiment on any topics);
- the essence of the material (clinker tiles is very low, compared with porcelain stoneware, but has identical indicators).
It is also important to note that this material is quite popular and in demand in the modern construction market. Due to its numerous advantages, clinker tiles are used in the arrangement of most elements of the manor and the local area.
Disadvantages of clinker tile
As you can see, a lot of advantages at the clinker, however, it will be wrong not to mention all the shortcomings of this material, although few.

Clinker tile has the following shortcomings:
- fragility (since in the process of production, the tile is led by quenching at high temperatures, it is able to withstand any negative natural impacts. But it is worth considering that the firing makes the clinker unstable to shocks, since to some extent violates the internal structure of the tile);
- the cost (the manufacturing process is quite labor and the scene. The high cost of this material is written off by the complexity of the production of tiles).
Choosing a clinker tile as a finishing material, you will get high-quality and durable coating capable of protecting your home from most negative factors. Although the clinker has a high cost, but will serve for a long time and will not require much care.
Facing the foundation clinker
If you want to separate the housing facade with reliable and durable material, then the clinker tiles will perfectly cope with this task. By choosing this material, you save the heat inside the room in the winter, while allowing the structure to "breathe". Before proceeding with finishing work, it is important to prepare thoroughly, then the coating will last long.

Required tool
Any work will pass faster if using a special tool that will help to cope with everything much easier.

To qualitatively award the basement base of the foundation, we advise you to acquire the next set of tools:
- mixer, perforator, bollard, tiled machine, drill;
- hammer, knife, ax, hacksaw, stovetur, rubber cynica;
- roulette, level, rule, rally, chopping cord;
- capacity for solution, spatula Ordinary and gear, bucket, scroll brush, bath;
- pencil, Venchik for the kneading solution, cutting stone discs;
- gloves, glasses, special equipment.
Features of work with clinker
In order for the work to be made in compliance with all the basic rules and technologies, it is important to highlight some of the features that may occur in the process of facing the foundation by clinker tiles.

To put the clinker qualitatively, use the following tips:
- each tile has special grooves on the reverse side. Place the clinker, adhering to their directions, then the seam line will be greater;
- interprehensive seams should fluctuate between 5-12 mm;
- temperature at which facing works are possible from + 5C ° to + 30s °;
- do not work in too hot, cold or crude weather. In this weather, it is possible to mount only clinker thermopanels;
- to comply with the direct angle in the transition process from one wall to the other, use special angular tiles, it will simplify installation;
- use frost-resistant tile adhesions, or add a special plasticizer to the mixture.
Preparation of the surface
Before you start laying the tile, you need to carefully prepare the base. Further operational indicators of such a coating will depend on the quality of work on this stage. Please note that the foundation base is in close proximity to the surface of the Earth, there is more often exposed to a wet environment and dampness.

To prepare a foundation for facing, follow the next algorithm:
- Check the surface for convexities and recesses. Cracks make a special solution. Strongly discover parts by the ax or perforator.
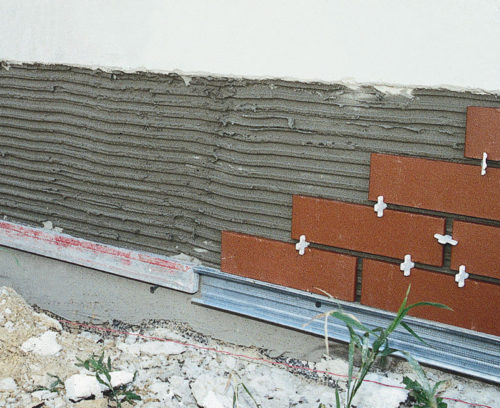
- To increase adhesion - process the foundation of the concrete contact.
- Start insulating the foundation. Use polystyrene foam plates with a thickness of 50-100 mm. On the wall, apply a small layer of glue, commensurate with a plate area.
- Additionally, lock the insulation. Drill the hole in it and insert special thermal lips (umbrellas). For one sheet, 5-7 fasteners are enough.
- Crop the polystyrene foam where it is necessary. Switching from one wall to another, sheets mounted a mustache so that they formed a common straight angle. Total plane periodically check by applying the level and rule.
- Armed with a facade mesh, begin to apply a reinforcing solution with a thin layer. Gradually, press the grid in the mixture so that it is reliably fixed.
- After drying the heat insulating layer, process the foundation with a special facade primer. It will prepare the following layer to the reliable connection.

Use only quality material at the preparatory stage. The primer must be only for outdoor use. Mounting the thermal industry, note that their length should be at least 3 cm greater than the thickness of the insulation. This will help achieve reliable fixation of the entire layer.
Laying clinker tile
Before the start of the facing, first of all, get the clinker from the factory packaging and mix. The tile of tiles in the packages may be varied because it can be produced by different parties.

In order to separate the foundation of clinker tiles, they come as follows:
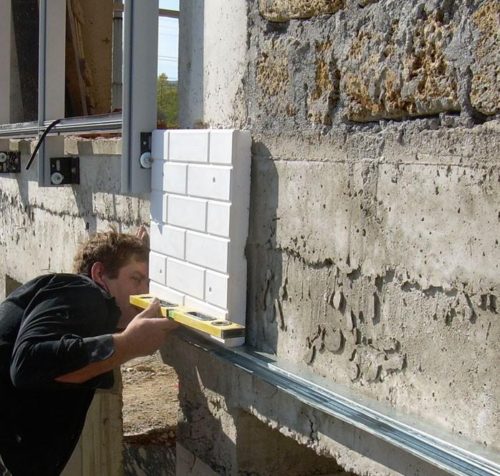
- To set the direction to the wedge, in the base part, mount the starting bar. Note that the plank must be located strictly in the level to the horizon. For this, the UD26 profile is perfectly suitable, which is used when mounting drywall structures as a guide. From how the starting profile will be installed will depend on the quality of further laying.
- Using a toothed spatula, apply glue to the foundation in small areas. Someone in each other, start laying the tile. To comply with the distance, use tile crosses.
- Construction level Measure the plane of each fresh tile. If necessary, pick up the rubber image that the discovered part. If the clinker was drowning in the level, add a little solution.
- Place the tile with horizontal stripes into the dispersion. Do not lay a lot of layers immediately - from the large weight of the clinker and the adhesive composition of the raw coating can be asked.
- To bind the angular parts of the foundation, the clinker is first stuck at an angle of 45 °. Do not be afraid of small chips, which will appear after cut, they can be blocked by the extender.
- Do not forget to check the level of facing every time. By mounting a small plot, arimize the rule and level to check the vertical and horizontal plane.

The process of finishing the foundation by clinker is quite time consuming. This is due to the fact that the tile has a small size, and the adhesive solution quickly solidifies. In any case, such work on the shoulder of anyone who is able to hold the spatula in hand and knead the solution. A little snarling and work will pass quickly and unnoticed.
Shutdown of seams
This is the final stage of finishing the foundation by clinker. Since the seams are wider and deeper than when laying ceramic tiles, then the material will go much more. To begin with, wait for the whole pouring of the adhesive solution, pull all the wedges and crosses. Remove the guide profile. About 3 days will take drying.
Mix the dry dummy with water in the proportion indicated on the package. Fill the empties between the tiles of the finished mixture so that there are no bubbles on the surface. For the convenience of these works, use a special rubber spatula. If part of the bouncing fell on the clinker, it is better to immediately remove it, the rubbed with a damp cloth or sponge.

Choose an extender intended for external work, it has high elastic indicators, and with the onset of frosts will not give the coating to crack. At the end of the sealing of all the seams, give the solution to dry in a day. After that, you can rinse the lined facade with detergent.
To better understand the process of lining the foundation by clinker tiles, we advise you to see the following video:


