Installation of the ceiling of plastic panels is one of the most popular methods of building finishing, in the conclusion of which there is always the need to close the gap formed between the ceiling and walls. For this purpose, plastic plinths are well suited. They will successfully look as a decorative insert, as they have external similarity with stucco. But this material is quite budget and has good performance.
Content
Advantages of plastic plinths
The ceiling plinth plastic has a number of features that determine the popularity of its use in construction work. Consider such parameters in more detail:
- ceiling plinths allow you to solve two tasks at the same time: installation of panels and decoration of the ceiling;
- polymer baguettes do not require special care, and also do not absorb unpleasant odors;
- an important advantage is that the presence of plastic plinths does not create restrictions for ceiling panels. This contributes to the protection of the ceiling of deformation;
- such products do not absorb moisture, which is positively reflected on the period of their operation;
- the material is characterized by simplicity and speed of installation;
- the advantage of plastic plinths is also a relatively low cost of material.

Plinth selection parameters
The ceiling plinth for plastic panels in length is always a standard value in 2 m. However, the situation with plinning width is different - this indicator may vary from 1 to 20 cm. In order not to be confused with such a variety, consider the features of the use of wide and narrow ceiling installations:
- Wide baguettes help visually smooth the angles of the room, disguise defects, which, as a rule, arise at the stakes of the ceiling with walls, as well as hide the gaps of the suspended design.
- Narrow plinths are decorative and used for cladding perfectly smooth ceiling.

Choosing the size of the products, it is necessary to consider the height of the ceiling, since the price of the ceiling plastic plinth will depend on it:
- for a low ceiling, preference should be preferred by narrow plinths, since the wide in this case will look too cumbersome and the level of ceilings will be further reduced.
- it is recommended to use the cartel not wider than 35 mm;
- before mounting the plastic ceiling plinth on a high ceiling, you should choose a product with a width of 70 mm and more;
- on the middle ceiling height of 2.5-3 m, the cartel widths from 40 to 60 mm will be width.

After selecting the width of ceiling baguettes, you should think about the color scheme in which they should be selected for the overall design of the room. To determine the most optimal option, you need to take into account such moments:
- For the middle and low height ceilings, white plinths will be the best choice. This color visually extends the room.
- Dark shades cartel will look good at a high ceiling, as the room will look lower.
- Also, no more than 3-colors in one room should be combined, in this case the space will look too much.
- Black and white shades will be successfully harmonized with any palette of the interior decoration. Plinettes of contrasting colors will look quite effectively. But in this case, the palette of the products must coincide with the color of some interior detail.

And in conclusion you need to decide on the form of ceiling baguettes:
- Extremely harmoniously, complex embossed shapes of panels look. But they will be appropriate to look only in the presence of an expensive stylized premises.
- More versatile are plinths with simple uncomplicated lines. They will suit the finish of any style and direction.

Recommendations before starting work
In order for the installation of plinths to be accurately and had an aesthetic appearance, it is necessary to take into account such features of the process:
- For high-quality execution of work, it is originally necessary to measure the length of the room in which the laying of plinths will be carried out.
- The installation process should be started with room angles. At the same time, you need to take care of the disguise of the joints. To do this, you can purchase specially intended angular details or independently perform corner correction.
- If necessary, the surface should be aligned with a putty. In some cases, the installation of products on top of wallpaper is also allowed.
- The installation process has its own characteristics depending on the type of wall. On walls made of wood Material Breppy using wood screws.
- If we are dealing with the surface of the walls of plasterboard, then the screws should be used for the attachment. Such mounting elements are allowed to fix on a metal frame profile through facing material.

Installing a plinth with a channel for a cable
This method of installing plastic ceiling plinths assumes the presence of a channel for laying cable networks. This is a pretty practical solution, since it is possible to conduct or remove the cords of the phone, the Internet cable or communication of television. And at the same time there is no need to dismantle the plinth. This installation technique has its subtleties:
- The location of the connection is covered with a lid, which is easily removed.
- The material strips are connected using angular connectors.
- Installation of ceiling plinths This method will require the installation of certain clips.
- Clips are installed near the wall, retreating several millimeters. This will allow stationary cables in the resulting space.
- It is advisable to initially place the wires, and then mount the plinth. It will provide an opportunity to replace the desired cable, unscrewing the product fragment from the clips latch.

Aesthetic Mounting Mounting Plinth
The fastening of the plastic ceiling plinth is allowed in such a way that does not provide for the installation of internal and external corners, as well as connectors. This method does not match the manufacturer's instructions, but has advantages in aesthetic terms and looks more neat. Consider the detail order of manipulations:
- It should be paramount to remove the cable channel.
- After that, the edge of the adjacent plinths cut off at an angle of 45 °.
- Then you need to insert the channel for the cable to the provided place, while its middle should be on a slice of two plinths. This will be an additional support for mounting the material.
- Next, you need to cut the canal on another plank in half and paste on both sides of the design.
- Installation of plastic ceiling plinth completed.

Fixing the ceiling plinth on the dowel
This method is the most common when installing plinths and implies the following actions:
- Starting from the angle of the room you need to install 2 material strips.
- Then using a drill, make a hole in the plinth, and with the help of the perforator, we do a hole in the wall.
- To avoid difficulties with dismantling work or with the redistribution of cables under the plinth, it is important to attach a limiter to the perforator, which will be more than 5 mm than the desired depth of the opening.
- Such a limiter is quite possible to make it yourself. For example, you can secure the tape on the drill a small piece of the tube. Or stick the tape to the required drill length. The fastening size is determined depending on the strength of the walls and material.
- After that, in the finished holes we drive the dowels and screw the baguette bar with screws. It is necessary to take care of the recesses on the bar in the place of each hole for the screwdriver. This can be done using a drill that will be larger than that we used. In order to avoid deformation of the plinth, screw the screws as neat as possible.

With this method, the installation of the place of attachment is clearly visible, which negatively affects the aesthetic appearance of the finish. To improve the situation, the most appropriate option will be gluing plugs for screwdrive caps, the color of which will be identical to the color of the plinths.
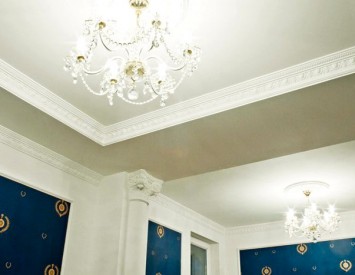
Stock Foto Plinth ceiling plastic:

How to trim the plinth
An important point in the process of installation of plastic plinths is the correct trimming of the corners of the material and its dusting on external and internal angles. In contrast to other types of plinths at the ceiling baguette, the mounting angle to the base is 38-45 °. Because of this, in the joints of the joint to make a cut at 45 ° difficult. To work carefully, it is necessary to adhere to such recommendations:
- Plinths should be cut off from the front side, as well as at the outer edge.
- If it is necessary to make the outer corner of the trimming, we perform from the inside.
- After the pruning procedure, the texture of the eaves on the outer and the inner side should be viewed.
- After the side sections are made, plastic plinths should be performed to the ceiling and, if necessary, be corrected.

Tools for execution will be required as follows:
- sanding saw;
- stuslo.
Using them, you can get a fairly accurate result, you will only need to set the required parameters and perform pruning. Handling and manual stub are suitable. But as a result of the application of these tools, the risk of material damage arises.

Before installing plastic ceiling plinth, you need to know the following features of working with tools:
- Stuslo apply if the ceiling and walls indoors have a flat surface. We make a cut at 45 °.
- Then we carry out a similar slice on the next plinth, but in the mirror reflection.
- If the walls and ceilings are uneven then the dummy knife is required.
- Plinth, as in the previous case, cut off at an angle of 45 °.
- After that, we perform the fitting of the sliced \u200b\u200bpiece and the next fragment.
- Thus, cut corners in all plinths.
Instructions for fastening plastic plinth presented on video:


