
Garden tracks - the first thing that sees a person by entering the site. As a rule, at first they appear completely spontaneously and almost independently - the owners themselves simulate paths to strategically important objects. However, with the first rains, this state of affairs ceases to delight and bring convenience - neat paths turn into a dirty mash, moving around which is very uncomfortable. Therefore, sooner or later the question arises about the manufacture of a garden path. Moreover, it is always extremely desirable that the costs of this event are minimal. In this article you will learn how cheap and beautifully lay paths on your site.
Content
Types of garden tracks: choose suitable
The types of garden tracks exist so much that there would be no one hour for the listing, so we decided to stop only the most practical, inexpensive and easy-to-manufacturers. Fortunately, materials suitable for this are more than enough. Most designers converge in the opinion that the garden tracks followed by the material from which the residential building was built - this technique allows you to create a harmonious general view of the site. In addition, after the construction, it certainly remains a bunch of surplus: boards, logs, stones, bricks, cement ... Do not rush to store all this in the barn, and let it go to the construction of comfortable tracks before the rainy season occurs.

Garden trails
Garden paths are exactly the natural phenomenon that we have already managed to tell. If you live in an arid climate region, they may well serve year-round, without delivering special inconveniences. However, the inhabitants of the middle strip, such happiness does not shine - they still have to take tools and materials in the hands, in order to come up with something more practical.

The garden path can be used as a temporary option or leave a couple of short tracks to flower beds and a garden, visiting which is relevant only in the warm season. To enjoy and highlight the path, you can post on its edges of cobblestones, bricks, stick glass bottles with tornbeams down or plant so-called border plants.
Tracks from backfill
One of the most budget options is a gravel snowflower. To make such a route, you need to dig a trench of a comfortable width of a depth of about 10 cm, to eliminate the bottom and walls with geotextiles, strengthening it on the sides of the curb ribbon. From above pour rubbank, screening, pebbles or marble crumb. Here, in fact, all. It remains only to take the resulting embankment.

If this option seems to you too simple, you can put a large stone or concrete tile on top of the mound. This method will be described in more detail below.
Concrete fuses
If you work on the site with a large and heavy garden equipment, the tracks are regularly subjected to serious loads, and with the first rains of the wheel will certainly be lit in the blurred soil. The best solution to this problem will be the fill of the path of concrete. But the gray coating may seem too boring and ugly, so we propose to "enlarge" with decorative elements: tiles, pebbles, mosaic, multi-colored glass, found on the sea shore, etc.

How to make a garden track from concrete:
- Make on Earth markup, designating the width and length of the future track.
- Drop the pit in accordance with the marking depth of about 10 cm.
- At the bottom of the trench, put the sand with a layer with a thickness of 5-6 cm, sprinkle with water from the hose and how you follow.
- Build a formwork along the entire length of the track by setting the board or plywood frames at a distance of 5-6 cm apart. The width of each frame should be the same as the width of the track. Optimal dimensions for concreting in this case: 60x60 cm.
- Prepare a classic cement-sandy solution in proportion 1 part of the cement is not lower than M300 on 3 parts of sand. First, mix the bulk ingredients, and then gradually add water until the mixture reaches a homogeneous consistency of thick sour cream.
- Pour the solution into the formwork and wait for it slightly back.
- Lay out on the surface of decorative elements, slightly drowned them in concrete.
- Leave the track to dry for 2-3 days.
- There are unpretentious lawn plants between the plates.
This, perhaps, can be attributed concrete paths created using special forms. You can buy such in any construction store, having spent pleasure no more than a thousand rubles. But that the case is moving quickly, it is better to purchase 3-4 forms.

Useful Tip: Most of the forms for tracks have standard dimensions of 60x60 cm, which is quite enough for a narrow path, which is convenient to walk on foot. But if you need a way to sew, just use two forms, placing them in bulk - it turns out a 120 cm wide trail. Some masters prefer to make shapes for garden tracks with their own hands, which allows them to move away from standard forms and sizes.
How "works" form for a garden path:
- Make marking on the ground to designate the length and width of the future track.
- Drop the trench over the entire length of the track depth 10 cm.
- Thoroughly align and confuse the bottom.
- Clean the gravel or rubbed layer with a thickness of 3-4 cm.
- On top of the rubble, pour 5 cm layer of fine river sand, sprinkle with water and sink.
- Lubricate forms for tracks by working or machine oil. If it did not find it, you can use the cheapest vegetable oil.
- Set shapes on the sand.
- Mix the solution from 1 part of the cement is not lower than M300, 3 parts of sand and 4 pieces of rubbank. It is even better to add a special binder for foundations. Then portion pour water to bring the mixture to the desired consistency. If you want to make a color track, add a special dye.
- Arm yourself with a crash and fill in forms to the very edges, trying to prevent the appearance of air emptiness inside (they reduce strength well).
- Remove the surplus of the solution with the help of a plastic rack-rule and leave forms at rest for 30-40 minutes.
- Gently lift the shapes so as not to break the barely clutched concrete and repeat the procedure, thus moving along the entire length of the trench. If you need to smear the shape of oil before pouring them with concrete, they are separated quite easily. Do not forget to lubricate them every time.
It is now important to gain patience and drive away children and pets from a frozen track next 2-3 days.
Wooden log paths
One of the most inexpensive and adorable gift of options is garden paths from wooden storage, boards and sleeps. If the climate in your region is sufficiently dry, you can safely take care. To create such tracks, it is best to choose solid wood, ideally - larch (it is not susceptible to rotting). The level of tracks are usually slightly raised above the ground, so water is not delayed on their surface and the dirt is not lowered. As a support, massive bars impregnated with antiseptic composition, which prevents rotting.

Brief instruction on the creation of a tree track:
- Make marking the future track.
- Drop the trench in accordance with the markings of a depth of 10 cm.
- On an even tampering earth bottom, pour a layer of gravel or rubble with a thickness of 5 cm.
- On gravel, put the wooden flooring with a distance of 1-2 cm between the elements. If you put them with a bunch, the code will delay in the cracks and will rather spoil the wood.
- If there are old trees in the country that it's time to cut, they can be launched on beautiful and unusual tracks. Split trunks on round and lay out the garden tracks. You get a kind of wooden tiles. Very nice these elements look on the lawn when the grass is green breaks between them. The gaps between the large kruglyahami can be filled with gravel or small branches Spila.
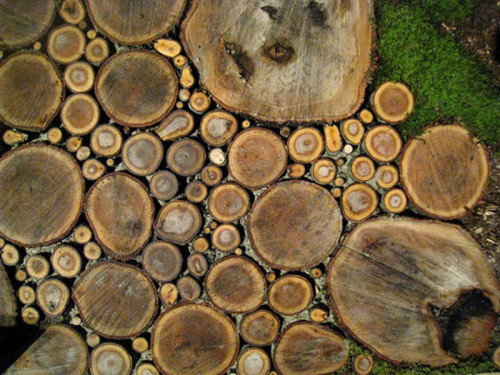

To extend the life of wooden tracks, all elements need to be soaked in hot oil twice, and between the gravel pillow and the soil put geotextiles. Below on the video - garden paths with their own hands from Wooden Speils:
Walkway in the garden with your own hands: master classes
In this chapter, we will tell you in detail how to properly make neat tracks and to harmoniously entertain them into the natural landscape. As you will soon make sure, it is not necessary to use expensive materials at all, and the gifts of nature are in the last master class and at all.
Large stone tile path
This path will like those who prefer simplicity bordering the primitiveness. Large stone slabs, between which the lawn grass makes the looks look very unobtrusively and at the same time are a functional and convenient element of the landscape. Stacking technique will not require inhuman physical exertion or abundance of consumables. To work, it will take directly a large tile, paint in an orange or white canister (for contrast markup), a building water level, a shovel, roulette, river sand and several boards, the length of which is equal to the width of the track.

How to make garden tracks with your own hands with lowest costs:
- Make marking the future track. To do this, laid wooden boards (width of the track), and stretch the twine or hose along them along it). The distance between the boards should be about 50 cm.
- Along the twine or hose, swipe the paint line from the cylinder, after which you can remove the auxiliary elements.
- Calculate the total area of \u200b\u200bthe path in m² and prepare the required number of plates.
- Spread the plates as you would like to see them in the final result. It is absolutely necessary to put them smoothly - it is best to scatter as chaotic, but at a small distance from each other so as to create the effect of a casually folded mosaic. Try to withstand the distance between the plates of 8-10 cm.
- Each slab circle paint from the cylinder.
- Lift one of the plates and set aside. Now, with the help of a shovel with a rounded edge, carefully remove the top layer of soil along with grass and roots. First, push the turf on the markup, and then picked it up and cut it. You must have a neat hollow in accordance with the plate shape.
- Put the slab in the hollow and continue this exciting occupation until all the plates are slightly recessed in the grass.
- Thoroughly confuse the plates and check that they are located at one level. If some of the stones are higher than others, you will definitely all the time stumble about it. If necessary, remove the desired amount of the ground or sleep the sand onto the bottom of the hollow.
Stones will be lost in a completely natural way. What is convenient - you can immediately walk on the track, without waiting for drying and not afraid to destroy it with a careless movement.
Ground path with square plates
Such a garden track in the country can visually expand and "unload" the space. Unlike the option described above, it looks more neat and modern. It also does not require any special skills or great efforts. The most important thing is to make a flat marking in width and length, after which find the area and buy enough material. For example, if you want to make a three-cm width path and a length of 8 m, then its area will be: 1 * 8 \u003d 8 m².

To work, you will need square stone plates 30x30 cm, crushed stone or gravel for drainage pillows, river sand, wooden pegs and twine for marking, roulette with a level, shovel. You can use a special vibration tool for tamping, but if you failed to find such a common heavy log. Also resourceful craftsmen tie wide boards to the sole of shoes and walk along the surface, adding it their own weight.
Important: Hold the distance between the plates and the edges of the track 8-15 cm to provide high-quality drainage and ventilation.
Share such a track is very simple. First, make marking with pegs and twine, then drop the trench, see the bottom, pour sand and rubble, and then confuse again. Put the plates, plunge the gaps with rubble and again sink, slightly watering with water from the hose.
Gallery garden track
The tracks from concrete slabs are good, but these plates need to be bought in the store, and then it is also somehow delivered to the site. If you fell happiness to live near the river or the sea, whose bank was covered with solubular smooth pebbles, we suggest you to use this master class. Please note that there is a general installation technology that will help firmly fix items. But in what order to do it and what patterns to lay out, solve only you. At the end of the article you will find a photo of garden tracks of such a plan, which may inspire you to create masterpieces.

So, you need the following for work:
- pebbles (stones of different sizes and shades);
- fine sand;
- plywood;
- cement M300;
- gravel crumb;
- building level;
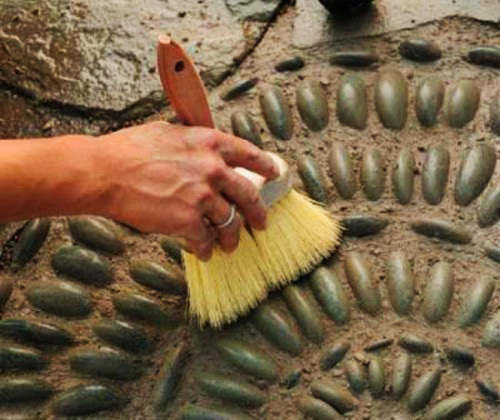
- rigid brush;
- wooden kiyanka.
Before proceeding with the work, take a bunch of pebbles brought from the shore, take a couple of hours and thoroughly sort the pebbles in size and color scheme - it is very useful and save a bunch of time if you want to create a beautiful pattern, even the easiest. Rinse the stones from dirt - you only need to work with clean material.
Useful Tip: If you want to lay out a path with a pattern or pattern, it is better to sketch in advance on paper. After that, on a piece of plywood or tarpaulin, lay out an exemplary drawing of stones, having them as you see them in the final result. Then take a picture of the song and try to reproduce it already when finishing.
Styling technology:
- Make the markup of the future track and dig a trench with a depth of about 20 cm.
- At the bottom, put a mixture of gravel crumb, cement and sand with a thickness of 5 cm. (10 m² of the track goes about 1 bag of concrete mix).
- Pour the powder from the hose so that it stops dust.
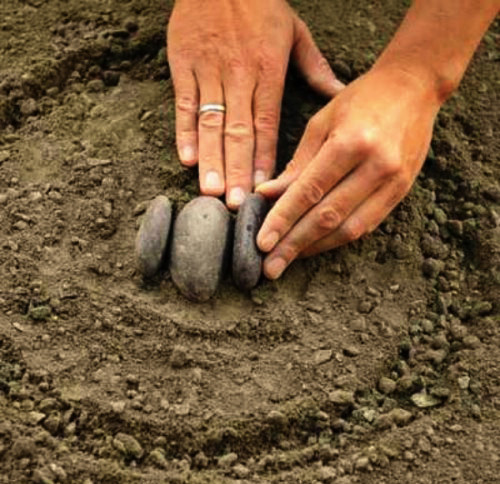
- If you will lay out the mosaic circles, use the proven cunning - tie a rope to a long nail or pencil, place its opposite end to the alleged center, pull and scratch on the ground a smooth circle, having spent a nail (pencil) around the circle with an equal tension of the rope. By changing the length of the rope, you can make circles of different diameters.
- To reliably fix the pebbles, jump the first elements in concrete by a third. The first stone should always be put strictly vertically.
- Around the first stone in the center of a small shovel, you need to dug small holes in which the drawing is given methodically.
- Make sure that the joints between the elements are most durable, and the stones fit tightly to each other.
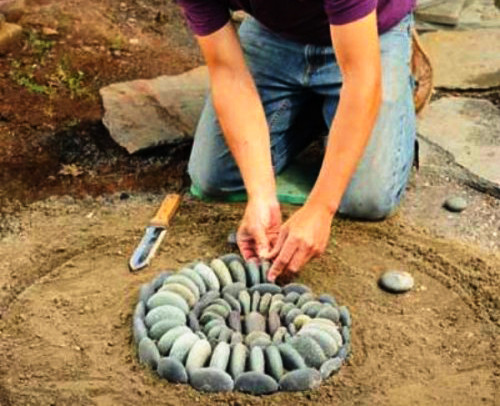
- Constantly check the level horizontal laying is the most important thing. Otherwise, you will constantly stumble on the track and very quickly choose interfering stones, violating the composition. To adjust the height, knock the stones in the Cyonya.
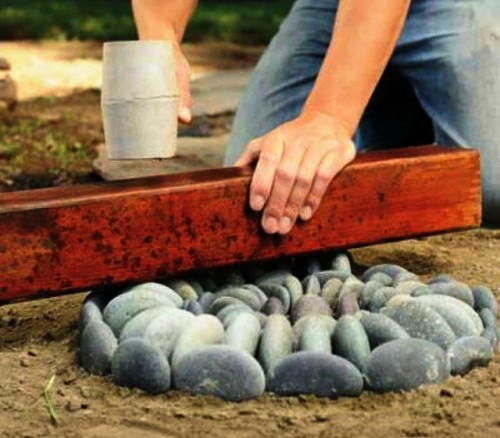
- After completing the composition, make the frame of the track from large stones, tiles or bricks so that it acquires a neat and completed view.
- In the slot between the stones, fall asleep cement with fine sand, moisten and cover on a day with a polyethylene film or a tarpaulter so that the concrete is as impregnated with moisture, but not dry.

- After a day, hammer the concrete mixture between pebbles so that only a third is in the outside, and two thirds were underground. If you score concrete even more so that only the tops of the elements look out for out, this path will last longer.
- Once again, how to moisturize the concrete, watering it from the hose. If he gives a strong shrinkage, add the desired amount of the mixture.
- Take a hard brush (not metallic) and form neat seams between pebbles.


Eat the almost finished path of the tarpaulter and leave for a couple of days. Fully mosaic will dry only in a couple of weeks, so you are taking patience and try not to destroy beauty ahead of time.
Useful advice
As you can see, there is nothing complicated. You can take advantage of the infirred materials and gifts of nature or just buy plastic garden tracks, without bothering yourself with physical exertion. By the way, such products are distinguished by mobility, not inherent in the above-described analogs - they can be removed in dry weather and at any time lay in any direction.

Finally, we suggest familiarizing yourself with useful tips, which can be useful when creating tracks in the country:
- Stepper trails look very careful. Such tracks consist of scattered elements, for example, large square or round plates, stones, wooden sleeps. But to transport garden equipment on them is strongly inconvenient - they are suitable only for hiking.
- Feel free to use a variety of materials. The stone is perfectly combined with a tree, so gravel looks harmoniously with boards and logs, and narrow tracks from pebbles can scatter from the central slab trail.
- Before starting construction, especially if concrete is involved in it, ask the weather forecast. Best of all, if no precipitation is foreseen in the coming week. Then the track will have time to dry completely and how to harden. But for simple crushed stone springs, a short "mushroom" will be quite by the way - it finally complies the surface and will digest dust.
- If you like natural asymmetry and a variety of forms, use a natural untreated stone. It turns out beautiful curved tracks, looping between fruit trees and berry bushes.
Whatever the track you can build, you need to carefully care for it, otherwise the joy of walks on clean flat paths will last long. All the necessary information on this issue can be found in the article. "Care for a garden path".
Garden tracks do it yourself: photo
We have prepared for you a small photo crying, in which you tried to fit the most original and, most importantly, the examples of garden tracks implemented in practice.


