With the advent of a new family member, each parent buys only high -quality clothes and toys to his baby. Parents have to acquire many things for their child, including children's furniture. Unfortunately, choosing something suitable is not always real: if the price is acceptable, then the quality does not live up to expectations. And when the quality of children's furniture meets all the requirements, then the cost of such a stool for feeding is too high. For the head of the family who knows how to work with a tree, it will not be difficult to make such furniture independently.
Content
The tables for feeding babies are different, in this article we will consider how to make a transformer for feeding the children's table. This model is successful with most parents. The basic requirements for children's furniture are the choice of quality materials, safety and strength of the structure.
What materials are needed
Reliability and safety are the main thing that must be taken into account not only when choosing finished furniture, but also if you decide to make something with your own hands. The table should be stable, the surface (countertop, seat) and all other details - smooth, without cracks, bulges and other visible defects. Since you will have to work with natural material - wood, you need to come thoroughly to choose the basis for the manufacture of children's furniture. So, for children it is better to choose soft rocks: pine, spruce or lip. It is easy to work with such material, by the way, linden is more durable than coniferous wood.
Before proceeding to cutting the workpieces, it is necessary to carefully inspect each board and just in case process the surface with fine -grained sandpaper.
In addition to sandpaper, it is necessary to prepare tools for wood work: this is a standard set of carpentry tools, as well as fasteners (nails or screws), plus select safe paint or varnish (we pay attention to the packaging, we need varnish or paint “not toxic”). Acrylic paint is also suitable. Be prepared for the fact that your baby will not only use furniture to eat, most likely, he will even try the tree “on the tooth”. So we approach the choice of finishing materials as responsibly as possible.
Types of children's chairs for feeding
Reaching six months of age, the child begins to show interest in food, parents are increasingly taking the baby with them. It is still not able to sit on the chair on the chair, it is difficult to hold the grown peanut on his hands, so the baby needs to be put in a special stool table. There he will be comfortable and safe. Mom may not worry, her baby will not fall, since in different models of chairs for feeding there are fixers - special straps that hold the fidget.
The principle of children's furniture intended for feeding babies is the same - as a rule, a universal structure - the table can be made high so that the baby is at the same level with parents at the table. Mom and dad are more convenient to feed the baby. You can fold the chair, then the table will be on the same level with a chair. This option also likes parents, you can feed the child and leave to sit at the table so that he plays a little.
In stores you can see different options for children's tables and chairs made of strong plastic, metal and wood. The principle of everyone is the same, only there are classic chairs - tall, but there are transformers. As the child grows up, the chair can be used not only for feeding, but also for games and classes. The transformer stool is very practical and will help parents, starting from 6 months of age, up to the first class.
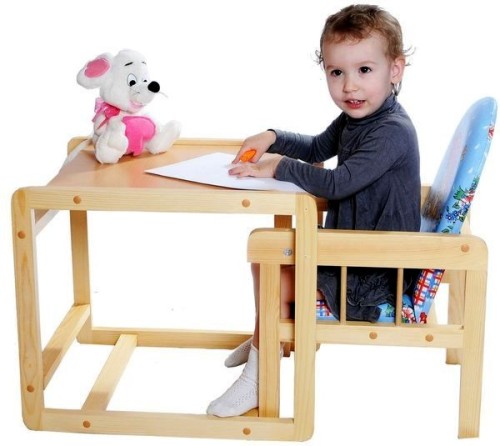
Pay attention to several options for children's tables for feeding - transformers. Photo:
How to make a children's table for feeding children
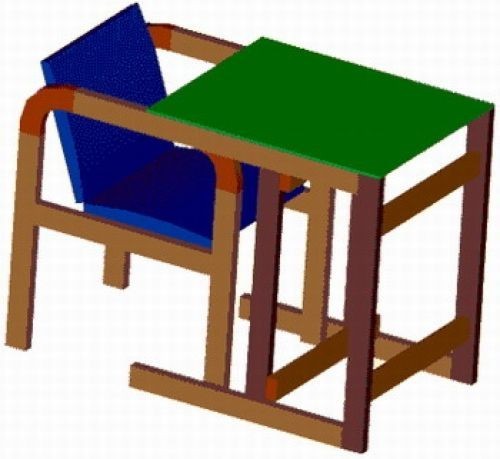
We offer to make a universal table and a chair for feeding children independently, which can also be used as a desk for classes (when the baby grows up). For work, you need to prepare a wooden beam (section 40 x 20 cm), as well as whole boards (with a thickness of 2 cm). In addition, you will also need a sheet of fiberboard (standard sizes).
The beam is useful for cutting the supporting parts for the manufacture of a stool, rounded parts need to be cut out of the board (taking into account the handles for the chair). Sitting will make a fiberboard from a sheet (you need to cut out the seat of the desired size), as well as for the table. By the way, another material can be used for the table. A plywood sheet, chipboard with the effect of lamination or classic is suitable - wood.
When there is no way to purchase all the necessary materials in the store, do not postpone the idea of \u200b\u200bmaking a children's table for feeding for your beloved child. For work, you can use old boards (only so that they are not rotten), disassemble the old wardrobe or chair. In any case, each owner has not only the whole tool at home, but also the material. Only if you work with old materials, then pay more attention to the preparatory process - each part needs to be carefully processed, smooth all the irregularities and remove flaws.
What is needed for the manufacture of a chair:
- for the legs, you will need a wooden beam 40 cm long - 4 pcs.;
- rounded parts need to be made 4 pcs.;
- for the manufacture of the crossbars, a beam is also suitable, 35 cm long - 2 pcs.;
- for the upper crossbars, cut the beam into 2 equal segments, each 22 cm long - 2 pcs.;
- transverse crossbars, size 30 cm - 3 pcs.;
- count of a countertop (size according to the drawing) - 1 pc.
To make the table, prepare the following:
- for legs - wooden beam (length of 50 cm) - 4 pcs.;
- planks-40-41 cm-4 pcs.;
- transverse planks - 35 cm - 4 pcs.;
- counterbox (dimensions 38 x 45 cm) - 1 pc.
How to make details correctly
Preparatory work is the most difficult and painstaking, not tolerating fuss. Therefore, we are storing patience and begin. In order to find parts of the desired size, you will need to cut a wooden beam. All, without exception, the details need to be treated with sandpaper.
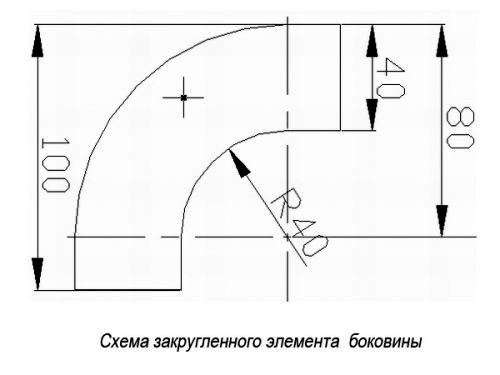
To get rounded parts, you must first transfer the drawing with a pencil onto the board and according to the scheme, carefully cut out all the parts according to the markings.
Attention! In order for all the details to be strong, it is necessary that the wood fibers are located perpendicular to the corners of the rounding.
It is necessary to combine cut parts using fasteners and additionally treat all places with furniture glue.
If you use dowels as fasteners (furniture “chopic” made of wood), then first you need to drill holes in the tree, a recess of 3-4 cm.
Assembly of the side parts
First you need to collect the right side (or left, this is not fundamentally). We will prepare the following details:
- rounding - 2 pcs.;
- legs - 2 pcs.;
- crossbar (lower and upper).
First you need to prepare the connecting elements (wooden doughs) and smear fasteners with glue, as well as holes. Collect the legs and combine with the lower stool crossbar. Check the result of the work, you can use the construction corner. It is very important that the corners are the same (90 oWITH).
Now we collect the upper crossbar: connect it to two roundings, smear it with glue. We expect when he grabs to continue his work. It is enough to wait only 30-40 minutes, and then pull the finished structure with a clamp. Leave the workpiece for at least a day so that the tree is dried.
The assembly of the second sidewall is carried out in the same way. Do not forget to process the sides of the chair with sandpaper (at the initial stage in the preparation of parts).
Collect sitting and back
Prepare 6 identical parts (can be cut from chipboard), dimensions of 30 x 25 cm. Carles (two) round so that the radius is 0.5 cm. The ends of each workpiece must be cleaned so that they are smooth. Take 3 identical parts, smear well with each glue, connect and put any heavy object on top. We need the workpieces to be firmly interconnected. We made a seat.
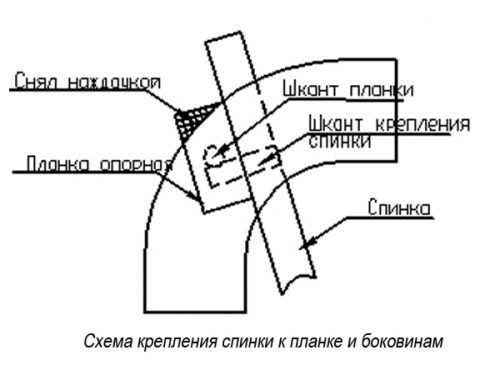
Now the back is cut out the desired workpiece and fasten it with sitting with screws and corners. 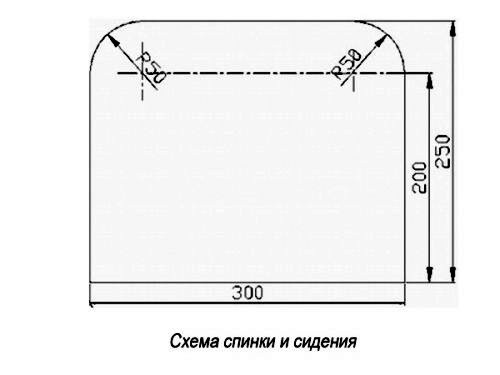
We collect a chair
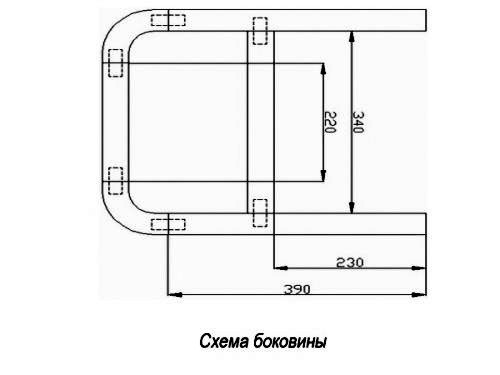
Ready sidewalls must be connected with strips (length 30 cm). In order not to get confused, you need to make marks with a simple pencil and drill holes for fasteners (furniture doughs).
Now the bar: they also need to drill holes (4 pcs.), And in the bar, which holds the back of the chair, also make the same number of holes (2 pcs. In the end and 2 in the bar, which must be attached to the back).
In the lateral details, you will need to make 2 holes to fix the bar and back, and another 2 to attach the countertop.
Do not rush to immediately connect everything completely and smear with glue - first make a control assembly to see whether you have collected everything correctly. If everything is true, there are no distortions, then you can put all the details on furniture glue. Wait until the glue dries. And only after that you can finally polish the surface, and then apply a layer of paint or varnish.
Assembly of the table
Now you need to assemble another part of the transformer table-to assemble the table. To do this, connect the legs to the lower and upper bar. The length of each bar is 41 cm. The lateral parts must be fixed using transverse strips (the length of each bar is 34 cm). On the right or left side, you need to install and fasten the countertop.
Now you need to do similar actions and collect the right side of the table, indicate the place for fasteners, drill a hole to insert wooden plugs.
It remains to collect the rest of the details, check each angle for the strength of the connection and only after that you can smear each part with glue. Then you can start assembling the side parts. To do this, you need to fix these parts with transverse strips so that they are located to each other. Everything, you can insert a countertop, and then walk along the entire surface of the table with an emery skin. Now it remains to be treated with varnish and this part of children's furniture - a table for feeding.
This is perhaps that’s all, but there are some nuances. We ourselves love to have breakfast, dinner and dinner as comfortable as possible. This applies to sitting places - adults choose a kitchen corner or stool with a soft seat. For a child, you will also need to sew a soft seat. To do this, you need to cut a square of the same size from the foam rubber as the seat of the chair, tighten the foam with a soft cloth, and best of all, artificial skin so that caring for children's furniture does not take much time. If there is no foam rubber, fold a synthetic winterizer in several layers, wrap it with a dense fabric and a furniture stapler, fix the edges on the inside of the stool.
A wooden children's table for feeding is ready, you can plant a baby and feed with delicious porridge.
Children's table for feeding. Photo:
We suggest watching this video material to get acquainted in more detail with the stages of creating a children's chair:
Simplified version of a children's chair
What to do if it is not possible to independently make a full wooden stool for feeding a child? You should not despair, do this option independently for each mommy. Let's sew a device for feeding a child from the fabric. The cost of such a simple, at first glance, soft chair in children's stores is quite high, but we will try to sew it on our own. Such a soft stool will help out, vehicles and travels.
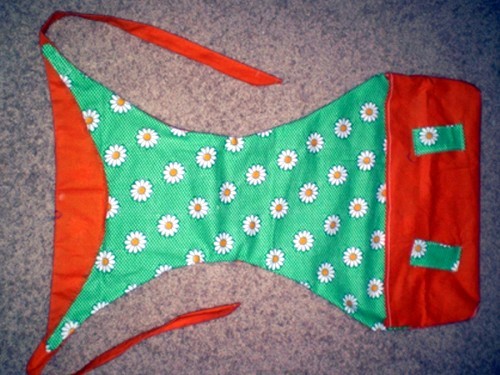
Outwardly, the design is quite simple - this is a soft cover with holes and straps. It is put on a standard chair with a high back and fixed with fasteners.
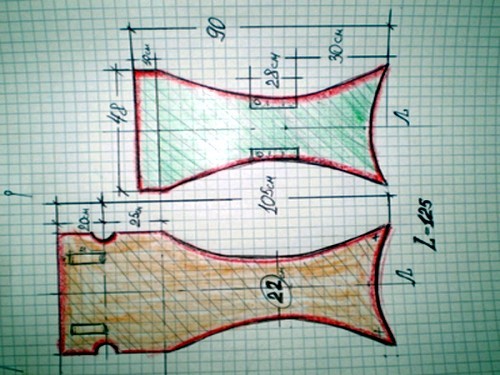
The scheme of this uncomplicated device is quite simple: only 2 details are a case for a chair with the so -called pocket and two holes - to put the child inside.
What you need to cook for work:
- dense fabric. Cotton is suitable, you can take old jeans or a linen shirt. Prepare 2 m fabric;
- strong braid - 3 m;
- carbins-rifles-3 pcs.
You will also need needles, threads, scissors, a centimeter ribbon, a pencil and a sewing machine.
Once again, carefully study the scheme of cutting the fabric. The width of the pocket in which the child will sit should be equal to the width of the back of the chair. The diagram shows standard dimensions, plus/minus 2-3 cm with a margin so that you can attach such a chair to a car or a chair while visiting.
The fabric can be used by any, nothing terrible if it is cuts of fabric of different colors and textures. You need to find only 2 parts and sew them with each other with a simple seam. It is desirable that the dense fabric is inside (this is a smaller part), and the lining is located outside (large part).
And once again we look at the pattern carefully - we see that there is a fold at the top. This means that the fabric in this place needs to be tucked and stuck. You should get a handbag without handles or a bag. It is put on a chair and tied a strong braid (you need to add in advance). Do not forget about barriers - they must reliably hold the baby under the handles. The straps from the shoulders should not fall, then you can not worry about the safety of the child during feeding.
Do you have children or you are only standing at the planning stage, in any case, both options for feeding will not interfere with you: the first will always help you out at home, and the second you can take with you if you planned a visit to your parents, friends or go on a trip .

