
Wall shelves are replacing bulky furniture. Today more and more people prefer the compact and ergonomic design, allowing to accommodate a maximum of items. Wooden shelf, made with his own hands, will give your interior a touch of individuality and creativity as a self-made shelf can be the embodiment of your most unusual requests.
Content
Description of shelves of wood
Before you start tinkering shelf made of wood, you need to understand what it represents, this piece of furniture, and what kinds of shelves there.
Most standard shelf in any apartment or house are almost indispensable accessory that plays a role as a decorative ornament and the most sought after piece of furniture. In the office, on the shelves are folders and documents in the kitchen - dishes and other kitchen utensils, and shelves in the hallway are the repository of all sorts of materials at hand: lipstick, gloves and keys. Externally it presents a furniture article, which has no front wall, which is made from different kinds of raw materials and is intended for storage of various items.
Classic material for the manufacture of shelves is a tree. It is easy to operate with wood and process, and its service life is quite large, provided that the wooden shelf will be in optimal conditions with minimal humidity. At the same time, the advantages of this material are obvious. First of all, it is: high quality finished product, strength, durability and, importantly, environmental friendliness.
As a rule, the shelves are mounted most often there are wooden, in view of the fact that they are pretty strong and hardy. Additionally processed with a protective coating, which is capable of listening to you for many years.
Photo of wooden shelves made with compliance with various stylistic solutions, you can view below.


Types of shelves
Shelves are:
- Wall.
Such shelves are usually placed above the desktop, sofa and bed. They are usually attached to the brackets that, in turn, are planted for special pins.
The walls are divided into:
- classic. The most common shelves due to the simplicity of their design and ease of installation. There are both square and asymmetric;
- outdoor. They look in the form of supports for shoes, relevant in large rooms, corridors and hallways. It can be a shelf for shoes of different sizes, made of wooden parts;
- open and closed type, shelves, as a rule, wooden, can be carved and often serve as decorative interior decoration. Made with retractable glass and without it.
- Suspended.
Mount directly to the wall with cables, belts, chains and other fasteners.
- Corner.
Located between adjacent walls in the corner. The mounting of the angular shelves can be performed both to the wall and to the ceiling.
Materials for the manufacture of shelves:
- Wood.
- Metal.
- Glass.
- Stipples and tree fiber plates of a fine fraction.
- Hypus fiber sheets.
- Combined shelves from two or more materials.
In their constructive features, the shelves are:
- console type;
- with walls on the sides and without them;
- with the back wall and without it;
- vertical execution and horizontal;
- with doors;
- multi-tiered;
- having rounded corners and straight;
- inclined and straight.
Under conditions of a certain design, you can make a suitable shelf, with a backlit or without, combined in the color of the walls in the room and the general texture.

Load on wooden shelves
Before making the shelves, it is important to determine the maximum permissible load on them, which depends on such nuances:
- tree thickness. The more items you plan to arrange on the shelf, the thicker should be the board. In addition, the smaller the bitch on the board, the hardestly it will be;
- fastening method. The finished wooden design can be fixed on the wall using metal brackets, bars or special ears. The most reliable and durable fastenings are brackets;
- the number of fasteners on the shelf. We are talking about long shelves for conservation designed to withstand greater weight. For example, a 6 m long shelf must have at least 5 mounts at a half-meter distance from each other.

Wood shelf with their own hands
Production of shelves from wooden parts should be started with the selection of the tools necessary for the operation. In order to equip the storage room you will need:
- tree with a thickness of 2.5-3.0 cm;
- timing segment 2x3 m;
- 1 Metal bracket (with a width of more than 80 cm wide);
- marking pencil;
- building level;
- self-tapping screw;
- drill.
Stages of the manufacture of wooden shelves in the pantry:
- Pencil make markup on the wall and decide how much shelves must be placed on the back side of the storage room. The preferred embodiment of the floors is 30 cm in increments.
- Using the level, make horizontal lines.
- Making markup, attach the wooden bars in advance. The length of one on the sides should be 30 cm (such is the standard depth of the shelf, which allows you to install a 3-liter jar or a box on it).
- When mounting the bar, use the screws under the hexagon. Three screws will be needed for long bars, and two are for short.
- Work only with treated tree. For this, cropped boards inject sandpaper or grinder with a special nozzle.
- To brushes on the wall screws, attach the boards. The length of the self-samples is defined at 3.5-4 cm.
- If you do not have a special pipe for furniture, then buy it. It is necessary to ensure that the shelves do not be bombed under the weight of the cargo.
- Cut the pipe in size, corresponding to the height between the floor and the first shelf, strengthen the first shelf.
- Insert the pipe and secure flanges.
- By the same principle, strengthen all other shelves with each other.
- Thanks to simple and simple actions, we turned out a compact and comfortable wooden rack, in which each shelf can withstand quite large loads.

Wall regiment with your own hands
Before making a wooden shelf, familiarize yourself with the instructions for making it, and also assemble a set of necessary tools.
To work, you will need:
- electric drill;
- knife, pencil, line;
- wood with a thickness of 1.5 cm;
- the sheet of plywood for the shelf wall 6 mm thick;
- sliding glasses;
- rake for glasses;
- grinding Bulgarian;
- brackets;
- carnations and self-tapping screws;
- dowel.
Stages of the manufacture of wall shelves do it yourself:
- Such a shelf of wooden wall-mounted materials is best to do on a predetermined drawing. In our case, this is a rectangular design. Its sizes are visible in the figure below.
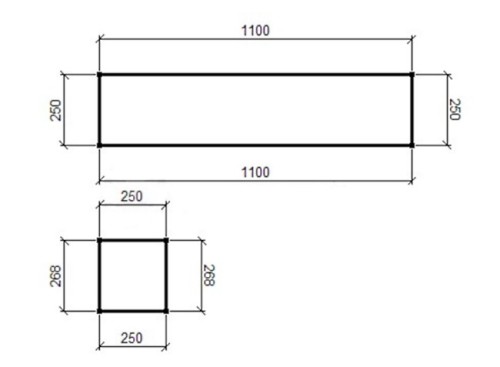
- Split wood according to the size of the sizes.
- In order to level ugly cuts, take them in the edge of melamine. To do this, the hot iron is walking along the edge in the place of a spike and then when it sticks, cut extra pieces with scissors.
- On horizontal parts of the shelf, retreating around the edges of 5 cm, make holes. In this case, the diameter of the drill should not exceed the diameters of fastening screws.
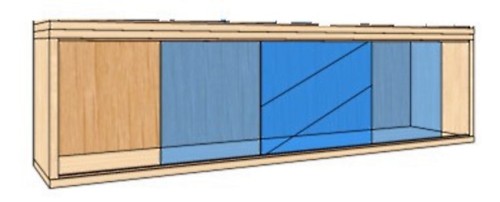
- Collect the shelf. To do this, cut out the wall of plywood for the future shelf and screw it to horizontal boards. Attach the rail guides for glasses. Crerate all the parts of the shelf as it is shown in the figure below.
- At the side walls from the end, attach the brackets. Then make marks on the wall, drill holes, insert a dowel, and in them - self-tapping screws, so that the latter perform a little from the wall so that the shelf can be hung.
- Insert the glass into the shelf and hang on a new place. Wall shelf is ready. Such wooden shelves can be successfully used as a colors stand.


Corner wooden shelves are manufactured by a similar principle:
- the parts of the angular shape, a thickness of about 5 cm, according to the drawing, are cut out of the pine;
- then they are painted in the desired color;
- with the help of self-tapping screws and drills, the shelves are attached in the corner over each other. That's all. The manufacture of such shelves does not take much time, and to all other things, such furniture looks very nice.

How to choose and prepare wood:
- The market should choose only dry raw materials. And if there is a suitable wood on your attic or on the balcony, but it has already been removed, then dry it perfectly. Spread the tree to each other and give away something very heavy. This is done so that the tree is not swollen, being ready-made furniture.
- Before making furniture, be sure to prepare the tree with the appropriate way: stick to the sandpaper, then cover the mourn and paint.
- The color of the edge of the wood and directly the shade of the wooden shelf itself must coincide. Brackets should be selected in harmony with furniture.
Decorative colors shelf with their own hands
Such an original floral shelf can be placed on the wall, and this will significantly save the territory of the room. And for the manufacture of the model, it is recommended to use a tree as the most accessible and supportive material.
To work, you will need:
- wide wood boards, 2 pcs. 700 mm long; and 3 pcs. 280 mm long;
- narrow boards, 3 pcs. 280 mm long;
- tree paint, varnish;
- sandpaper;
- drill;
- hammer with nails;
- decorative twine.
Stages of making decorative shelves for colors:
- After that, with nails, bring long and short boards with each other as shown in the figure.

- Before proceeding with work, prepare a tree, squeaking with its sandpaper.
- Narrow short boards attach to horizontal wide. This will be a limiter so that the flowers do not slip off the shelves.

- At the top on the long boards, make the cross-cutting holes drill for mounting on the wall.
- Then treat the tree by the verse and varnish. Strip the uneven corners and at the end cover the design of the layer of varnish.
- In the prepared holes, grind the twine and secure the nodes. The shelf is ready, you can hang it on the wall and decorate with flowers.


