Many builders consider wood with the best material. And this definitely makes sense, since on the basis of the tree you can easily create any designer composition. Wooden materials are capable of transforming even the most nubble rooms, and it must be remembered.
Content
The most important thing for people who want to separate the wood is the whole room, this is the fact that wood never comes out of fashion. The design created at the beginning of the 20th century on the basis of natural material, it looks great and now. There are a lot of such examples, and over time, woody finish and furniture are becoming more attractive outwardly.
Also, do not forget that wood can be processed again, which makes it possible to regularly update the dwelling, adding some modern outlines. It is good that there are no restrictions in this aspect, both in terms of design solutions and from the practicality of the use of wood.
Of course, wood has a lot of positive qualities, but in this material we will consider in detail the basic possibilities associated with decoration of the kitchen with a tree. We also analyze the main problems of this process. We will not bypass the question and the issue of acquiring high-quality wood furniture, which will make the kitchen with a cozy and warm place in the house.
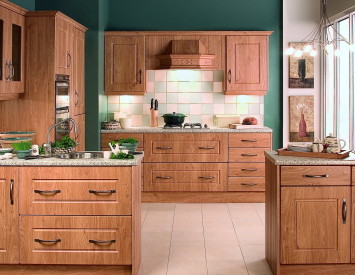
Main features of wooden kitchen
As already mentioned, wood allows you to create comfort in almost any room. However, if we are talking about the kitchen, there is no doubt about the positive result. The good news is that the kitchen allows you to implement a wide variety of solutions associated with finishing walls of wood, as well as installation of furniture.
It is important to know that from the cozy kitchen room is very easy to make a tasteless room. It is enough just to make a mistake with a choice of wood breed so that the kitchen looks ridiculous. It must be understood, so often the design is professionals who know perfectly what is combined with, and which item will look good in a particular space.
Accordingly, it makes sense to find a ready-made design solution on the Internet, and on this basis it is equipped with a kitchen. We will know which one we get at the end. It will also be easy to deal with materials that will be needed in the process.

Wood materials for the manufacture of kitchen headset
First of all, you need to know that there is no need for the use of solid wood. It's too expensive. Also, it is also impossible to exclude difficulties in the process of wood processing, as each tree has its own structure.
For small shelves or Tumba, you can use MDF. The thickness of such panels should be 16 mm. This wood material is dense enough, so you can be confident in the high reliability of the components of the elements of the room. Also on sale you can find MDF with various color options. This allows you to significantly diversify the appearance of the kitchen.
If we need to create partitions for drawers and cabinets, you can use thin panels based on Fiberboard. The thickness of such material is often limited to 5 mm.
To create a high-quality and durable table top, it is best to apply an array of wood, the thickness of which should be approximately 30 mm. With this situation, you can be sure that the countertop will last not one year. Also, wood can be reset, updating its appearance.
Do not forget that the timber array must be pre-handled with antiseptics.
Tabletop of wood
Obviously, the table is the most important component of any kitchen. Now we will try to consider the process of creating wood countertops in detail, as well as take into account the main difficulties that can be encountered.
At the very beginning you need to decide on the dimensions of the future tabletop. In this case, it all depends on the size of the kitchen. If this room is small, you should also make a small worktop in size. It is also necessary to take into account the fact that the countertop must be convenient to perform daily action.
It is worth recovering and to choose the tree of wood. It should be borne in mind that the durability of the future countertop depends on this. Often, the choice is made in favor of the following trees:
- cherry;
- oak;
- nut;
- cherries.
Also, often specialists create countertops based on exotic trees. However, it is worth keeping in mind that such solutions are too expensive, so it is best to limit the above-mentioned rocks of wood. If necessary, you can cover a tree with a tree or special varnish, thereby making the surface of the table top original and attractive outwardly. In this case, we are talking about sufficiently modest financial spending.
In the process, we will need such tools and materials:
- wood;
- paint / varnish;
- glue joiner;
- antiseptic;
- sandpaper;
- milling tool;
- jointer;
- clamps.
Do not forget that the boards needed for the table top must have the same thickness, otherwise, during operation, you can face a variety of problems.

Next, you need to decide with the method of connecting boards. It should be borne in mind that this is a very important aspect that includes a lot of subtleties.
- Method for connecting edge to edge. This is the easiest way of fastening, and at the same time the most unreliable. In this case, glue uses, therefore, during the operation period, the boards may be reached, it is also impossible to eliminate the appearance of cracks, the location of the material layout.
- Method "Edge-PAZ". It is also simple, but, unlike the past method, more reliable. Accordingly, a groove is created that allows you to qualitatively fix parts of the future table. Interestingly, the grooves, most often, are made small (up to 15 mm). The deepening in the wood is created using a cutter, which provides the excellent quality of the created grooves. You can also purchase ready-made metal grooves and install them in the right places.
After attachment, it is necessary to treat wood surface. To do this, it is necessary to use varnish, which will give wood a pleasant shade, as well as protect the natural material from external phenomena. Apply the surface to the surface best with the brush. When using a dark varnish immediately, the places that were skipped during the processing of the material will be seen. Also, wood can be coated with a layer of paint, but a positive result in this case is quite rare.
Do not forget about additional events related to the creation of countertops. It is about creating the protective edge of the table. This is a mandatory measure that will make a tabletop more attractive, and also protects the main surface from random damage. To do this, we will need 4 timber bars from solid wood. Of course, it is best to use birch or beech, but the oak is not very suitable for this situation, as it is too heavy. The height of the bars must correspond to the height of the wood surface, and the thickness can range from 5 mm and to one and a half centimeters. At the edges of the countertops, one-way comb is created. This can be done with hand cutter. Accordingly, we have a kind of groove that serves as an attachment to the tabletop. The protective edge is labeled with glue (can be used), and firmly pressed to the main part of the table. To do this, you can use additional fixing tools. After the glue is completely drying, you can use sandpaper to handle wood quality.

Production of kitchen chairs
Unlike many other kitchen accessories, chairs can be relatively easy to make with your own hands. Moreover, you should not think that in the end we will get too simple stools. With the help of simple actions, you can transform this element of the kitchen, resorting only to minimal financial costs.
In this process, the following materials and tools will not be superfluous:
- wood bars;
- plywood (preferably large thickness);
- building a pencil;
- line angle;
- saw;
- grinder (or a set of sandpaper);
- drill;
- screws;
- brush;
- lacquer.
All of the above tools and materials you can buy or borrow without the hassle. However, it should be noted that instead of jig saws can be used, preferably an electric (this will significantly speed up the process).
Accordingly, the bars do we need to create the chair legs, and horizontal fastener design. As for plywood, it will be used to create a seat. Thus, it is important to bear in mind that the plywood should be thick and uniform.
Before the start of the process will not interfere to create a full drawing of the future chair. In this case, you need to tag all sizes, from which you can draw on. Enough to portray types of chairs at the top and the side.
Next comes the basic process of creating a chair:
- First you need to take the sticks and check their status. Of course, on the wood should be no flaws, as well as curvature and bumps. All marks in size makes a pencil. With the help of a saw cut the extra part of the bar, while paying attention to the geometric accuracy. To do this, you can use miter box, which does not allow cut off a crooked timber. Likewise saw off all four legs of the chair of the future.
- Also, we need the so-called partitions, which are located between the legs. This is an important part of the structure, which ensures its integrity. In this case, it is imperative to meet all the planned size, or assemble a chair and did not succeed.
- Next, on the basis of plywood (or large wood panel) cut seat. Here again, we should seriously consider the size, as any deviation will be immediately evident.
- Now, you need to arm themselves with sandpaper and carefully sanded feet, partitions and seat. It is with emery can minimize any flaws that may be in wood. You can also use a polishing machine, which more effectively treated wood.
- At the end of the build of the chair. You can use the self-tapping screws with plugs. Also, often there are special grooves that allow to connect all parts of the future chair. Thus it is necessary to use a PVA adhesive, which will ensure bonding strength for many years.

Cladding wood-paneled kitchen
If we want to make the kitchen completely wood, you should take care of the finishing of the walls. Accordingly, for this you can use wooden MDF panels, which every year are found in housing more and more. And there is nothing surprising in this, since these panels have a huge number of advantages that are not in other finishes. First of all, the versatility of the material can be noted, since it can be used in almost any rooms. In addition, the installation of MDF panels does not need to pre-put or align the surface.
Of course, the MDF panels are made on the basis of a fiberboard, so those who wish to separate solid wood walls should pay attention to other options.
The decoration of walls of the kitchen panels MDF includes the following steps:
- A framework is created, based on which panels will be attached. It can be a wooden lamp or a frame of metal profiles. The second option is more durable, but the wood base will completely come.
- Installation of panels begins with an angle. The mounting of the first panel occurs combs to the corner based on self-taped. All subsequent panels are fastened with grooves. It is necessary to ensure that all components are tightly connected to each other.
- At the end, set the corners around the skin, which will become a kind of borders for panels. Also, the material can be treated with varnish to protect it from the effect of moisture, fat or dirt. With this scenario, the panel will serve for a very long time, and if necessary, they can be easily replaced with new ones.


