
Each owner, which set up overhaul in an old apartment, faces the problem of dismantling interroom or entrance doors. It would seem that there is a difficult thing here - to remove the canvas with the loops and "torture" the box. But not everything is so simple. As practice shows, if you want to get a smooth and beautiful doorway, it is necessary to remove the old design correctly. About how to make dismantling doors, we will talk in this article.
Content
Breaking - Do not build: dismantling features
Many inexperienced self-tavering builders mistakenly believe that to remove the old door only to pick up shoals from the wall. But in practice, everything is not so simple. Often, with an incorrect and aggressive dismantling, not only the door design is destroyed, but also part of the wall. Especially this situation is common in the old Soviet homes, where fragile plaster plates used for the construction of interroom partitions.
If you do not want, with the dismantling of interior doors, you also lose the pieces of the wall, it is necessary to approach work. First of all, decide whether you need an old door or you are going to spend it on the last path - to the landfill. In the first case, dismantling must be taken carefully, so as not to damage the components, for example, if you want to rearrange the door from the apartment to the cottage. If you don't need a box and all its elements, there is a faster and "merciless" way that we will tell a little later.

But whatever way to dismantle the old doors you choose, work should be carried out if possible, carefully not to damage the wall. Otherwise, after removing the box, you will have to spend time and money for putty and shockting.
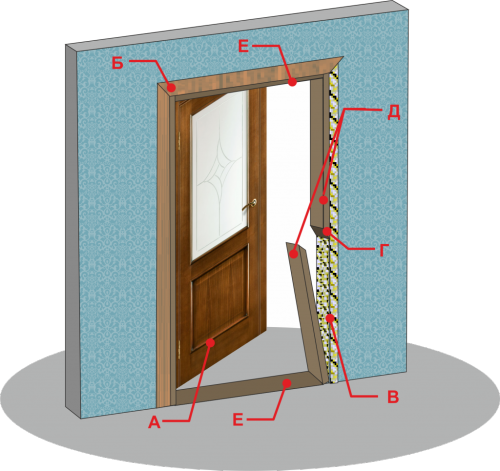
But first a little theory. Any such design consists of two vertical racks, one horizontal crossbar from above and the door leaf itself, sometimes the lower horizontal is also present. Often, old doors in their long lives have managed to survive 5, or even 10 painting sessions, becoming thicker to several millimeters, and hence heavier.
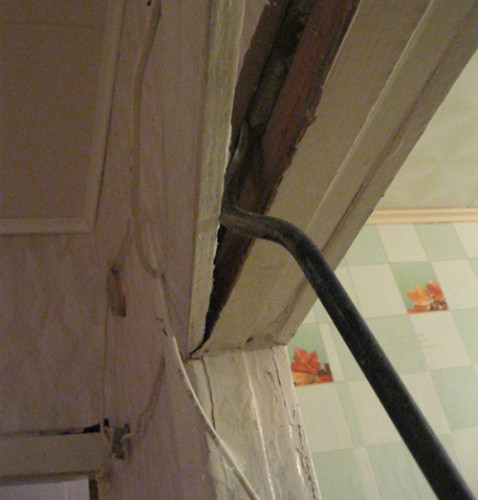
The paint has long hid the slightest hints at the location of the screws, nails and other attachments, but at an intuitive level can still be recognized wherever it is. So, usually a wooden bar is located between the common man and the door frame. Its thickness was chosen in such a way that the vertical racks were located strictly perpendicular to the floor surface. In this bar, a large nails were driven by a length of 120 or 150 mm: two in the left vertical rack, two - right, and one (sometimes two) - in the upper horizontal crossbar. If the doors did not change 30-50 years, then these nails probably managed to rusted, so it's easy to remove the box.
In order not to target the walls with bars, use the nail or mount. You will also need a hammer, an ax and saw (knife).
Splashing method
In this chapter, we will tell you how to remove the door and the box so that they can be used in the future.
Progress:
- Remove the door leaf, slipping between the door and the floor of the FOMCA to make the lever. Slightly opening and closing the door, start lining the canvas, pressing on the mounting lever.
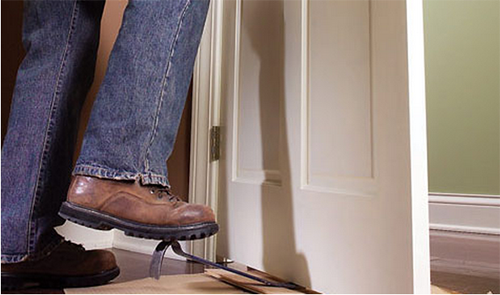
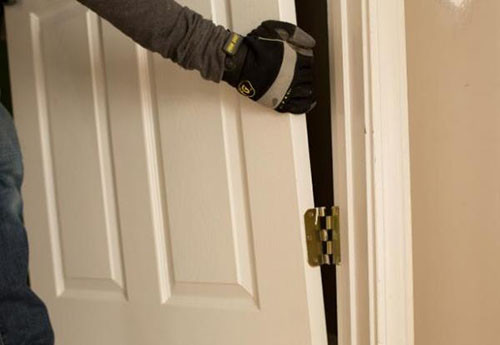
It is better to do it together, as the old Soviet doors are quite heavy, especially if you do dismantling the entrance door. If the hinges do not respond to your manipulations, they may have rusted or clogged themselves. In this case, apply lubricant (it is better to use anti-corrosion lubricant in a spray that instantly removes rust), wait a couple of minutes and try again. Full removal of the canvas should be performed in open form, otherwise the door will be strengthened into the horizontal crossbar above.
- When the doorbell is assigned to the side, you can proceed to the elimination of platbands. It is not particularly worried about the preservation of old platforms, since in most cases they are in a rather deplorable state and covered with a thick layer of old enamel. Attach the axes of the ax in the hole between the platband and the box or anywhere higher, if all nails are covered with paint and nothing can be seen. Keep the ax, the other - the hammer one hand.
- Nonal, but with confident movements, score the ax and disconnect the platband from the box.
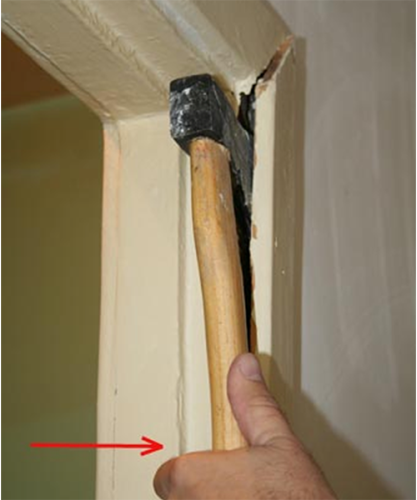
- In the expanded gap you can see the biggest nails. Move the ax under one of them and move the platband to the maximum limit. Repeat the same procedure at the location of other nails. As a result, you should easily separate the entire platband from the door frame.
- Since the platbands are available on both sides, repeat similar steps from another part of the wall. Unfortunately, almost always the platband breaks down. At the time of the heyday of Soviet engineering and construction, nails were made very thick and durable, and the platbands put quite thin, so it's easy to remove them with the rusted nails. But, fortunately, to make new and more aesthetic platbands today is quite simple and inexpensive. In addition, if you remember that the half-meter of the filled enamel has already been stopped on a mill platband and it cannot be used even on firewood, it will be reasonable to get a new framed for the door.
- So, the platbands are removed, and the door frame with iron loops remains before you. Before trying to pull it out of the wall, remember that it is nailed to the aligning brushes with long 150-millimeter nails. Carefully inspect one of the vertical racks - if the bottom attachment point (nail or bar) is seen, retreat approximately 20 cm from it. If the fastener is not visible, then retreat from the floor 60-80 cm and reveal the rack.
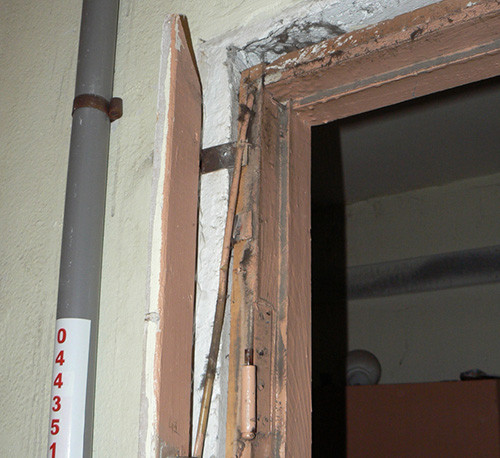
- Slightly above the resulting propyl, insert the axes of the ax so that it is between the doorway and the wooden stand, and then confidently press the stand from the wall. In this way, you simultaneously remove the rack and pull the nail out of the wall.
- Do the same with the opposite part and the upper crossbar. When the first rack is removed, dismantling doors with your own hands is much faster and easier.
- Keep the door block, which served 30 years or more, does not make sense - today you can use more modern, durable and inexpensive materials or put the same tree, only more fresher.


We described one of the most problematic options for dismantling doors using large nails as fasteners. If you see that the elements are tied with screws, then disassemble such a box does not represent complexity - just use a screwdriver.
Video about dismantling doors will help you more accurately work:
Fast way
If you plan to get rid of the old door and are not going to install it elsewhere, use the simplest and fast way to dismantle the box.
To work, you will need the following tools:
- axe;
- hammer;
- lomik;
- wooden hacksaw.
How to quickly dismantle the door:
- Remove the door cloth as described in the previous instructions - it is no longer possible to do this stage and faster.
- Disassemble the door frame does not make sense, so it is easier to break it. It is very easy to do if you cut in the central part of one of the vertical racks.
- With the help of the hacksaw, make cut, but not perpendicular, and at an angle of about 45 °.
- If the doorway has flags, it is also better to cut in the center.
- If the threshold is fixed in the doorway above the floor, then it is easy to "emerge" with the help of a lomika.
- The platbands will be able to quickly be able to handle between them and the axis of the ax. Take the ax to the ax that the gap appears is sufficient for further work with the lomik.

We remind you that if the old door box do not need, the remaining wall is still useful for installing a new door, so do the work as little as possible.
Dismantling plastic door
Plastic and metal-plastic doors have long ceased to be new, and it is much less likely to see a high-quality solid canvas from a tree than the usual design that shining the pristine whiteness. However, for proper operation, repair and adjustment, you need to know some secrets that are known not to all owners of plastic doors.
The most important thing is to understand the device and the functioning of the loops on which the door is held. Then you can use all its potential to the maximum, independently repair or remove the entire design. The loop consists of several elements: steel tabs, frames with fastening pins, remote sleeve located between the tab and frame.
Dismantling door on the balcony
If you try to dismantle the plastic door on the instructions described above, you will not succeed. The fact is that such designs have their own characteristics of the installation and, therefore, dismantling, so they need to be removed in a special way.

Dismantling of the balcony door:
- Remove the protective caps covering the loop.
- Take a hammer and gently select the axial mechanism, a slightly open door.
- When the area of \u200b\u200bthe axial mechanism appears from the bottom, grab it with subtle passages and pull down until it completely comes out.
- Tap the door to myself, tight holding it with a free hand (it is rather heavy), and raise 5 cm to release the pin pin. Since in such loop structures at the bottom are not fixed, the door can be easily removed, slightly lifting and removing to the side.

Deontament of entrance door
The device of the plastic entrance door is different from the balcony, so the dismantling occurs a little differently. The main difference is that the entrance doors have an enhanced design, and double-glazed windows are installed in them.

The structure of the loops is also different - they are more powerful, fortified and possess the anti-burglar system. The inlet plastic door has as many as three loops, in the balcony - two. This is explained by the fact that the door is rather heavy, and two loops would not have coped with such a load.
In principle, the dismantling procedure is accepted by the same scenario, like a balcony door, with the only difference that you need help - it will not work alone in a single way. When you raise the door with the loops, it must be kept hard, and only two can cope with it.
Dismantling metal door
In most new buildings, apartments are commissioned with inlets of metal doors, but unfortunately they seem reliable only at first glance. In fact, this is the usual sheet of steel, not a fortified and certain no longer possessing insulating properties. The owners of such apartments prefer to replace the designs to new or insulate the existing, but first need to somehow remove the canvas itself.

Dismantling of the metal door is pretty simple:
- Remove the plaster near the door slope to open the attachment points of the door ears.
- Since modern metal doors are fixed using an anchor-wedges or anchor bolts, then try unscrewed them with a key or screwdriver.
- If the fasteners are not amenable, hollow them with the chisel of the perforator.
- Between the common and the door frame is a layer of mounting foam - cut it with a knife to free the door.
- Lift the door leaf and remove it from the loops in the open form.
- Next, you can remove the door frame and set a better door.
As you can see, dismantle the old door is completely simple, whether it is wooden, plastic or iron. The main thing is to do everything dimly and carefully, so as not to spoil the opening in the wall, which is still useful for installing a new door.


