The heat field system has recently become one of the most popular types of housing heating, ranging from small apartments and ending with large cottages. The essential advantage of such a system is a more rational heat distribution. As everyone knows from school bench, warm air is easier cold and rises up. That is why, thanks to this method of heating floors, the entire room heats up evenly.
Content
Another indisputable advantage of such a system is that much large area is amenable to heating, in comparison with the use of radiators. This allows the temperature to be used for heating the temperature is much lower, which more favorably affects all equipment. How to properly mounted a warm floor under the tile in my home - hereinafter.
Basic moments

Warm floor systems, which are mounted in residential premises, are divided into two types:
- Water. As a coolant in this system, water or other liquid acts in this system (in some cases, when the room is heated unevenly, for example, the cottage, ethylene glycol or "non-frozen" are used as a coolant to not defrost the system). Heating of the coolant comes from the boiler: electric, gas, solid fuel, etc.
- Warm floor under electric tile. The principle of operation of such a system is based on the heating of a special cable from transmitting electrical current through it. Compared with water systems, electrical are more compact, cheap and easy to install. In addition, the electrical system is easier in the installation and is easier to adjust during use.
Warm floor under the tile, water

The principle of such a system is quite simple. It consists of several main elements:
- Boiler. For a warm floor system, almost any boiler with forced circulation of the coolant may be suitable. However, due to the difficulty with adjusting, solid fuel boilers are rarely used here. Basically use gas or electric. Most of these models are already equipped with a circulation pump, which is the second important element of the "warm floor".
- Ball valves at the inlet of the boiler.
- Pipes for wiring, pipes for laying under the tie.
- The reinforcement grid on which pipes will be laid under the tie.
- Shut-off valves and fittings.
- Collector. It serves to adjust the supply of coolant in different rooms. It is a large pipe with several taps, the number of which depends on the number of circuits of warm floors. In addition to adjusting the coolant supply in a particular circuit, air valves are mounted in the collector, as well as the emergency reset valves of the coolant. This detail of the "warm floor" system is the most difficult and at the same time - the most important thing, because the comfort of its proper work will depend on the room.
Warm floor mounting

Warm floor-based systems based on a liquid coolant are quite complex, so when installing in a large room, you need professional design. Depending on the conditions of the floor, the average ambient temperature, the heat loss is made in the project, which indicates:
- The number of heat carrier contours in a particular room, their length and installation location.
- The number of collectors and their "strapping" in the holistic system.
- Adjusting the collector for the most optimal floor heating throughout the area.
The project will also act as a height passport.
After approval of the project, you can start the installation of the system. All operations on the installation of a warm floor based on a liquid coolant can be divided into several stages:
- Paul preparation. To lay the pipeline system, the surface of the floor must be cleaned from the construction waste, not to have drops of heights. If necessary, it is aligned with bulk materials, such as sand.
- Laying waterproofing. Waterproofing plays one of the main roles in the installation of a warm floor, as it prevents the appearance of condensate and the appearance of moisture on the surface of the draft floor. As waterproofing, a polyethylene film is usually used, the thickness of which should not be less than 100 microns.
- After the waterproofing layer, the damper tape is stacked. It must compensate the expansion of the layer of the concrete screed when heated. The tape is stacked throughout the perimeter of the room. It is made, as a rule, from foamed polyethylene. Fastening the tape is performed using self-tapping screws with washers.
- The next step is the heat insulating coating. The most frequently used material for these purposes is polystyrene foam (foam). When choosing a material, it is necessary to take into account that its density must be appropriate for the use for floor coatings. The thickness of the polystyrene is selected depending on the thermal resistance of the surface above the pipes so that in the case of a complete heat load, this figure was below the heat resistance of the insulating layer. Simple words: the layer under the pipes should keep warm better than the layer above the pipes. Otherwise, the boiler will simply warm the draft floor.
- The reinforcement grid of wire with a diameter of 4-5 mm is stacked up the heat-insulating coating. The size of the mesh cell, which is used for this purpose, is usually 100x100 mm, but large sizes are found. The grid is stacked for reinforcing concrete and fixing the pipes of the coolant. In some cases, if necessary, two layers of reinforcement are used, laying the grid and over the pipes.
- After laying the grid to it, the pipe is attached. Pipes for warm floors are sold in bays and stacked from the collector and to the collector without seams. This is a rather important condition, since otherwise there is a chance of the occurrence of leaks. Laying the pipe is made in the manner prescribed by the project. The ends of the pipes are summed up to the collector and are temporarily fixed. The fastening of the pipe to the reinforcement grid is performed using plastic or metal clamps with a step of no more than 300 mm.
- After laying the tubes of all contours, they are connected to the collector. Already at this stage, the pipe is cut to the desired size. The incision should be strictly perpendicular to the axis of the pipe so that there are no leaks during operation. The connection of pipes with a collector is made using special fittings: nipples, precipitated nuts and tapered washers. After the whole system is assembled, conducting its test. It can be carried out both with the help of water and with compressed air. If the tests are carried out with the filling of the system with water, it is no longer poured, but left in working condition. Before the fill of the concrete in the fields of pipe output to the surface, they dress protective clamps, so as not to damage their surface when soling the solution.
- Then the screed is laid. The thickness of the screed usually ranges from 50 to 100 mm. A smaller layer of concrete may simply not withstand constant temperature drops, and the larger will make the entire system too inert, which will not allow its adjustment. The screed is placed either with the help of cement-sand mortar, or with special mixtures for filling the floors. After cooling the concrete screed on the floor, the tile is stacked.
Warm floor with their own hands electric under the tile

The most suitable option for laying a warm floor under the tile is a system based on heating cable. In contrast to the water system, the warm floor based on the heating cable is less complicated in the installation and is better to be adjusted, which is why it is greater popularity. Especially often it is used to lay a warm floor under the tile in apartments, where to create a water system is very difficult.
The only obstacle to the installation of cable warm floor can be the wiring of the house. In old houses, it is not designed for such loads, which can lead to peak shutdowns.
This system consists of several parts:
- Heating cable.
- Thermostat.
- Thermal sensor.
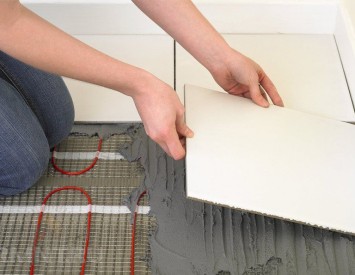
- Reinforcement grid.

Installation Warm floor with your own hands electric under the tile

Installation order:
- These work is carried out already at the final stage of repair. The first thing in the room in which the warm floor will be installed is a separate electrical line and a separate automatic is installed at the distribution site. If the emergency disconnection of a warm floor is happening, all other consumers will be with energy.
- The prepared surface is originally settled by a layer of insulation. Usually, polystyrene foams are used as the latter. Its thickness depends on what room is under the floor. If at the bottom is the heated apartment, then a sufficient insulation is a thickness of 40-50 mm, if the base was at the bottom, then the layer of the insulation should be at least 100 mm.
- Next, the heat-reflecting screen is laid on the surface of the insulation. It will not allow infrared radiation to go down, but will send it up.
- The next step is to lay a reinforcement grid, which folds the heating cable. It is attached to the grid with the help of plastic or metal clamps.
- After the installation of the heating wire is completed, the entire system is connected to the electrical network. Connection diagram is provided by the system manufacturer. The connected warm floor is checked for performance.
- Next produce pouring upper screed. To do this, use a special solution for filling the floors. After the solution is dry, they produce tile laying.


