The gate is an indispensable component of any garage, because they protect the inner space from the penetration of foreign ones. In addition, the garage doors must perform the role of a strong and reliable fourth wall, do not be afraid of temperature drops, humidity, and even look appeal. It is easiest to buy them or order a manufacturer, but it will not save and it will not be as nice, as if you built the garage doors with our own hands. After reading this article, you will learn how to make simple tools to make a strong gate.
Content
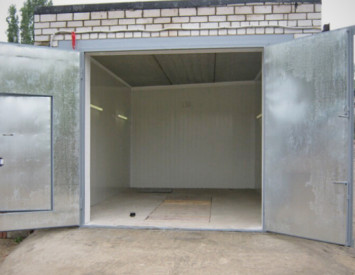
Garage swing gates
If the purchase of a finished gate does not impark you, then there is only one way out - to make them yourself. And the reason for this may be not so much the financial side, how much the need to create something useful and durable than it will be pleasant to use every day. And while the walls, the foundation and roof protect your car from bad weather, the gate perform a much more important feature - protect the car from possible hijacking and damage. If the gate is strong and reliable, in the garage you can not be afraid to leave an expensive tool and other items that did not have place in the house.
There are several types of gates on the principle of opening, and in this article we will look at step by step creation of swing and lifting structures. Thus, you can evaluate and compare the features of both systems and choose the optimal one.

Swing garage doors, as you can guess from the name, swing up, opening access to the room. They consist of one or two sash, frames, loops and other elements. The size of the sash and the number of fittings on them can be the most different, so the work should begin with the creation of a detailed drawing. If you set the gate to the already existing doorway, then it is necessary to repel from its size, but if you plan to reduce or increase the workshop, take into account the following recommendations:
- From the side of the car to the rack of the gate should be at least 30 cm. The distance is better to increase in case in the future you will use the same garage for a more large-sized car.
- The height of the opening should be at least 2 m, but it is better to make it 2.1-2.4 m.
- Choose steel sheets with a thickness of at least 3 mm.
Assembly of swing garage gates
For standard swing gates, need sheet metal, metal corners, profile, loops, valves and locks. To work with the metal, prepare the welding machine and the grinder, and the square, roulette and the construction level will also be useful.
Make garage doors:
- First of all, you need to collect a frame. To do this, you will need a welding machine and the elementary skills of handling it. Cut the grinding profile to separate items according to the parameters in the drawing, spread them on a flat plane, weld the seams and read them to get the perfectly smooth surface. The seams are the most vulnerable place from which corrosion and destruction begins, so you should not neglect processing. In addition, if they are not smooth, future flaps will not be able to closely. Make a similar way outdoor and inner frame.
- Next, from the metal profile 60x20, weld the frame for each sash. Check the evenness of the corners with the help of the square. Between sections and framework, leave a small clearance so that it was convenient to open the doors.
- Attach the sheet metal to the frame in such a way that the left-left canvas goes to the frame of the right to a pair of centimeters, and the right in connection with this should be already at the same distance.
- Loops better prepare in advance. We weld the bottom of the loop to the frame, the top - to the canvas. To mount the fastening, use fittings, welding it from the inside.
- To increase security, in addition to an ordinary castle, it is better to use the goals, setting it on the inner part of the gate. But the goals are rational only if the design provides a gate. So you first enter the garage through the wicket, open the goal from the inside and open the gate completely. Castles can choose mortise or mounted. In the first case, the installation will require additional metal plastic, and in the second - the outer loops. It is better not to be limited to one lock, but to put 2-3 at once so that in the event of a breakdown of one of them, you still could close the garage.
- It remains only to paint the gate, and it is necessary to do it until the installation. Painting is needed not so much for aesthetics, how much to protect the metal components from corrosion. Accordingly, for this you need to use the weatherproof anti-corrosion paint for metal. It is possible to apply it by hand with a brush or roller or with the help of aerosols, which is much faster and more convenient. Before applying the paint, the surface should be rebounded. The paint is better to apply in 2-3 layers and every couple of years to update the coating.
Installation of swing garage gates
When the paint is driving, you can install swing sectional garage gates. To fix the inner and outer parts of the frame, use metal pins about 15 cm long. Secure them in the slopes, cut and stick the ends so that they do not make it difficult to closing the sash. Between themselves, two parts of the frame cover with steel plates with a thickness of 4 mm, welded every 50 cm, after which the finished sash can be mounted on a loop.
At this stage, it is worth thinking about the insulation of the garage gate, because only through them almost 50% of heat leaves. If you prepare elementary materials, it is very simple to do it. Felt a wooden sawmaker from lumber, fix it from the inside of the sash, after which fill the insulation. The cheapest materials can be used as thermal insulation, such as stone cotton wool or foam. Close the crate can be clapboard.
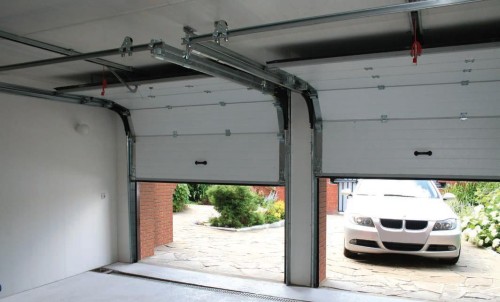
Lifting garage doors
Lifting garage doors are very popular, but it seems to many that make them with their own hands without appropriate experience is absolutely impossible. In this part of the article we will try to prove the opposite. First of all, we consider what the design itself represents and what is its advantages compared to swinging. Opening, the canvas of such gates on the hinges rises under the garage ceiling, moving from the vertical position to the horizontal. Thus, it occupies a much less space than swinging flaps.

There are two types of lifting gate design:
- Lifting-section - consist of several sections of about 50 cm wide. Wood, metal or plastic can be used to build panels. The inner emptiness between frame frames is filled with polyurethane foam insulation. Sections are connected by hinged loops with plastic or steel movable parts (quality, durability and cost depends on the material). Such gates are very comfortable and easy to manage, but they have quite low protection against hacking. In addition, it is very difficult to make them very difficult, especially if there are no design skills. Nevertheless, it is possible to save, buying a ready-made kit and putting it yourself.
- Lifting-swivels - have only one sash that rises by hinges and levers. In contrast to the previous type, such gates are well protected from the penetration of ill-wishers.

In the case of such a gate, the silent of their work plays a major role, since their design does not imply the use of rollers with guides, but the decisive factor acts that it can be made it yourself. For this, you will not need special skills and large financial investments.
Lifting garage gate
The lifting-swivel design consists of a frame, sash and a lifting mechanism. For a frame, you can apply not only steel, but also wooden beams that are installed in the opening. The guide profiles are placed in the door frame by which the gate will move when lifting and lowering.

The obvious advantage of the lifting-rotary gates is the integrity of the canvas. It can be made of wood, it can be seen by sandwich panels or metal. One-piece wooden canvas will cost quite expensive, while it will weigh a lot, and the material itself is not so steady and durable, like plastic or metal, although it looks beautiful. Optimal and most common options are wooden or plastic panels and sheet steel. Sandwich panels in this regard are even better because they perform the role of sheat and thermal insulation. Other materials will need to additionally insulate foam or stone plates.

Technology manufacturing lifting garage gates
Before installing the roller shutters of the garage gate, it is necessary to determine the opening mechanism.

There are two types of devices:
- A hinge-lever is a popular solution that guarantees the simple move of the sash and the anti-blocking of the canvas. However, such a mechanism requires a very accurate installation of the guides, as well as a scrupulous setting of springs tension, which is unlikely to make a newcomer. If you do not set the guides strictly vertically and parallel to each other, the shield will be blocked.
- On the contrast - the principle of operation lies in the fact that the cable attached to the lower corners of the frame and missed through the block brings the winch to the pulley, and in the other end, the counterweight is fixed. The harder the gate canvas, the harder it should be this counterweight. However, it should be taken into account that the design is subjected to large loads, so it is mainly used for the construction of a massive gate, and for private garages on 1 auto using a hinge-lever mechanism.
When you have decided on the project of the future gate, the dimming was moved and developed a sketch, it's time to prepare tools and materials.

Consider the construction of a lifting gate on the design example for which the following will be needed:
- steel pins (armature trimming 15-18 cm long);
- wooden ram 120x80 (racks) and 100x100 (cross);
- steel corners 40x40x4 and 3.5x3,5x0.4;
- step bracket 8x4,3x0.5;
- spring D30 mm;
- plywood shields;
- sheet steel;
- steel rod d8 mm.

How to install garage doors:
- Take 2 racks, crossbar and run the box by connecting the parts with the corners or plates. The lower part is plugged into a concrete tie 2 cm.
- Lock the box in the opening of steel pins.
- Collect the framework of the canvas and cover the plywood, you will attach the leaf iron outside.
- Create a backup to the mechanism from the corner.
- In one of the shelves, make a hole for fixing to the racks, in the other, make holes for the spring bracket. To secure the bracket, which will be used as a support for the spring, drill 3 holes.
- Make the adjustment plate from the steel strip and connect the spring with the bracket using it. Examine spring springs are brought to the pliers so that the hooks come out, and attach the steel rod below.
- Make a hinge corner and breed to the frame. Thus, you can mount the lifting lever on the hinge at 12 cm.
- At the end of the lever, attach the plate for the tension regulator.
- From the pair of corners, build guide rails for the moves of the gate themselves. To do this, weld the corners along the edge, following the internal distance between the vertices to be strictly 5 cm over the entire length.
- Attach the rail to the plate, leaving the lumen of 8 cm between the lower end of the crossbar and the axis.
- At another end of 12-15 cm from Niza, attach a channel, then attach it to the ceiling bruster (use a bolted connection).
- At each stage, before something to fasten, check the horizontal guides.
Useful advice: In order for in the garage, it is possible to make a deaf window in the canvas. To give the design of additional strength and in order to avoid random shocks and damage, glue the rubber kant with compensating overlays to the canvas.
Finally, we suggest familiarize yourself with the video where the garage gate of the lifting type is shown in all details:
Garage Gate: Photo
Recently, the artistic painting of the garage gate is gaining great popularity. Pictures with effect 3D are used by special demand:


