Bunk beds are an excellent solution if you want to save place in the children's room. Thanks to this, there is a lot of useful area in the room. But the requirements for such beds are higher than to normal. So, such structures should at least have sufficient strength and stability. It is necessary to take into account when designing such a bed. In addition to the beds, it is necessary to provide a convenient and safe rise to the second tier. Usually for this purpose build a staircase. When developing a project such a bed, it is important to consider the location of this staircase.
Content
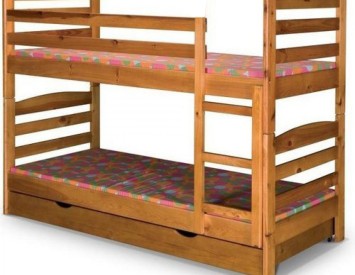
In addition, it is necessary to make the correct calculation of the length of the beds, as well as the distances between the tiers. The bed should turn out such that from the floor to the lower bed there was enough free space. It must be enough for the sun bed can easily sit adult. In this case, the resulting niche can take something. For example, a box with linen or toys. As for the upper tier, it is not worth placing it too high, even if it allows the ceilings. The fact is that in the upper part of the room the air is usually warmer, and, therefore, it will be stuffy. In addition, it is dangerous for the child himself. Read more about how to make a bunk bed for children - Next.
Selection of materials

Pine is most often used as a material for the manufacture of a wooden bunk bed. So, the boards of the desired dimensions will be required, most often it is 30 × 30, 40 × 80, as well as 20 × 150. The length of the bars for each detail of the future bunk bed for children is usually calculated before. It should be considered, from which type of board you need to make a detail of the bed. So, from pine bars make a bed more complicated than from another breed of wood. Therefore, if you do not have any experience of such work, it is better to abandon the pine and take bars from oak or ash as the main material. So you facilitate your work and improve the chance for a successful quality result. If the place allows and there is a desire, then you can even make a bunk bed with a sofa.
For the manufacture of bed, in addition to wood, we need for each tier of plywood sheets that will perform the role of base under the mattress. The dimensions of such sheets most often amount to 900x1850x10 mm. In addition, to fasten the parts with each other, screws and washers-plugs will be needed. The assembly is better to produce indoors with humidity and temperatures close to those who will be present in the children's room. If it is not considered, then the boards can deform with time.
How to choose the sizes of the bed

For the manufacture of any children's two-tier bed, it is necessary to prepare drawings in advance. And it is better not to use ready-made options, but to make them yourself or order. The fact is that the finished drawings may not come up for several reasons. So, when selecting the size of the structure, first of all, it is necessary to correctly determine its height, but only after that width and length. Most often, the size of the bed is selected with a reserve so that children can sleep on it for several years and did not have time to grow out of it. Most often, such a bed is made in a length of 190 cm, and a width of 90 cm. In addition, it is necessary to take into account the dimensions of the mattress that is planned to be used. In this case, the length of the bed must be larger than a width of about 9 cm, and in length 11 cm.
As for the height of the bed, then with its selection, first of all, the dimensions of the room are taken into account. Moreover, it should be enough space for convenient movement of the child. It is better to make the height so that the child sitting on the second tier does not take the ceiling with his hands. A similar principle is used in selection of distances between tiers. So, the adult, sitting on the lower bed, should not get the top tier head. As for the bottoms of the lower bed, it should be from the floor at a distance of at least 310 mm. When calculating the ratio, it is also recommended to take into account the thickness of the mattresses used.
If you want to still use a ready drawing, it is recommended to check whether the dimensions specified on it are suitable for your room. If necessary, you can take a ready-made project as a basis and create your own on its database. It is recommended to take care of strengthening the framework frame so that it is sustainable and reliable. If the room has a small area, then it is possible to give preference to the construction of a compact children's two-tier bed with a wardrobe.
How to make a bunk bed
Basic moments

To minimize the cost of manufacturing the product, it is recommended to calculate all the necessary materials before they are purchased. It will be necessary to make two loungers in the form of gratings, which will fit the mattresses. For their manufacture, there will be a size of 18 × 140 mm. For each sun bed, there will be 10 boards. Such a design should be quite strong. The width of the bed must be at least 85 cm. In order for the sun bed to do without any problems in his place, it should be done a little already. As a support for a lattice under the mattress, a bar of 30 × 30 mm sizes can be used.
The upper tier of such a bed must have special sides so that the child does not fall from height. In addition, it is necessary to establish a staircase to the second tier. The staircase and flights are made of 40 × 80 mm. The same side of a wish can be done for the lower tier. The required number of boards is calculated depending on the type of side and the location of the stairs. The bed itself for its amplification is necessary to pull the massive board around the perimeter. For this purpose, the board size is 40 × 140 mm. It should be noted that the two-tier children's bed from LDSP is much harder than solid wood. At the same time, it is much cheaper.
Phased assembly

For the manufacture of the product will be needed:
- hacksaw,
- screwdriver
- milling machine
- roulette,
- level.
Consider a Read more of the process of assembling a children's two-story bed:
- First of all, the frame of the bed shelves is going. To do this, the nest is cut into the bar, the depth of which is approximately half the thickness of the tree. These bars are useful in order to combine transverse and longitudinal boards.
- When the frame will be assembled, it is necessary to check its perpendicularity. Next to the frame are fastened with plywood shields, pre-lubricated with joinery glue.
- The compounds need to be strengthened with the help of screws, while between adjacent screws should be a distance of about 20 cm. When the shelves of the bed will be ready, they need to be carefully dryed, and then poll.
- After that, you can proceed to the assembly of the stairs. To do this, first placed racks, and then with the help of the first drill, small holes with a diameter of 30 mm and a depth of 17 mm are drilled.
- When the hole is cut, iron bars are inserted into it, which then need to be fixed using screws. The wall can also be equipped with joineric glue.
- Now you can connect the racks of the beds with shelves. In order for the beds of beds to be strong, you first need to place the height of the fastening of each of the shelves. This is usually done on the inside of the racks.
- The shelves are tightened by clamps, their perpendicularity will be checked and labels are made under the fasteners. Next, the holes are drilled on both sides of the boards. After that, the shelves will remain and tighten the screws.
- When the bed stands are connected to the shelves, you can go decorative edging. It is necessary to learn how much the distance between the racks, and then cut off and cut the edging boards.
- In order for the bars not to be noticeable, they are set to approximately 45 mm below the carcass. Next, the edging is attached to the shelves with screws.
- After that, you can proceed to install the stairs. For mounting the left counterparts to the bed, screws are used in the amount of 4 pieces. To the bottom edging, the right rack must be screwed alone, and to the top - three screws. At the same time, the fastest is to be tied on the inner side of the bed.
- After installing the stairs, you can start the installation of fences on the top tier. They should be not only sufficiently stable, but also have a beautiful appearance. After all, the bed should become an additional decoration of the room.
- Longitudinal and transverse boards of 70 × 20 mm are usually crashed in the rack, namely, in special nests in the racks, which must be made in advance with the help of the chisel. On the lower bed, the fence is usually not done. Reiki are fixed with screws from all sides.
- The existing openings between the fence and edging must be closed with a cloth. The product assembly remains to paint and cover with varnish. In order for the children's bed to be more stable, it must be additionally attached to the wall through brackets.

Metal bunk bed
A bunk bed of metal is somewhat more complicated than a wooden one, but it's easier for her design itself. The main complexity is to be used in the welding machine. In addition, a person who will assemble will need some experience in handling such equipment.
The frames of the bed of such a bed are assembled using a metal corner of 45 × 50 mm. For cutting products in size, the grinder is most often used or a metal hacksaw. At the ends of the corners, it is necessary to cut the gaps to carry out a more dense docking of parts. After welding all the elements, it is necessary to check if they are exactly accommodated. In addition, you need to determine the value of the direct angle.
It should be noted that in the design of such a bed, unlike wooden, no sideboards. Vertical racks are made of thin-walled pipe diameters of 30 mm. The frame is attached to the finished racks with welding. After that, all welding seams need to be processed. The bed will turn out to be more beautiful if for the upper tier, headboard and finite use forged sides. Therefore, such products are made to order in special workshops. If there are welding skills, the head of the beds can be made handled from the pipe of the desired diameter and rods.
Children's bunk bed: photo


