In the modern segment of building materials, there is a huge variety of colors of ceramic tile. However, despite such a choice, the creation of decor is relevant. One way to show fantasy and creativity, create an independently original interior is the execution of the decoupage of the tile.
Content
Features of the method of decorating
Decoupage is an art technique that involves sticking to a wide variety of items of individual patterns as well as entire paintings. The name of this technique translated from French means "cut". Despite the fact that such a type of creativity originated in China, in Europe, this trend came only in the XVII century as art for the poor. The peasants could not afford to decorate their housing by an expensive finish, as a result of which a decoupage technique arose. However, modern designers widely use the decor methodology and apply it in a wide variety.
Today, the trend is becoming popular to decorate by decoupage by ceramic tiles. This makes it possible to upgrade and decorate the furnishings of the room without performing labor-intensive repair work.
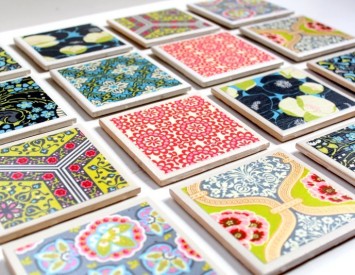
Material for decoupage on the ceramic tile can be napkins, wrapping paper, various illustrations from print editions and even labels. Recently, such materials like printer printouts are substantially popular. You can decorate the most diverse items, without applying material effort. In addition, the decoupage can be done with minimal financial costs.

Methods of execution of decoupage
Specialists distinguish many options for decoupage, but today the most popular today are:
- Location of one image on several tiles.
- Selective drawing pattern.
- The use of simultaneously multiple patterns.
- Accommodation on each tile of the same print.
- The combination of images on the tile with finishing other surfaces and parts in the interior of the room.
Decoupage on ceramic tile Photo:

Required materials and tools
If you decide to make a decoupage on ceramic tiles, this occupation will not be much trouble and will not require significant financial costs. To perform the decor you need to prepare the following:
- paper, it is desirable that it is as thin as possible;
- napkin with selected image;
- tassel for drawing drawing;
- acrylic and varnish-based paint - acrylic-urethane, polyurethane or urethane;
- ceramic tile;
- small scissors;
- acetone or alcohol;
- glue.
Important! When choosing a tile, it should be noted that the size of the working surface should be sufficient to place the planned pattern.
Find all the necessary materials will not be difficult. Today, many specialized stores offer such products individually or included. Contact artistic, stationery, as well as in building markets.

Recommendations before starting work
Decoupage of ceramic tile Master Class requires compliance with certain subtleties and features that will allow to spend the whole process as gently and aesthetically. Consider a more detailed recommendation for the implementation of decoration techniques:
- When cutting out the pattern from the material for the decor, a small scissors with rounded ends are well suited - manicure, as well as medical.
- If more dense paper is used, the knife should be used specifically designed for decoupage, in addition to this, the scalpel is suitable.
- In the presence of small parts in the image, you can cut larger, and the remaining fragments are drawn.
- To glue the drawing, it is recommended to use special adhesive for decoupage. But if this is not available, it is permissible to use the usual composition of PVA, as well as adhesive from egg protein, pre-diluted with manicure varnish or glue for wallpaper.
- When using a napkin with it, it is pre-removed the first two layers, leaving only the latter on which the drawing is located.
- The napkin is applied to the surface and glued with a flat tassel. The glue is applied on the outside.
- It is necessary to consider that the napkin impregnated with the adhesive will be stretched, as a result, with insufficient accuracy, it can break.
- If paper is used specifically designed for decopter technology, it is necessary to soak it in the water before use. In this case, the glue should be applied from the inside. After gluing on top, one can be covered with another layer of adhesive composition.
- If the drawing is printed on the printer, then it is desirable to apply a little hair lacquer on paper. This will prevent the breakdown of the paints.
- For decoupage it is customary to use acrylic paints. They dry pretty quickly and do not dissolve when the water gets into the image.
- Upon completion, the product should be covered with varnish to create a protective layer from possible damage. Depending on the type of varnish, you can get a matte or shiny surface effect. For this purpose, Acrylic-based varnish is well suited.
- The number of layers can be different. We put the varnish until the drawing is merged with the decorated item.

Decoupage execution technology
Creating a decoupage on ceramic tiles with your own hands – scrupulous, but a fairly interesting occupation, which will allow you to add the originality of the housing to the feastful interior of the housing and the innovation of the author's idea. In order for the work to be performed as high quality and gently, it is necessary to follow this procedure:
- At the first stage, it is necessary to determine the pattern that will be moved to the tile. Choosing an image, you should be guided by the indicator how harmonious pattern or picture will fit into the overall interior of the room. And, of course, with its preferences and tastes.
- Then, if it comes to a printer printing, the picture must be processed in a graphic editor. It can be Photo Shop. In the process of processing, the image should be corrected in accordance with the required dimensions. In other words, increase or decrease it, adjust the brightness and contrast. After that, using the program functions, it is necessary to cut the image to the desired number of individual fragments. After that, we save each part in a separate file, while we leave from all sides to 5 mm.
- At the next stage of the process, all parts of the picture must be printed using translucent paper for this. At the same time, the paper should be pasted with traction. After all parts of the picture are printed, disconnect them from paper and get rid of unnecessary parts.
- Next, go directly to glue images. In order for the pattern to be firmly attached to the surface of the tile, it must be carefully deguted. To this end, medical alcohol or acetone is suitable.
- Then, with a brush, we lubricate all fragments with glue. It is necessary to ensure that the paper is completely impregnated and only after that we apply it to the front side of the tile.
- Breeping paper to the surface of the tile with smooth movements, moving towards the center to the edges.
- Also eliminate air bubbles and possible tubercles. This stage is very important, since the presence of bubbles and irregularities can lead to the fact that the paper is broken. We will wait for the time to dry out the product.
- Next, you must turn on the oven to the mode of 170 ° C and put inside the tile for 30 minutes. After the specified time is expired, turn off the oven, but do not pull out ceramic fragments until the ovens can be cooled. Otherwise, due to a sharp drop temperature, the product may crack or split.
- Then it is necessary to apply another layer of acrylic paint to the surface of the tile and put into the oven again. But this time the heating time will be 10 minutes.
After cooling the product, its surface is recommended to be covered with varnish in two layers. This will contribute to long-term operation and low exposure to abrasion and damage.

Stencil technique in decoupage
Run Decoupage tiles can be used using the stencil. This is a simpler and less costly method that guarantees a successful result even a novice master. To do this, it is necessary to prepare the following materials:
- monophonic tile;
- stencils with the desired pattern;
- acrylic paints;
- aerosol glue, with which the stencil is well attached to the tile;
- brushes of various sizes;
- sponges.

The process of performing the work is as follows:
- First you need to clean the surface of the tile from pollution. To do this, rinse fragments in water using dishwashing agents. You can also wipe with alcohol.
- Tile should dry. At this time, we prepare stencils. We apply an aerosol glue on its opposite direction. This will help fasten the stencil during work.
- After the tile gets dry, we put the stencil onto its outer surface and you can start working.
- Choosing a color gamut for the future drawing, it is recommended to take into account one point. It will be more profitable to look like a product if the previous shade is darker than the subsequent.
- Next, proceed directly to the drawing of the picture. To do this, you can use a brush or a conventional sponge. In the process of work, the brush should be kept perpendicularly, and paint apply point movements. Otherwise, the paint will leak under the stencil and the drawing will eventually work out fuzzy.
- To achieve various design effects, you can also put an image of a sponge that will create a roughness in the picture.
- After the image is applied, you can remove the stencil. Then you need to wait a few hours so that the paint can dry completely.

Options for using stencils for decorating tiles There are a whole set. Tile can be used during repairs and thereby make exclusive notes in the interior. You can attach from the back of the felt part and get a convenient and practical stand under the dishes. Another option is also possible - to determine the tile into the frame and get the picture. You can decorate and already laid tiles.
Showing creative abilities using the Decoupage technique, you can diversify the interior with your own hands, as well as make it exclusive and original. And it will not require significant financial costs or a lot of free time.
See the decoupage technique on the ceramic tile on the video can be in a fragment below:


