Your furniture has long come out of fashion, but I don't want to part with her? Then there is an excellent alternative - give the old furniture to the second life. How to do it? Today we will talk about popular equipment for decorating furniture and other interior items - decoupage.
Content
What is a decoupage technique on furniture? At first glance it seems that this is something too complicated, requiring costs and efforts. But this is not the case, even a fragile girl will be able to master this technique and update any subject of the interior.
Decoupage is a special kind of decorative art, with which you can update any item and even furniture with glue, scissors and paper. Well, now you will get acquainted with this technique and learn how to make a decoupage on the furniture.
Decoupage furniture do it yourself
Updating the old furniture - the task at first glance is complex, because you need to think through everything to the smallest details so that the furniture fit into the interior. Therefore, complexity may occur only with the choice of materials, or rather the drawing for the decoupage. Easy furniture update techniques are the main advantage of decoupage. For work, you need a minimum of tools and materials. The choice of the main material depends on the treated surface.

To perform decoupage of furniture from chipboard, prepare such materials and tools:
- picture napkins;
- pVA glue;
- scissors;
- tassel;
- sharp knife;
- lacquer on acrylic basis;
- porolon-based roller;
- soft wash.
The main work material is napkins or special paper with a pattern. Depending on the surface treated and idea, it can also be clippings from old logs and newspapers, printed on a home-based image printer or a specially purchased paper cloth with a drawing for decoupage. In any case, if there is an idea, then it will take a minimum of attachments for implementation, and all the necessary tools can be found at home.
What to expect from decoupage of furniture? First of all, this is a complete update. If we are talking about kitchen headset, you can completely update the kitchen, make it stylish and interesting. Everyone will be able to master this technique, just be prepared for the fact that you have to gain patience. No rush, everything is performed thoroughly and have not rushing anywhere.
Furniture Decoupage Ideas:


The main techniques of decoupage techniques
The main direction of updating interior and furniture items is to attach a selected pattern or picture to the surface in different ways.
Decoupage techniques:
- Simple decoration. It is necessary to cut out of the paper or napkin the desired element, attach it to the surface and on top of apply a thin layer of glue. When it gets free, you can open this place with varnish. This technique has a mass of retreats. Sometimes the master wants to add something, he takes a brush, choose the desired color of the paint and manually teleshes some details to give the picture volume. Or artificially aware of the surface, if necessary.
- The technique "Reverse Decoupage" is slightly different from the traditional drawing of the pattern on the surface. It is used to design transparent and glass interior items, less often - furniture. What is the feature: the selected picture is cut, glued face with the opposite side of the subject, and after drying, acrylic paints and brush are drawn by manually image elements to "show" the drawing, make it alive and volumetric.
- Decoupage Artistic - technique of applying patterns of the pattern is the same (cut out, glue), only if you need to achieve a single image on a large area, you need to draw individual elements manual, grow and draw shadows. The technique is very beautiful, but complicated. Run colorful decisive is possible only manually. Such work is considered expensive and exclusive.
- Technique "Deopatch" - refers to the category "Decoupage", is performed similarly, only instead of napkin or paper elements, various materials are used. It can be both a special paper fabric, and paper under silk, plastic and glass. The surface of the subject is completely filled with individual elements, creating a general background. Paper for decorating must be broken with hands so that there is no clear boundary. What is the difference between a simple decoupage from Deopatcha: in the first case, carved finished pictures are used, and in the second - a certain area or the entire area is covered with entirely pieces of decorative paper.
- Decoupage Volumetric is the imitation of art painting, made on the bulk surface. First, the patterns are applied (cut from special paper or napkin), and after drying, each part is drawn.
Decoupage technique on furniture. Video:
We continue to get acquainted with the basics of decoupage techniques, now consider the common effects:
- "Gilding" or gilding. How is done: cuts out of a napkin or a special paper picture, sticks to the surface, and then processed by a thin layer of metal paint: under gold, silver or bronze. To achieve an externally expensive inlay for gold, sheets of special material - graval gold;
- outping shadows with brushes and pastel paint. The paint is recruited with a dry brush, the boundaries between the drawing lines are masked to smooth the sharp outlines;
- painting pattern with multi-colored paints, in order to impart expressiveness and volume;
- artificial formation of objects, decoration of furniture under the ancient;
- crakeller technique - a special varnish (single and two-component) is used, which, when drying, form cracks on the surface;
- patinating is the intentional shading of certain areas on furniture or objects (the places of frequent contact - edges and angles).

Each surface before proceeding with the work, must undergo a certain preparation. For example, glass needs to be properly deguted. To do this, it is necessary to wash it, dry, wipe with a lobby cloth and treat the degreaser (for saving materials, the craftsmen often use a diluted colorless dishwashing agent).
Preparation is also very important for working with tin products. A special solution (water and vinegar in proportions 1: 1) and a rigid metal brush surface is cleared of contaminants, thus the top layer is removed.
Wooden surfaces and furniture from chipboard is processed by a fine-grained sandpaper to smooth out all irregularities.
Decoupage furniture with your own hands. Photo:


How to make decoupage of furniture. Instruction
For newcomers, only knowing the basics of this type of decorative art, the best decor of furniture start with simple equipment.
To work, it is necessary to prepare the following:
- filler for wooden surfaces (if the furniture is old and there are cracks in it) or a spacure on a tree;
- special glue for decoupage. If there is no such, then you can use conventional PVA glue;
- flat brush (not tough);
- emery paper sheet with small grain;
- acrylic varnish - can be glossy or matte, depending on the idea. Buy lacquer for work with plastic or wooden surfaces;
- scissors;
- primer mixture for wooden surfaces;
- stationery sharp knife;
- napkin (special) or clippings from any magazines and newspapers. You can print on the printer (color or black and white) any image.
These are the napkins with a pattern:

Step-by-step master class:
- We offer to update old kitchen furniture. We begin with surface preparation. Do not miss this item in no case - the final result and service life of furniture depends on high-quality surface preparation. Carefully inspect the surface being processed. Suppose you decide to update the kitchenette - the selected drawing is placed on the stools and the worktop. Take a look at the surface if there are cracks, they must be filled with a special grout, called the means "thresholder". It is very important - if the defects are large, then it is necessary to use a putty on the tree, fill in the deepening, and after drying the means, shine out the sandpaper. Wait when the grout or putty will dry out (it is better to leave for the night). After 8-10 hours, it is necessary to clear the surface of the kitchen furniture with a small grain with a small grain with a small grain and apply a layer of primer (wood). We are waiting for the primer dry, do not hurry, as the drawing can do not go smoothly.
- Preparation of the selected image. So, while the layer of putty or primer dries out, fragments can be prepared. To do this, cut out from a napkin or paper picture drawing, and then very carefully remove the top layer (to work with napkins). If you have chosen a big drawing, then it is better to order a printout on a special printer (widescreen) to paste a drawing without junctions. Try to cut the drawing not with straight lines, but with a bend, spinning the edges. Then the image will look harmonious, especially if you chose a picture in dark colors.
- Application of glue: you first need to smear with glue, the picture so that the napkin or the paper base is soaked well. To work with napkins, try not to pour a lot of glue, since the paper becomes too thin and can break. Now you need to impregnate the base with glue and carefully put on the surface of the drawing. A roller or brush (it depends on the size of the picture), you need to try carefully, without stretching the edges of the paper, to cry out the drawing, remove the folds and swollen areas (air bubbles). Very important information: If you are working with napkins, then the PVA glue is suitable for this material, it is not necessary to dilute it with water. Well, if you chose a drawing on thick paper or printed an image on the printer, then buy special glue.
- Surface treatment with varnish. Do not hurry, you first need to wait when the application dries and only after that you can begin to the final stage of decorating furniture - applying varnish. Need to open the furniture fully (not just that site where there is an image). Wait, when the first layer is dry, apply a layer of varnish, the entire layers should be 3, the maximum 4. The gap between the application of each layer is at a minimum - 1 hour. Such painstaking work will consolidate the drawing and extend the life of the updated furniture.
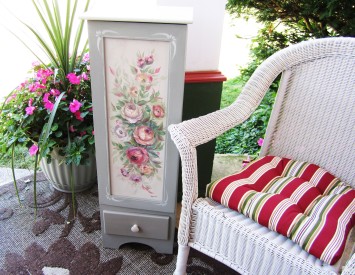
See what beautiful furniture from us turned out:

How to make a decoupage of furniture, see this video:
Decoupage polished furniture
We looked at the option of decoupage of wooden furniture, and what to do if I don't want to part with an old polished chest? For smooth glossy surfaces, it is difficult to glue a paper drawing, but it is quite real.
How to apply a paper fragment on polished furniture:
- First you need to use the coarse sandpaper to remove the shine. It is very difficult to remove completely polishing, this work is long and painstaking. It is important to try to at least clean up to get rid of shine. Well, if you try and carefully fulfill all the recommendations so that there are no glimpses at all. Then you can count on a long-term "sock" of the drawing.
- If there are defects on the furniture: cracks, bulges and irregularities - all thoroughly fill in a special grout or putty. We are waiting for these areas dried, we will apply a layer of primer, we are waiting for complete drying again.
- Polished furniture will not be such a beautiful pattern, like furniture made of wood. Therefore, you need to work with the primer so that the surface "has played". We use acrylic paint as a primer mixture (selected under the tone of the furniture).
- Cut from a decapiguble card or napkins the desired fragment and glue using a special glue to the surface.
- Thoroughly brush or foam roller smoothes print to remove air bubbles and chances.
- Now you have to adjust the background. We do it with the help of acrylic paint and a thin brush. Draw the contour if you need - revive the paint drawing, drawing separate parts.
- We carefully align the finished surface - we apply a layer of varnish as a fixer. We are waiting for when it dries, turn the layer of varnish again, waiting for drying and repeat our actions again.
- If you update the furniture in the kitchen or in the bathroom, then you need the last time to apply a layer of transparent varnish, and then when it gets free, apply a thin wax layer. Such a surface looks more spectacular.
Here is the result of the effort:

How to make decoupage furniture cloth
To work with the cloth, you will need the same set of materials and tools, only instead of napkins or paper drawing, you need to prepare tissue patchworks.

Let's make a decoupage with a cloth on a small bedside table:
- We prepare the solvent, as you have to remove the top layer of paint from the bedside tables, and then it is good to take the entire surface.
- Then you need to cover the bedside table completely acrylic (in this case it is a primer).
- Apply the layer of PVA glue to the surface and immediately prepare glue for the fabric. It is best to pour a bit of glue into a container with a sprayer, add some water (or purchase special adhesive for fabric).
- Cut the fabric or glue the pieces of matter with the help of PVA glue. In this case, it does not matter, you use the material of one color or prepared several multi-colored flaps. The fantasy has no borders, so you can safely begin the implementation of the conceived.
- We are waiting for the cloth to stick, we allocate for at least 40 minutes to this process, after which you need to clean the fabric to sprinkle with the pulverizer so that it is finally glued to the surface.
- We postpone work again. We are waiting for when the fabric will completely dry and only after that cover all the furniture with a transparent varnish in several layers (the break is 1 hour).
We admire your work:

Decoupage furniture with your own hands. Video:


