Wooden mills for the garden have always been a great way to "revive" the plot and make a variety of in its aesthetic component. Little neat buildings create a feeling of comfort and calm. It seems that small workers will come out of the mill and get to wear bags with flour ... If you want to decorate your plot of one of these decorative mills, it is not necessary to spend a lot of money to buy a finished product. Today you will learn how to make an original and neat mill on the site by own forces.
Content
Manufacturing a wooden mill
Many wonder how to make their plot beautiful and unlike the neighborhood. It is this desire for landscape aesthetics and served as a reason for the development of a separate direction of design. Decorative sculptures and buildings are able to transform any plot by setting it a certain style or harmoniously combining with the surrounding landscape and residential buildings. All similar products are presented on the market in a wide range, private masters, manufacturing purely individual orders enjoy the demand. But if we are talking about a wooden decorative mill, even a newcomer can cope with its creation in a joinery. All that will be required - the ability to handle the elementary tools of the type of hacksaw and drills.

The design of any mill can be visually divided into 3 main segments: lower (platform), medium ("body" or frame) and upper (blades and roofing). For simplicity, each of these segments can be collected separately, after which to combine into a single system. Consider this process in all details.
Lower mill
Before proceeding to the description of the instructions for making a decorative mill for the garden with their own hands, we suggest discussing the materials from which it will be built. Since we are repelled from considerations of savings, but at the same time we do not want to sacrifice quality and aesthetics, the optimal option for creating a strong base will be a wooden pine timber or a wide board.
In order for the platform to be reliable and was able to withstand the load from the structure and atmospheric phenomena, choose a beam with a thickness of at least 50x50 mm. Cheat from it a square frame with a side of 60 cm. If you use the boards, then each thickness should be at least 20 mm, and the width is 150-200 mm. If, after the construction of the house or the barn, you have a lining remained on the farm, it can also be used to create a platform. This is a durable and durable facing board that does not need an finishing finish. For the main material you can take old sawn cuttings from the shovel, then you can build something that resembles a miniature log house.

When assembling the platform, it is extremely important to monitor the horizontal and verticality of all adjoins. To do this, it is necessary to collect it on a flat surface and use the construction level. If there is no level, use the roulette, checking the distance to diagonals.
If you are going to put a mill on bare land or lawn, then it is necessary to carry out thorough waterproofing of the base. Otherwise, wood will quickly wet, swell and starts to collapse, and after a month of exploitation in the open air, the mill will come into disrepair. To prevent this development of events, it is recommended to install a platform on low legs-stand. They can be made from a polyvinyl chloride plumbing pipe of arbitrary diameter. The plumbing pipe is inexpensive and available in any specialized store. So that the legs are resistant, to insert such a thickness over a pine bruster, so that they are tightly entered into. It remains only to fix them with self-draws and to nail to the lower part of the base from the inside of the corners.

During the sawing of the legs, make sure that they are all equal length. Spend re-check after fixing PVC pipes to the platform. When the legs are fixed with the bottom of the platform by boards or clapboard, tightly customizing the elements to each other. As a result, you should get something like a big stool.
Useful advice: To make ventilation and at the same time the stock for rainwater, drill in the bottom of the future decorative mill 10-15 holes of a small diameter. So moisture will faster evaporate from the inside, and the design will last longer.
Frame Mill
When the lowest segment is ready, you can start building a frame of a decorative mill for the garden with your own hands. The material for it should be selected from the same wood. Take 4 pine bars 40x40 mm for the manufacture of the base and as much as 25x25 mm bars - for the top.
Collect bars in the pyramid and run off galvanized nails. The construction of the middle part of the mill is the main stage, as it specifies the nature of the structure. You can make a frame of a pyramidal form or in the form of a rectangle, a polygon, can round the corners, etc. You can take the basic drawings of the decorative mill for the garden and add something to or modify the frame.

To give decorativeness in the middle segment you can cut out small windows, balconies or doors. It is very necessary that they function, you only need to give them the corresponding appearance.
The resulting pyramid is fixed on the basis of bolts with nuts. So the design can be disassembled for the winter and remove into the room before the onset of warm and dry weather. If you do not want to make it collapsible, you can connect the lower and middle parts by self-draws or galvanized nails.
Roof and wind blades
The next stage of work will be the construction of a roof of a decorative mill. To do this, you will need to assemble 2 triangles of 30x30x35 cm. From above, connect them with bars 60 cm, and attach with wide boards to the bottom.
To build the most sustainable, the triangular roof and the base of the pyramid must be placed on the vertical axis inserted into a pair of bearings. This will ensure not only the vertical fixation, but also will allow the roof to rotate from the blow of the wind.

As an axis, use a metallic heel with a length of 1.5 m and a diameter of 14 mm. It must be fixed in the center of the middle board of the base of the cover and the lower part of the pyramid of the frame. The thread on the axis must correspond to the length of the frame, which is approximately 1 m. In the upper and lower part on the central board of the roof, the axis must be fixed using a nut with a washer for free rotation.
In addition to the vertical axis, it is also possible to attach horizontal. To its end, the blades will subsequently be attached, which make the mill mill. The length of the horizontal axis in this case is about 40 cm. It passes above the center of the vertical axis and is attached in the same way - the nut with the washer. Pribe the boards to the base of the roof edge and do trust in accordance with its geometry.
Useful advice: Mount the bearings with tie bolts so that those pass through the entire width of the board.
So that the wings of the mill could catch the gusts of the wind and rotate the roof, you need to make a special steering wheel. For its manufacture, make two trapezoid details of 4 boards, insert into the central axis. So that the wind is better working, it is recommended to tinker with a galvanized tin. Axis secure on the bottom of the roof on the other side of the propeller with the help of self-press.
Mills
Finally, it is possible to start the final stage of work - the cutting of the frame and the blades. For this purpose, all the same wooden lining will be useful, but other lumber can be used. Cut the frame, placing the boards vertically. Make slots for doors and windows. If you do not want to mess with a jigsaw, you can simply be killed to a solid surface of the frame in advance made decorative windows, doors and balconies. Also for decor will be suitable any carved figures: hearts, rhombus, animals, etc. Remember that here the limiter can serve only your own fantasy, and there are no strict rules. To cover the roof from above, use galvanized steel or plastic, on the sides, you can close it with a clapboard.

In the manufacture of the wings of the mill it is important to remember that they should not be too heavy. Otherwise, they will not be able to rotate or overthrow the entire design at all. Take a pair of pine boards 150x5x2 (length, width, thickness), find their centers, fold the crosswise. At the intersection of the intersection, make the grooves so that the boards are entered into each other, then pull the bolt joint.
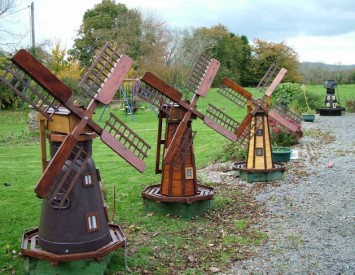
Each of the four blades of equal lengths, bring wooden planks horizontally. The length of the skullfield should decline so that they formed a trapeze on the blades. The photo of the decorative mill for the garden is shown just such a case:

It remains only to put the crossed on the horizontal axis. The protruding part of the axis is better to cut off so that it does not violate the aesthetics of the structure.
Useful advice: so that the upper part is most stable and easily rotated, touch the vertical axis on top of the middle segment with a metal plate with stiffeners. In this case, the roof will not be able to lean towards or backwards.
Mill processing and decoration
The final construction phase is the processing and painting of wood. As you have collected a mill of wooden elements, you need to protect them from destruction, otherwise all your efforts will be in vain. For this, each of the segments need to be treated with antiseptic composition. It will protect the material from rotting and damage by insect parasites. To not only disinfect wood, but also toned it, use the veil.

After drying, the antiseptic surface can be covered with varnish or paints. Here you can fully trust your fantasy. But so that the mill does not look at Alyapovato, still take into account the architectural features and the landscape design of the plot. Not only paints will be suitable for decorating, but also other materials. For example, the base can be imposed by pebbles or decorative facing stone remaining after the construction of the house. It will also be interesting and fun to attract children's mills to decorating. For painting, use gouache or acrylic paints.
After applying paint, it is necessary to cover all the wooden surfaces (even unsubeced) atmospheric varnish. Since the mill will be in an open sky, it is necessary that the varnish protect the wood from moisture and burnout under the sun. With this task, an alkyd varnish of PF-170 and yacht varnish are perfectly coping. The latter is more expensive, but demonstrates high protective characteristics. Apply Varnish in 2-3 layers, waiting for the complete drying of the previous one.

Useful advice: Varnish a mill with a closed dry room so that in the process of drying to the surface is not adhesive trash.
Also for decorating many set backlight. In this case, the mill not only decorates the loft, but also serves as a lighting device. Another idea of \u200b\u200bbeautiful design is to combine the construction with a miniature reservoir, building a decorative water mill for the garden. On how to create a personal reservoir, you can learn from articles " Plastic pond for giving with their own hands" and " How to make a pond from the old bath».
We hope this article helped you deal with technology and finally offer to familiarize yourself with the informative video about the decorative mills for the garden with your own hands:
Decorative Mill Mills: Photo


