The kitchen is one of the most significant premises in the home of any family. For maximum convenience and comfort, it should be equipped with not only beautiful, but also functional furniture, such as a buffet. And so that the interior is original, you can make it yourself, putting my soul to work using any materials. This article will talk about how to build a buffet or a servant for the kitchen with your own hands.
Content
What materials can be made buffet for kitchen
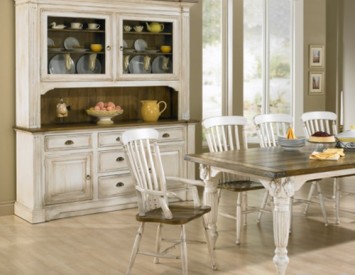
Servants and kitchen buffets do not have big differences and externally very similar to each other, because The progenitor of both is considered a wardrobe. The difference lies only that the buffet was used only for storage of dishes, and in the servant, in addition to it, tablecloths, napkins, towels and other table underwear were stored. And even a buffet, unlike the servant has a niche.

The modern market offers a large range of various types of raw materials in the price and quality of species. Before making a choice in favor of one of them, you need to carefully examine the properties and characteristics of these materials and compare with the qualities that kitchen furniture should have.
Its surface, first of all, should be waterproof, because In the process of cooking, water is constantly evaporated, increasing the humidity indoors.
The most popular to date materials are chipboard, MDF, DVP and woody array. Let's talk more about each of them:
- Wood chipboard (chipboard). It is produced by a cropping chips with phenol formaldehyde or carbamide-formaldehyde resin. This material is widespread due to its cheapness, as well as hardness, fortresses and water repellent properties. In addition, the chipboard is very easy to handle and better wood holds nails. This material has a rich palette of colors and textures.
Unfortunately, the chipboard has a number of serious flaws. This material can be distinguished in the atmosphere of substance dangerous for human health. This effect is intensified under the influence of temperature, therefore, if nevertheless is decided to use the chipboard, it is impossible to have furniture from it near the heating devices.

Even, the material has some features that are not allowed to produce small and curved decor elements from it.
- MDF or MDF (Medium Density Fiberboard) that translated from English means - a fibreboard of medium density stove. As well as The chipboard is made by pressing, only from smaller sawdust and without the use of resins. Lignin is used as a binder here. It is distinguished from the tree under the action of large temperatures.
MDF - Environmentally friendly material, absolutely harmless to people and animals. It is even more resistant to a wet environment than chipboard, so most suitable for the kitchen.
MDF is both durable and soft material. This property makes it possible to produce decorative elements of facades from it.
The disadvantages of this material applies except the cost higher compared to the DSP.
- Warfather plate (Fiberboard). It uses wood residues obtained during processing or making something. They are split into fibers that are impregnated with glue and form plates from them. They are exposed to high temperatures and after grinding.
Fiberboard is not afraid of moisture and high temperature, it has durability and ease, have a long service life and at the same time a small cost. They keep the fasteners well and permanently milling.
This material is mainly used for the manufacture of the rear walls of the cabinets and the bottom of the boxes.
- Charming array This material is natural and environmentally friendly. This is the main dignity. Properties directly depend on the breed of wood used. For example, pine is distinguished by high strength characteristics, not difficult in processing, easily glued. Larch has water-repellent properties. The oak is not subject to rotting, but at the same time it is badly coated with varnish.

Buffet made of natural wood will look rich and exquisite, but at the same time, it will cost a much greater amount than the above materials. To get a beautiful product and not to spend too much, you can make the furniture body from cheaper raw materials, such as chipboard, and facades from more expensive and beautiful.
Tool required for the manufacture of a buffet for the kitchen with their own hands
As already mentioned above, a servant or a buffet cabinet can be made by the kitchen perfectly, without resorting to the help of professionals and not spending money for it. The product can be a rack, an open or rear wall, a buffet or a servant with doors and others. Script for fantasy is not limited.
Before starting work, you need to stock up with a specific set of tools necessary for its successful implementation:
- a circular saw;
- lobzik;
- grinder;
- drill;
- screwdriver;
- machine for milling;
- lacquer coating for wooden surfaces;
- tree drills;
- a leaf for grinding, the abrasability of which is in the range from 120 to 240 units;
- duct tape;
- roulette;
- pencil for recordings and marking;
- vice for fixing processed parts;
- the drawing (it must be made before the start of the work. It should clearly show all the necessary measurements, quantity, size, thickness of parts, the locations of their connection, etc.).
Instructions for independent buffet manufacture
Modern kitchen buffets can be made, guided by the phased description of this process:
- Drilling holes in lateral parts. The holes must be 5 mm in diameter and are located in two rows on the inner plane of external side parts, and on both sides on the lower partitions.
To implement this, you need to draw a line by stepping 3.7 cm from the front and rear edges. Over it will be built holes. It should be noted on the drawing the position of each of them at the same distance from each other. The standard gap between them is 32 mm.

To inadvertently, do not drill the side part, you need to use the depth limiter, which is attached directly on the drill and helps to adjust it. The holes themselves must have a depth of one centimeter.
If after self-making a buffet you will enter the taste and want to make other furniture items yourself, it is best to buy a template for controlling the correct distance between the holes. The template is fixedly fixed on a wooden plate, and the holes are drilled right through it. The application of the template facilitates the task, makes it possible to make holes strictly vertically and with the same intervals.
- Compound of exterior sidewalls and partitions. The side parts and the upper and lower partitions are set down to the ends, so they will appear in the assembled form. After that, on the rear edges, the pencil need to put the mark so that in the future to understand which item to what it applies. Also need to mark and base.
Next, the upper bases and partitions must be put on the rear ends, as they will connect with each other. All parameters must be taken into account and fixed in the drawing that you create before starting work. Details must be clamped in vice to avoid their slip and shift. It should be remembered that dents from them may appear on the surface of the tree, and put wood trimming.

After that, mark those places in which partitions lay on the ground. In the grounds, in the center of the contour partitions you need to drill a pair of holes of 4 mm in diameter. The gap between them and the outer edges should be at least 3 cm. The holes in the bases should be divided (before this, it also drill the holes for the threaded connection in the covering plate, rebuild them from below).
Now you can connect the bases, with partitions using secret screws and a screwdriver.
To prepare a threaded connection of two wooden elements, a hole for a screw is better drilled using a drill exceeding its diameter by 0.5-1 mm; It needs to be divided to put the head of the screw. It is better to drill the second item using a 1 mm drill already screw.
- Compound of exterior side parts and upper part of the structure. Put the assembled top on the rear ends. The side parts and the bottom of the future buffet attach the way they are going to connect them. Pencil note the places in which the outlines of the base come into contact with the sidewalls.
Focusing on the center of markup, drill two holes for 4 mm and sprinkle them under the screws from the outside. You need to do it as careful, so as not to spoil the appearance of the product.

When all holes are ready only to connect them with secret screws and a screwdriver.
- Installation of internal structural elements. Install the body of the product on the rear ends. The places of contact of the lower partitions and the bases are stamped as a pencil as well as described above. In the lower base, in the center of the contour, drill for each partition along a pair of quadmillimeter holes. Dry them from the bottom.
The bottom of the partitions are screwed to the base with screws, and the top-fasteners. Install from two sides of each sidewall to one corner in a closure with a surface. Then set between the bases of the partition and connect secret screws through the lower base, as well as through the mounting corners. In the second paragraph of this instruction, it is described how to carry out a threaded connection.
- Assembling the elements of the base and its attachment. All parts of the base should be placed on the surface as they will be subsequently attached, and mark the edge pencil to see where which part should join.
Drill holes for a threaded connection in the panels and bars of the base. The panels are attached to each other using bars located in the corners in a vertical position. The elements of the base are attached, according to the drawing, with the help of a screwdriver.
Next, you need to do holes in the planks, at the expense of which the base will be attached to the case, and secure them using the same tools. After assembling the base, it is screwed to the housing.
- Attaching the covering plate to the case. In the second point of instructions, you have already drilled holes in order to attach the covering plate to the case. First attach it to where it will be located, leave the ledges on the sides of 0.5 cm, and ahead and behind - 2 cm. The protrusion of such a magnitude is necessary in order to hang the doors and attach the rear wall.
- Attaching the rear wall. It can be attached either with the help of dowels and glue, or with the help of fastening corners and screws. Screwdriver screwdriver to the outer side parts of the housing from the inside, thump with the rear edge, or to the inner planes of the base on the right and left side.
Put the housing on the side surface. Place the back wall, as it will join it. Secure it with vice and screw from the inside with the help of angular fasteners.
- Attaching loops and doors. By placing the door on the desktop, make a pencil mark to not confuse the right with the left, the top bottom. It should also be noted the lines where the lockers of the loop will be. Lines must pass through the centers of holes located in two rows.
Turn the design on the side and attach the door at an angle of 90 degrees. After that, you can easily transfer markup to it. From the first door of the line tolerate onto the second, using the line. For installation you will need curved loops. Holes for them must be 4 cm from the edge. Mark 4 holes on pencil lines and drill them using a tree drill, the diameter of which exceeds 1.2 cm.

Insert the loops into the holes and screw them with screws. Install them in two holes in a row. Put the housing on the side, attach the door at an angle of 90 degrees. Lay it along the sidewall. Attach and fix the hinge holders on the bearing plates. Do the holes under the handle and attach them.
- Now it remains only to polish the surfaces (in order to process them as much as possible, it is desirable to do to the assembly) and cover them with special wax, while observing the safety technique.
Such a piece of kitchen setting as a buffet is now at the peak of popularity. It is practical and universal, thanks to the designers created by many styles, shapes and configurations.
Large and massive, narrow and lungs, with shop windows and without, rectangular and corner buffets for the kitchen are her decoration, and thanks to their variety are able to fit into any interior.


