Planning the interior in the hallway room, do not forget about such an important element as a banquette. She will not only give the comfort and completion of the room. It can store things in it - umbrellas, handbags, equipment for footwear care. Well, of course, the banquette will serve as a comfortable seat, which is convenient to wear or remove shoes.
Content
Types of banquettes
Banquette first appeared in France during the Middle Ages. Frenchwoman from the Supreme Society used them as a way to the toilet table, and in the palaces this subject of furniture served as a waiting spot for courtiers before taking the royal family. The banquette for the nobility was performed from the most expensive wood species, decorated with expensive fabrics and accessories from gilding, silver. Later, since the end of the 19th century, the banquette has already ceased to be pompous.
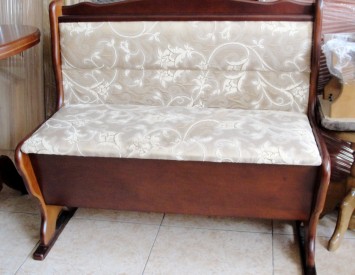
The banquettes in the hallway can be very different species depending on the purpose:
- banquette with a shelf in a hallway with drawers, which are located under the seat itself;
- banquette in the hallway with a drawer, which is closed by the doors on the loop;
- banquette for shoes into the hallway with an open shelf, which is also located under the seat and does not close the doors;
- banquettes Sofaments in the hallway, which serve only a comfortable seat;
- banquette with a mirror, shelf or rack;
- puffy and Banquette for Hallows in the form of emptying.

Material for the manufacture of banquettes
The banquettes can be manufactured from the most different material. An embarrassing book panels look gorgeous, but they are not suitable for interior.
Most often for this subject of furniture, the following materials are used:
- the tree is the best material due to its ecological purity, safety and reliability, but not the cheapest;
- Chipboard and fiberboard - one of the most inexpensive and demanded materials;
- forged metal - is only suitable for a particular interior;
- plywood is most often used as a back wall for wood furniture.
Criterias of choice
Choosing a banquette into an entrance hall, consider the following nuances:
- Style and interior of the hallway itself. All furniture should be properly combined with each other, as well as with wall decoration, ceiling and floor. In the hallway, made in a classic style, a banquette of a natural tree will look, a metal, plastic is suitable for modern style.
- The color of the decoration is also selected to the shades of the walls. Prefer the dark color scheme, they are less brand than bright, and easier to care.
- In the hallway with a small area, choose a small banquet so that it does not clutch the room.
- Decide in advance, for what purpose you will use the banquette. If you want to save the area, then lesside the shelves and drawers in which you will store things.
What can be a banquette for an entrance hall, you can see in the photo.


Bannaments in the hallway do it yourself
Today in stores and salons The choice of furniture is simply huge on any even the most refined taste. But some very much I want to decorate your apartment or house with individual furniture, unique. And then the question arises - how to make a banquette for an entrance hall with your own hands? In fact it is quite easy. Consider several options.
Stool for shoes of a furniture board
The easiest way would be to make a banquette of furniture board. Furniture panel - is glued together Planed bars. Most often they are made of wood such as birch, oak, beech, pine, spruce.
So, for the production of stools you will need these materials and tools:
- furniture board thickness of at least 18 cm;
- furniture fasteners - pins, screws for wood;
- furniture mounting tape;
- self-tapping screw;
- foam
- material for decor;
- fabric cut;
- glue joiner;
- electric drill;
- electrolovik;
- screwdriver;
- hammer;
- screwdriver;
- roulette;
- sandpaper;
- varnish or paint for wood;
- roller;
- marker or pencil;
- stapler furniture;
- loop furniture;
- accessories.
Banquette for shoes will have a sofa view of the closures. Dimensions you must determine on the basis of the area of \u200b\u200byour hallway.
Production of a banquette for shoes from a furniture shield consists of the following steps:
- First you need to make blanks. To do this, mark the furniture shield and the electrol gallery cut the details you need. If you make a banquette on 3 compartments, then you should have 18 blanks: 6 for lateral walls, 3 blanks for the bottom, 3 blanks for covers, 3 rear panels and 3 doors.
- All the workpieces are sure to sand sandpaper to remove all roughness and bursavar.
- Now you need to connect the blanks in Cuba. To do this, with the help of electric drills, do the holes in the ends for the pins, and in paired elements of the opening you need to do on the planes.
- It is important that the diameter and depth of the holes coincide with the diameter and the length of the pins.
- After that, you can collect workpieces and make sure that everything is done correctly, nothing performs for the edges of the details. And after this design, you need to disassemble, pre-marking the workpiece so that you do not confuse them.
- Mix the joinery glue ends of the blanks and glue them. To be confident in the strength of the design, secure it with self-draws at critical points.
- Now screw the loops to the cubes and to the doors, and then connect them. So, you will have 3 boxes with doors. If desired, the banquette for shoes can be done without doors.
- We make a soft seat. To do this, take the foam rubber and cut it on the size you need. Then obsheyte piece of cloth obtained by means of a needle and thread. You can decorate the finished mattress fringe, decorative ribbon or buttons.
- Then you need to connect the box into a single structure. To do this, use the screws to attach them to furniture canvas or a piece of plywood that size should correspond to the width and height of the cubes.
- Cover the product varnish or paint for the wood and allow it to dry for a day.
- Inside the boxes can be installed 1-2 shelves to put more furniture in them. To do this, attach the side walls of the special holders and replace them shelves, which are pre-cut of the furniture board.
- When the product dry, you can put a soft seat on it, and fasten the handles to the doors. Decorate a bay for shoes with pillows that can sew yourself.

Banquette - Puffy in the hallway from the old coffee table
If your house still has such old furniture, like a coffee table that you want to throw, do not rush to do this. You can breathe new life into it, thereby saving on materials.
So, for work you will need the following materials and tools:
- the coffee table itself;
- electrolovik;
- electric drill;
- screwdriver;
- screws;
- pencil;
- emery paper No. 200;
- tree primer;
- paint for wooden surfaces;
- foam
- sintepon;
- scissors;
- line Long or Roulette;
- threads, needle;
- fabric cut;
- stapler furniture with a set of brackets;
- 7 large buttons in tone tissue;
- iron;
- glue;
- decorative elements.
Work on the creation of a bench from the coffee table consist of the following steps:
- First you need to remove the worktop. To do this, unscrew the screws on which it usually holds.
- Turn the table top face down, put the legs up and measure the excess, silent the silhouette with a pencil.
- Then you need to trim from the countertop with an electroll bison, then too much that you measured.
- Now stick to the sandpaper, worktop and legs to remove the old varnish or paint.
- After that, heaing the tree with the primer, and when it dries, apply another layer.
- After the primer is dry, it will be possible to paint the tabletop and legs. The paint must be applied in 3 layers and after everyone to clean the surface with emery paper.
- While the paint dries up, take the manufacture of a soft top. Measure the foam rubber and cut the piece of the size you need.
- Electrodel Drill in the tabletop holes in the amount of 7 pieces through which you will later make a screed.
- Put the porolon on the worktop, and on top of it a synthetone and a piece of fabric, which in size should be more table tops by 15-20 cm on each side.
- Now make a place on the fabric where you drown holes in which you want to skip buttons.
- Sew each button to the place you outlined, skipping thread into the hole. The balance of the threads fasten the stapler.
- Tension tissue and attach it to the back of the table top with a stapler.
- So that folds on the banquette look beautiful, straighten them and smooth up with an iron.
- Stick the decorative element (fringe or pigtail) to the legs of the banquette.
- Now you can fix the top of the blankets on the legs. That's all - the banquette in the hallway at your own hands from the coffee table.

Banquette with shelf
Banquette with a shelf can be made from the finished shelf or from other materials, such as fiberboard, chipboard or plywood. If you have anything suitable for you, it will be easier to purchase the shelf in any furniture salon and buy the rest of the necessary materials to it.
So you will need:
- shelf into several compartments, depending on the size of the future banquet;
- Chipboard or plywood for the base;
- stapler furniture with a set of brackets;
- electrolovik;
- screwdriver;
- screws;
- foam
- needle with thread;
- fabric cut;
- santimeter for sewing;
- scissors;
- boxing;
- plywood for soft seats;
- guides for drawers;
- pVA glue;
- sintepon;
- pencil.
Production of a bench with a shelf - Step-by-step instructions:
- To begin with, you can make the headboard. His height may be like you like - high or lower, but you can make it rounded in the form of an arch. Cut the chipboard on the width of the shelf and hover it with a cloth using a stapler for this. Between the cloth and plywood, put a piece of foam rubber so that the headboard was mild.
- Take a piece of plywood and cut on a 2-3 cm shorter length and widths of the shelf.
- Measure the foam rubber in the width and length of the trimmed plywood, put it on the plywood and cut this design to the cloth the same as the headboard. Use for this stapler or needle with thread.
- Now proceed to the manufacture of boxes that will have to fit into the shelf separation. Cut out of plywood using an electroll billet and connect them into boxes with screws and screwdrivers.
- Watch the box with a fabric using PVA glue.
- So that the boxes are fluently put forward and moved, you need to fix the guides in the departments. Do it with screws and screwdrivers. If you have a screwdriver, then use it, work will go faster.
- If you do not plan to move the banquette from a place to another place, you can fix the headboard to the wall. If it is impossible, screw it to the shelf with screws.
- Put the soft seat on the shelf, and in the shelf separations, the drawers push.
- You can sew a pair of pads that you decorate your outbquet. Use for this segment of fabric, thread, needle and syntheps that will need to fill the pillowcase with you. If you know how to sew and you have a sewing machine, then use it, it will be much more convenient.
- It remains only to fill the boxes things, set the bench in your place and decorate it with pillows.

Banquette into the hallway that you managed to make with your own hands will surely please you more than purchased in the furniture store.


