When planning a kitchen design, most of us arises the question: is there a door there. Many modern design directions are held by the line that the kitchen should not be a separate room, but must harmoniously merge from the living room, representing one whole. Separate cooking areas, its reception and recreation, can be furniture objects such as sofa, table, bar counter. However, before removing the door to the kitchen, ask for security requirements, if gas devices are installed in this room, so as not to have problems with controlling authorities. In some cases, the presence of a door to the kitchen room with mounted gas heating or water heating devices is mandatory. If they are not, the door can be safely removed, connecting the kitchen with another square.
Content
Types of kitchen arches

After dismantling the door or Perestenko formed aperture to fill in any design element. The best solution to this problem - installation of the arch to the kitchen instead of the door. Arched doorway favorably with other forms of its elegance, beauty and elegance of form. It can emphasize the original design of the kitchen, and given the large number of variants of arch assembly, perfectly complement any design solution.
Before starting work on the construction of arches, you must decide what type of structure you will use. It depends on the overall design as the kitchen and the adjacent room with her. So, there are several basic types of arches:
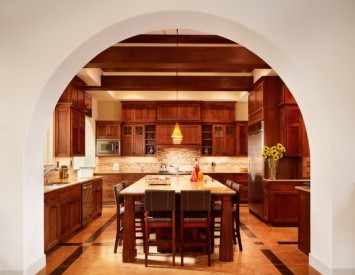
- Wooden arch is more suitable for classical interior kitchen. Such designs are made in woodworking workshops on special order. Mounted such arch after the repair, because it is already covered with a special coating that can spoil during finishing. This design is characterized by the fact that it clearly separates the border from the rest of the arched doorway trim.
- Arch made of plasterboard. This type of arch is used for design in the style of minimalism or hi-tech. Mounted such arch at the stage of finishing work. In contrast to the wooden structure, it can be done well for himself. Any inaccuracies in the manufacture can be subsequently corrected with putty. Typically such arched doorway is not isolated from the main decoration.
- Arch of ragged stone or brick. Repairs in the style of "loft" is quite popular recently. When such procedures are very often used masonry arch or edge extraction opening artificial or natural stone. The construction of such a structure - is not easy and is subject only to the professional mason or Tiles, however, worth noting that the result is spectacular.
By type arc arch there are several types:
- Classic - an arch with a rounded arc.
- Ellipse - arc is a part of an ellipse, that is, as it were flattened to the center.
- Trapeze - type arch, the arc which is a portion of a trapezium or an arc of a polygon.
- Portal - a rectangular arch.
It should be noted that this architectural element fits into the interior of the smaller houses, so that the arch to the kitchen in the Khrushchev is an excellent solution.
Arch to the kitchen with his hands Plasterboard

This embodiment is the most common. Its strengths can be considered as ease of installation and low cost of the materials selected. These arches are quite capable to perform even the lover, having a unit of tools. For information on how to make the arch to the kitchen with their hands on.
So, what we need:
- drywall ceiling sheet,
- galvanized UD profile
- set screws Drywall,
- dowel quick installation,
- painting Arch Area,
- screwdriver,
- jigsaw,
- metal scissors.

The order of installation works:
- The first thing we need to mount a metal frame for our design. If the thickness of the wall of the opening is equal to the width of standard profiles, one profile can be used, if not, to make the construction of several. In this case, the width of the door opening, which we will replace the arch is 112 mm, so we use design profile UW 100.
- Cut the profiles of the rack and crossbar. The height of the racks will be equal to the radius of the future of the arch. To smooth the ends of the arch for a smooth transition into her doorway at the rack ends prune the sidewall profile.
- Mount rack to the wall opening. To do this, use the drill and dowel quick installation. A drill to drill holes into the desired diameter and wall profile and trying to drive it in the first holder dowels, and then the nail.
- Opening up in the same manner fasten the bar. We obtain a U-shaped design. Then we cut two pieces of drywall construction size equal dimensions. In the center we find a single piece center. This can be done simply sketching mounting thread diagonally, at the intersection of which will be the center piece.
- Next, draw a arc that connects point cents and corners of drywall. This can be done quite simply. Take flexible nut, attach it to the end edges of the gypsum board and begin to bend until the inflection point reaches the center point of the marked sheet. Then gently circle the nut with a pencil. That will have a smooth arc.
- Cut an arc of a paint can with a knife, but it is better to use a small jigsaw sawing. Cut sheet drawn by line. The severed portion (half-circle) is applied to the other piece and draw out a pencil. Cut a second piece.
- Now fasten two blanks to metal structures. We do it with the help of a screwdriver and self-tapping screws on plasterboard. To keep the design better, the fastener step must be minimal. When carrying out this operation, plasterboard blanks carefully, so as not to cut down, press to the profile.
- When the base of the arch is ready, it is necessary to extract its end part. To do this, take a piece of profile, long equal to the dimensions of the arc, and throughout the perimeter with a step of 20-30 mm, we make cuts of the side walls so that it can be bent in the form of an arc arch.
- Bend profile and secure it with side walls inside to metal structures and plasterboard. Next, cut the lane from the drywall with a long equal length of the arc arches and an equal width of the arched opening. The strip should lie inside between the walls of the arch.
- Bend the strip. Plasterboard is a rather fragile material, so it is necessary to work with it neatly. In order for it to be bent in the form of an arc, it must be wetted. To do this, weanly wet the lane with water and roll it with a needle roller without extra effort.
- Then put the profile between the two tabs and leave for a while. Soon you will notice that the band began to fuse. Then we take it and put the arches into the end, fixing the self-drawing.
- The next step on the corners of the arch is laid a raner flexible corner and fasten it with an industrial stapler.
- We proceed with the primer arches from drywall in the kitchen. To do this, use a liquid mixture of deep penetration. Places of joints Arch with a wall Close up by a painting mesh. After drying the primer, we proceed to putty.
Arch between the kitchen made of wood

Most wooden arches are manufactured in specialized wooden workshops on special equipment. The fact is that the tree is not too flexible material, and in order to make an arc at the top of the arch, special knowledge and skills are required. As an option - arc arches with their own hands made from specially heated by the pattern of bars glued together. However, this method is quite long and requires good attention and practically virtuoso possession of a joinery tool.
Without much effort, you can make a trapezoidal arch or so-called portal. The latter is nothing but a modified door frame.
It is especially worth noting that the wooden door-arch in the kitchen requires special attention and care. It is regularly necessary to open with varnish, make sure that the pests do not spoil it. Also, such arches are very afraid of extra moisture, so try not to allow room flooding.
Arch into a brick kitchen
Brick arches are created at the initial stage of housing repairs. To build a right structure, you need to have brick laying technology in the form of an arched arch. It is not very simple, so it is better to trust this business a professional who, besides, will be able to assess the possibility of building such a facility. The fact is that brick arches are quite high, respectively, cannot be installed in apartment buildings with wooden inter-storey floors. In addition, the arch of bricks, laid not by professional stacked over the passage to the kitchen, can cause problems.
Applications of various arches in the design of the kitchen
Kitchen in the style of "Castle". A stone predominates in the decor of this room. Moreover, both natural and artificial stone are used to finish the walls with the same success. In order to more accurately convey the atmosphere of the medieval castle, the stone is better to use darker shades of gray. The arch in those year was one of the most common architectural forms, so this element, decorated with a stone, will look very organically in such a kitchen.
Design in the style of "Loft" can be decorated with a brick arch. To create a sensation of underground, you can use different colors of bricks. An interesting option will be put out of the brick arch in the window openings. Then the windows will be harmonized with the entrance to the room.
Wooden arches are perfectly combined with classic repairs. This arch is especially interesting, if its color and texture coincide with kitchen furniture. Beautiful pilasters decorated with wood carvings, emphasize the individuality and style of your kitchen.
Arches in the style of modern or minimalism, as a rule, are made of drywall. Thanks to the use of this material, not only the classic types of arches can be made, but also combined structures that are able to implement the most bold fancy designers into reality.
Arches into the kitchen: Photo


